The Complete LiftMaster Keypad & Accessories Guide: Diagnostics, Compatibility, and Upgrades


Published: Sep 17, 2026

Stepping out into your driveway only to find your garage door keypad flashing or completely unresponsive is a frustrating hurdle. When an entry system fails, navigating fragmented technical manuals or guessing which replacement part is compatible only adds to the headache.

Whether you are locked out on a freezing winter evening or looking to modernize your home’s entry security, understanding the LiftMaster and Chamberlain accessory ecosystem is the key to a seamless fix. This guide provides a diagnostic framework to troubleshoot your system and execute a seamless upgrade.
The Instant Triage Master Matrix


When your keypad behaves erratically, you do not always need a replacement. Use this rapid diagnostic checklist to identify the root cause of your system’s symptoms:

  • No lights, no response: This usually indicates a completely drained battery or physical terminal corrosion.
  • Keypad blinks slowly but will not open: The system may be in Lockout Mode. Ensure you do not accidentally engage this safety restriction or need to turn off the lock button on a garage door opener at the wall console.
  • Keypad lights up but the door will not budge: This points to signal interference. Standard LED bulbs installed in the overhead opener can emit electromagnetic interference in the 300–400 MHz range, which jams the receiver. Check if your LED lights interfere with garage door openers and swap them for shielded, garage-door-safe options.
  • Door starts to close but reverses, and the overhead lights flash 10 times: This is the manufacturer’s diagnostic code for a safety sensor misalignment, not a keypad failure. Utilizing professional garage door safety sensor troubleshooting steps can quickly clear this up.

The LiftMaster & Chamberlain "Learn Button" Color Decoder


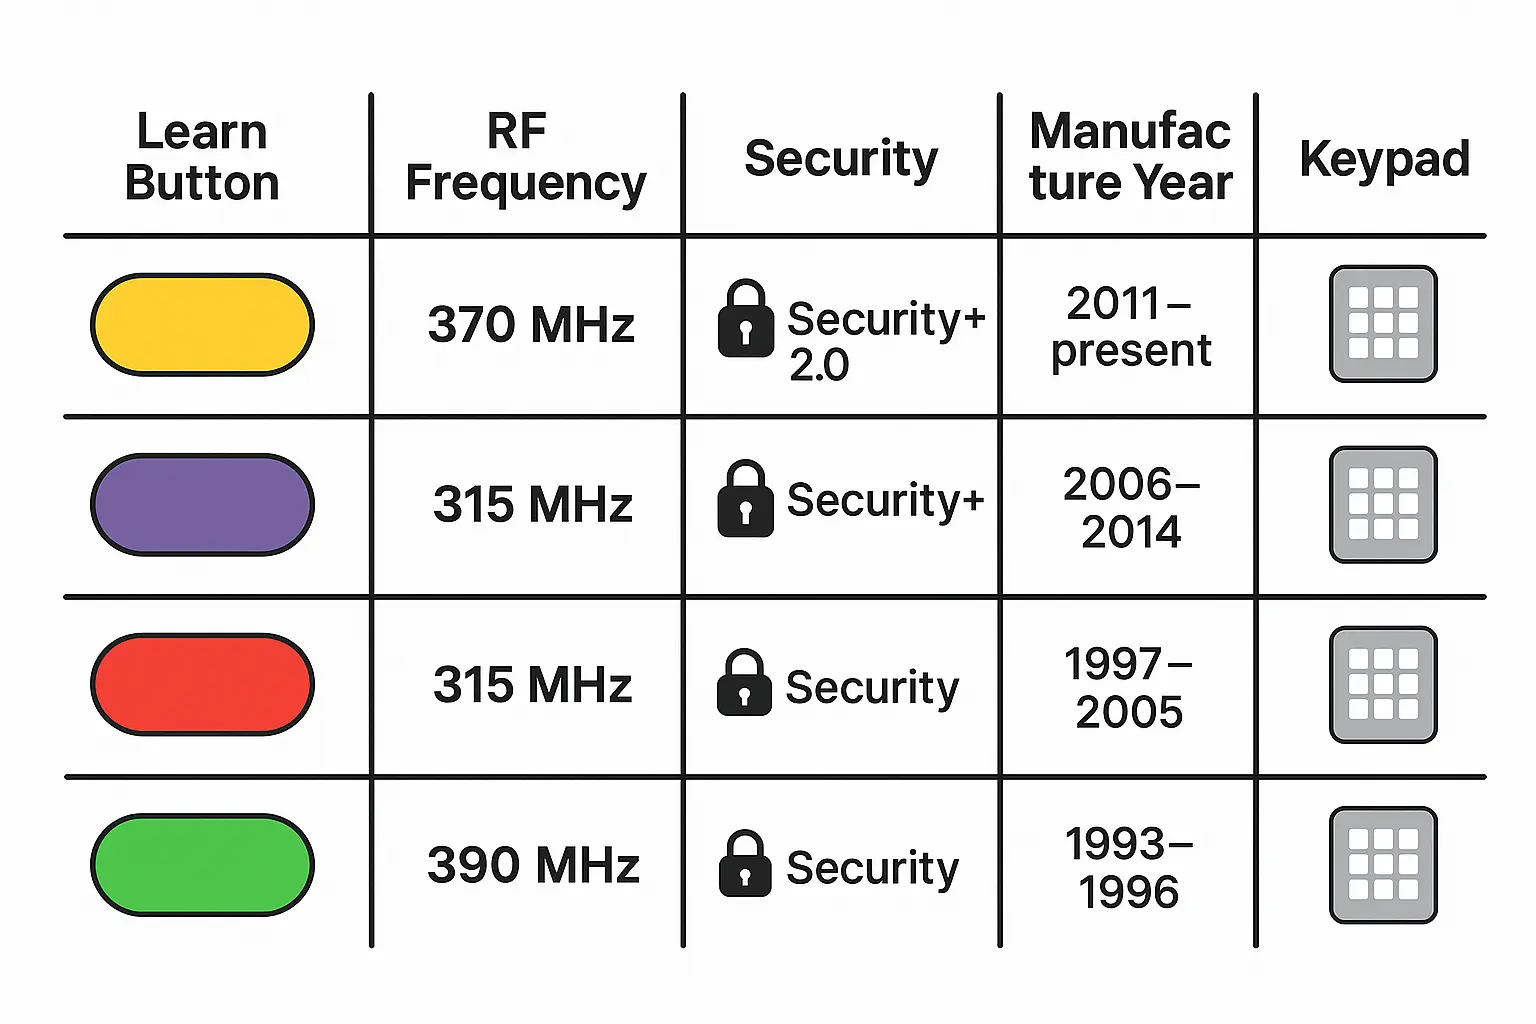
Before purchasing an accessory or attempting to program a keypad, you must identify your overhead motor’s radio frequency (RF) standards. The Chamberlain Group manufactures both retail Chamberlain and professional-grade LiftMaster hardware. While functionally identical beneath the casing, compatibility is determined by the color of the “Learn” button on the motor unit.

Knowing where is the learn button on garage door opener units is the critical starting point to identify your frequency:

  • Yellow Button (2011–Present): Security+ 2.0 (Tri-Band 310/315/390 MHz)
  • Purple Button (2005–2011): Security+ (315 MHz)
  • Red/Orange Button (1997–2005): Security+ (390 MHz Rolling Code)
  • Green Button (1993–1997): Billion Code (390 MHz Fixed Code)

This color decoder visually explains how LiftMaster and Chamberlain Learn Button colors correspond to RF frequencies and compatible keypad models, clarifying compatibility for programming and replacement decisions.

Step-by-Step Programming Chronicles


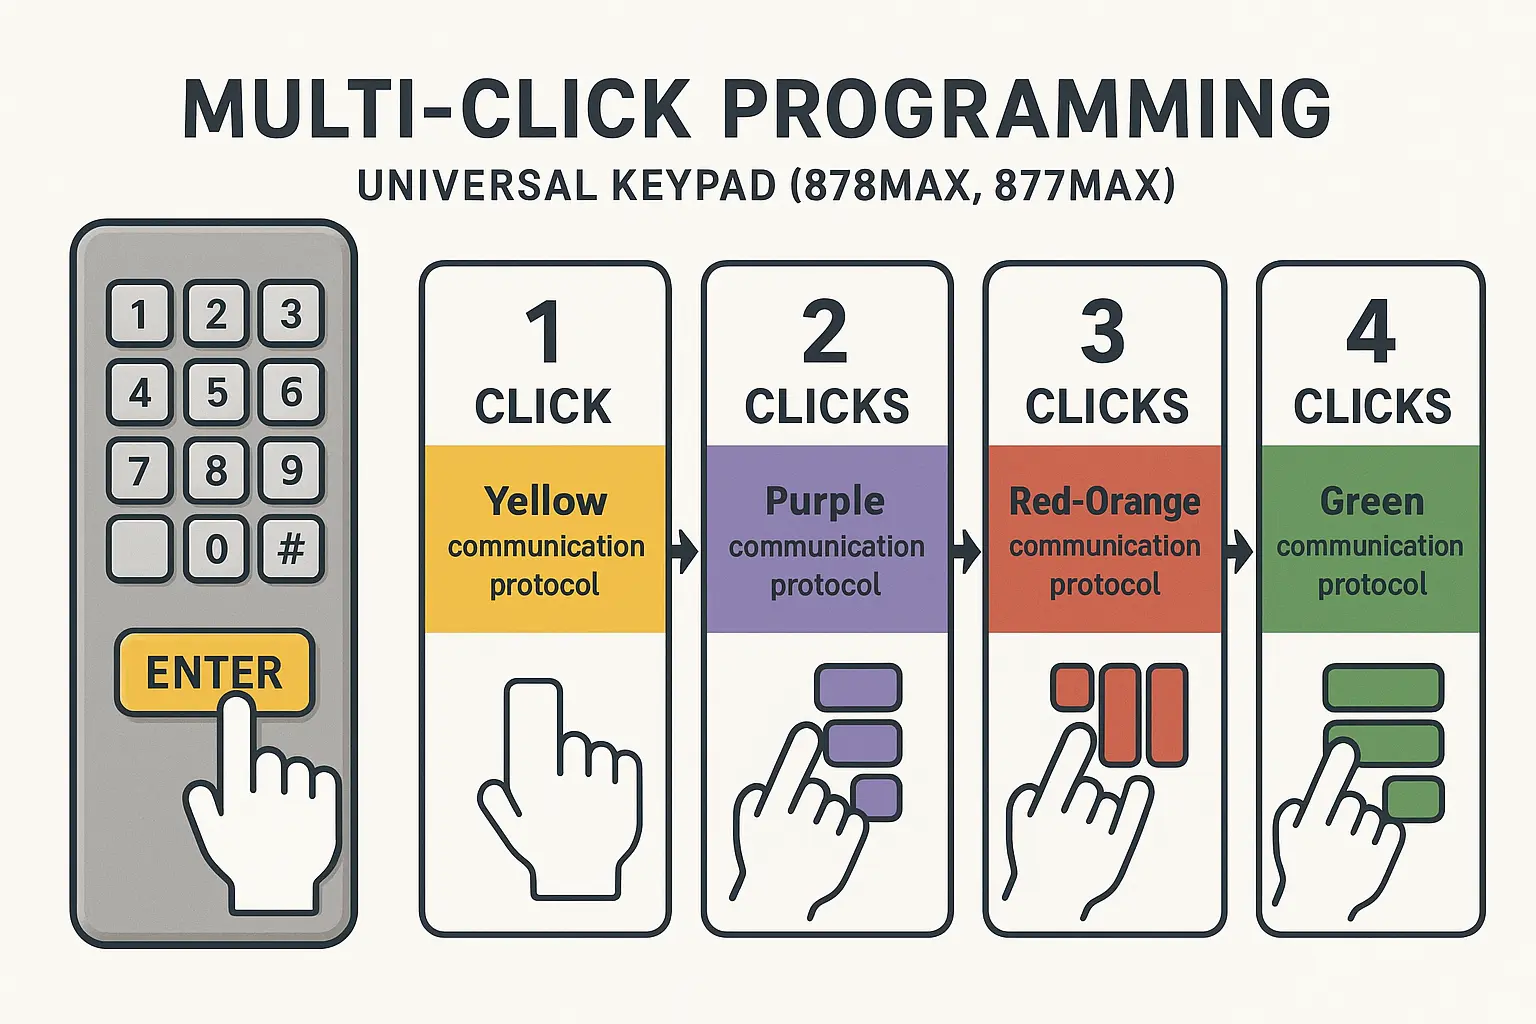
Pairing a universal keypad (like the LiftMaster 878MAX) requires communicating with your motor’s specific frequency. While many guides skip this detail, you must use a precise multi-click sequence during installation so the keypad knows which RF technology to transmit.

Learn how to program LiftMaster garage door opener keypads with this exact programming protocol:

  1. Press and hold the * and # keys simultaneously until the keypad’s backlights stop flashing.
  2. Enter a new 4-digit PIN of your choice, then press the # key.
  3. Tap the Enter key a specific number of times based on your learn button color:
  • Yellow Button: Press 1 time
  • Purple Button: Press 2 times
  • Red/Orange Button: Press 3 times
  • Green Button: Press 4 times
  1. Press the 0 key to lock in this selection.
  2. Press and release the colored Learn Button on your overhead motor unit.
  3. Enter your 4-digit PIN on the keypad, then hold the Enter key until the overhead motor light bulbs flash.

Following this protocol ensures your keypad synchronizes correctly without causing issues that lead to extensive LiftMaster garage door remote troubleshooting afterward.

This stepwise infographic breaks down the complex multi-click programming sequence into easy steps with clear color-coded click counts, empowering users to program universal LiftMaster keypads without confusion.

Environmental Diagnostics: The Winterization Hack


If your keypad functions perfectly during mild autumn afternoons but dies when temperatures drop below freezing, you are experiencing “winter-only” failure.

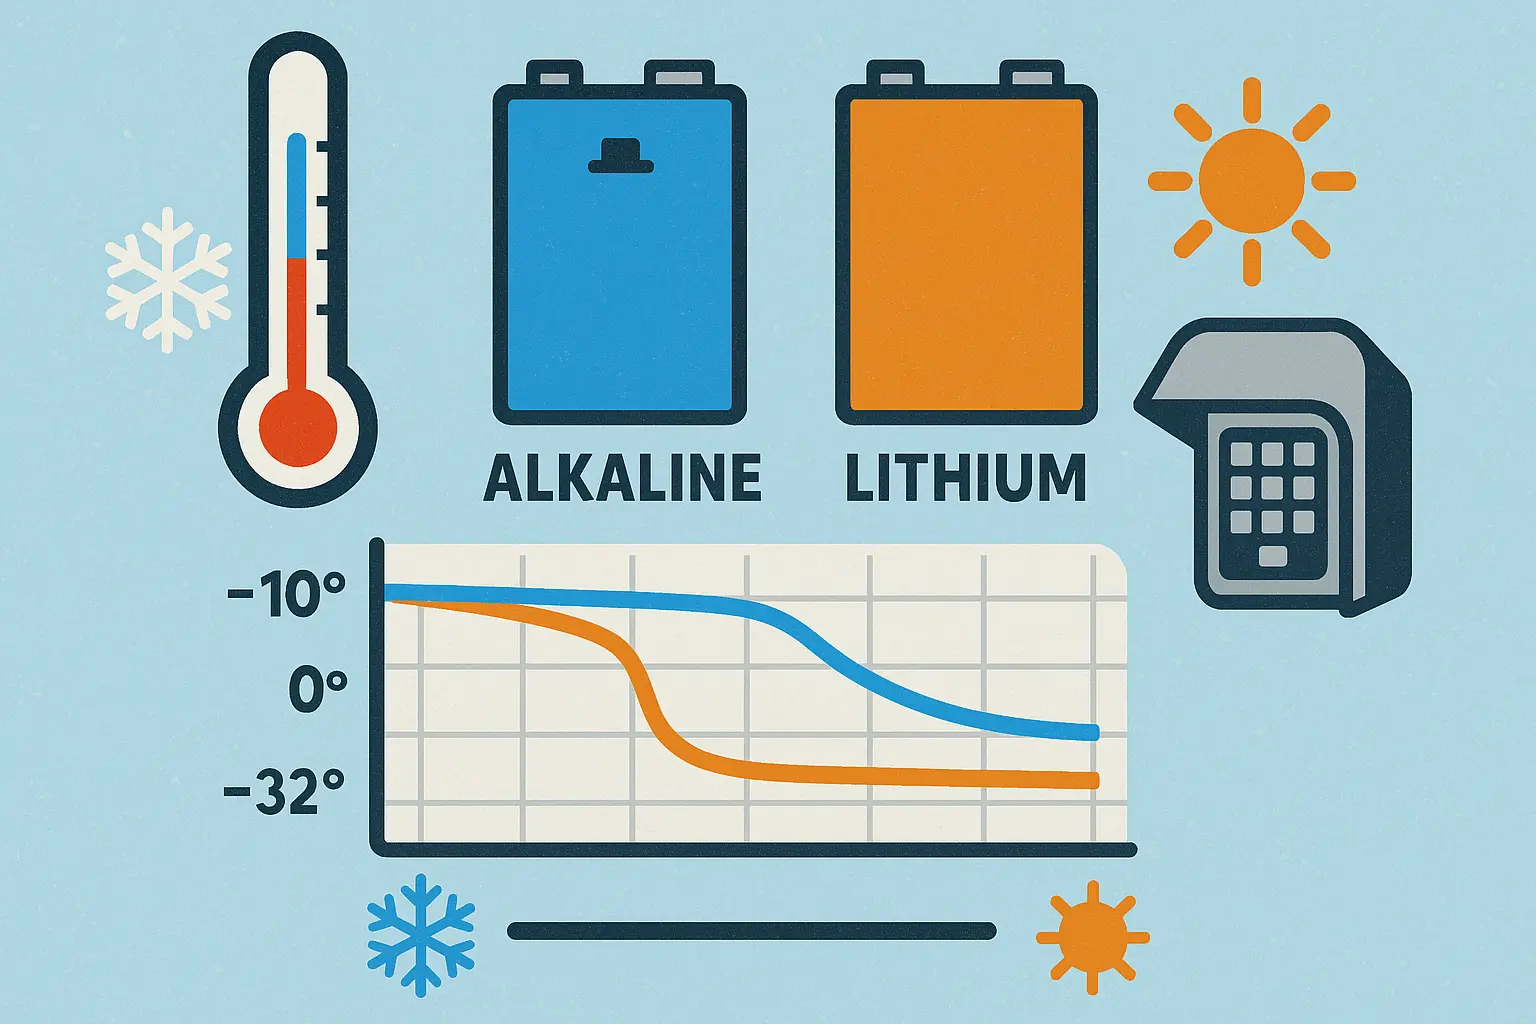
Alkaline 9V batteries rely on water-based chemical reactions that degrade rapidly in cold climates, dropping voltage under load. Replacing them with a Lithium 9V battery ensures reliable operation down to -40°F, preventing cold-weather lockouts.

Check out our complete garage door remote battery guide to learn more about choosing the best power source for your entry accessories.

This infographic illustrates why Lithium 9V batteries outperform Alkaline ones in cold temperatures for LiftMaster keypads, explaining the winterization hack to prevent seasonal failures.

Strategic Upgrades: Choosing Your Next Keypad


Outdoor wireless keypads have an operational lifespan of 8 to 10 years due to thermal cycling and UV degradation of the plastic keys. When it is time to upgrade, choosing the right model ensures long-term security. Understanding this comparison helps when planning a garage door keypad replacement strategy:

  • LiftMaster 878MAX: The gold standard for residential properties. It offers secure rolling-code technology, backward compatibility across all color frequencies, and temporary PIN generation for guests.
  • LiftMaster KPW5: Built with a metal casing and impact-resistant faceplate, this commercial-grade option is ideal for shared driveways, multi-family homes, or high-traffic areas.
  • myQ VKP1-LM Video Keypad: The modern smart-home choice. It integrates an HD camera, real-time app notifications, and customizable, schedule-based guest PINs—ideal for managing a smart garage door opener setup with multiple access points.

The "Safe Reset" Protocol


Many homeowners accidentally wipe out their handheld remotes or built-in car connections (HomeLink) by holding down the overhead motor’s Learn Button for more than 6 seconds during programming.

To change your keypad PIN safely without clearing your system’s memory:

  1. Enter your existing PIN on the keypad.
  2. Press and hold the # button until the keypad light blinks twice.
  3. Enter your new 4-digit PIN and press Enter. The keypad light will flash to confirm the successful update.

Frequently Asked Questions


Can I use a Chamberlain branded keypad on my LiftMaster garage door opener?

Yes. Because both brands are engineered by the Chamberlain Group, they share internal firmware. For example, a Chamberlain 940EV keypad is functionally identical to a LiftMaster 878MAX and will pair seamlessly using the exact same programming steps.

Why does my garage door keypad blink but not execute commands?

A blinking keypad typically indicates a weak battery that cannot sustain the radio frequency transmission or that the system has entered Lockout Mode. Replace the battery with a high-performance Lithium 9V battery and check your wall console to verify that the Lock button has not been engaged.

Will replacing my garage door keypad delete my programmed car remotes?

No. Your remotes and keypad are stored as separate slots in your overhead opener’s receiver memory. As long as you do not hold down the opener’s “Learn” button for more than 6 seconds (which clears the entire memory), programming or replacing a keypad will not affect your car remotes.


Need professional help selecting, installing, or servicing your garage door accessories? Reach out to the certified technicians at 24H Garage Doors for prompt, reliable assistance.

Contact / Request a Call