Master Class: Advanced Garage Door Installation in Low-Headroom Scenarios


Published: Sep 16, 2026

When architectural realities clash with standard construction standards, standard garage doors fail to fit. Whether you are dealing with low-lying joists in a historic Northeast basement, retrofitting a modern carriage house, or managing tight structural steel spans, solving the spatial puzzle of a low-overhead clearance requires deep engineering insight.

For homeowners, builders, and technical professionals alike, evaluating low-clearance space involves understanding the physics of track travel and spring tension. By moving beyond surface-level quick fixes, we can successfully execute installations where others declare there is “simply not enough room.”
The Low-Headroom Diagnostic: What's Stealing Your Space?


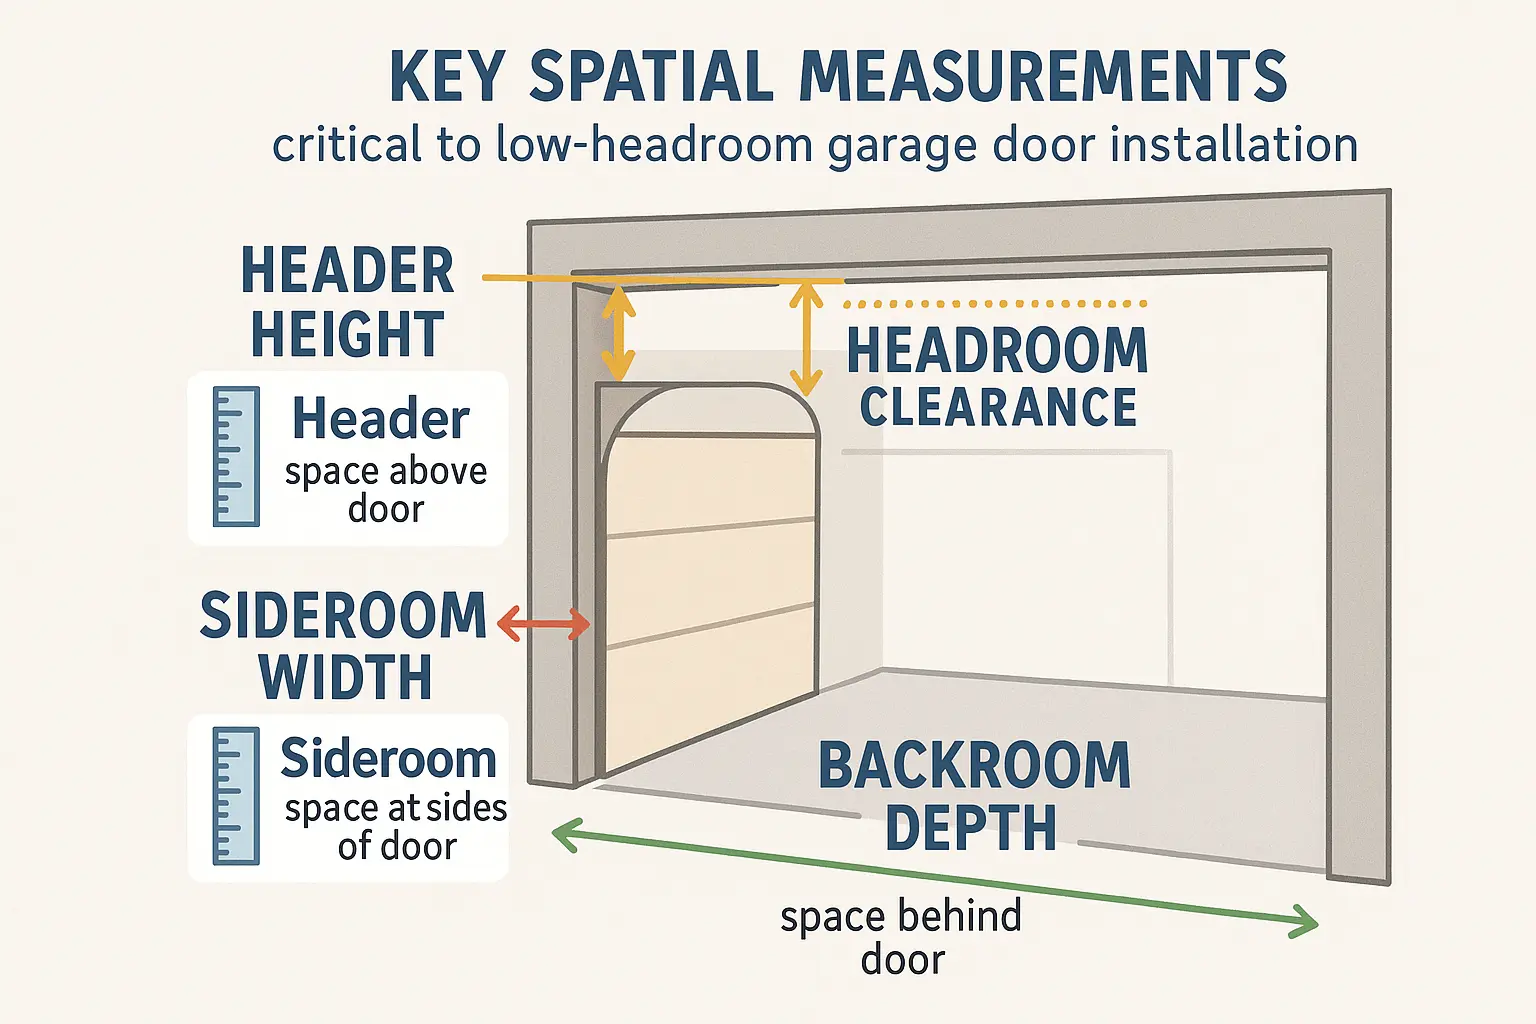
Before choosing a door or ordering hardware, you must perform a high-precision spatial audit. Standard garage doors require between 12 and 15 inches of vertical headroom—measured from the bottom of the header to the lowest point of the ceiling or joists. If your measurement is below this threshold, a standard setup will scrape the ceiling, bind, or fail to seal.

To accurately assess your opening, measure four critical zones:

  1. Headroom: The clear vertical space above the door opening.
  2. Sideroom: The horizontal clearance on both the left and right sides of the opening, which is vital for track mounting and shaft assemblies.
  3. Backroom: The depth of the garage from the header to the rear wall, ensuring horizontal tracks and overhead openers can extend fully.
  4. The Obstruction Line: Identifying low-hanging pipes, structural beams, or HVAC ductwork that compromises the overhead path.

If your structural headroom measures between 4.5 and 9.5 inches, you are in low-headroom territory and will require a specialized low headroom garage door track system to bypass standard clearance limitations.

A visual guide to accurately measuring the critical spaces around your garage door opening to diagnose low-headroom challenges and determine compatible door systems.

The Mechanics of Double-Track Systems


To clear a ceiling height of single-digit inches, standard single-track systems are physically incapable of guiding the door panels through the turn. The solution is a dual-track (or double-track) configuration.

In a standard setup, a single curved track guides all rollers through the 90-degree transition. In a double-track system, an extra upper horizontal rail is installed. The top roller of the top door panel is diverted onto this separate upper track. This mechanical bypass allows the top panel to pivot and travel horizontally almost immediately as the door starts to open, while the remaining lower panels follow the lower rail.

Achieving a flawless, bind-free transition relies entirely on precise garage door track alignment. Even a millimeter of horizontal misalignment between the dual rails can cause the rollers to pinch, resulting in severe motor strain or premature roller wear.

Front-Mount vs. Rear-Mount Torsion vs. Extension Springs


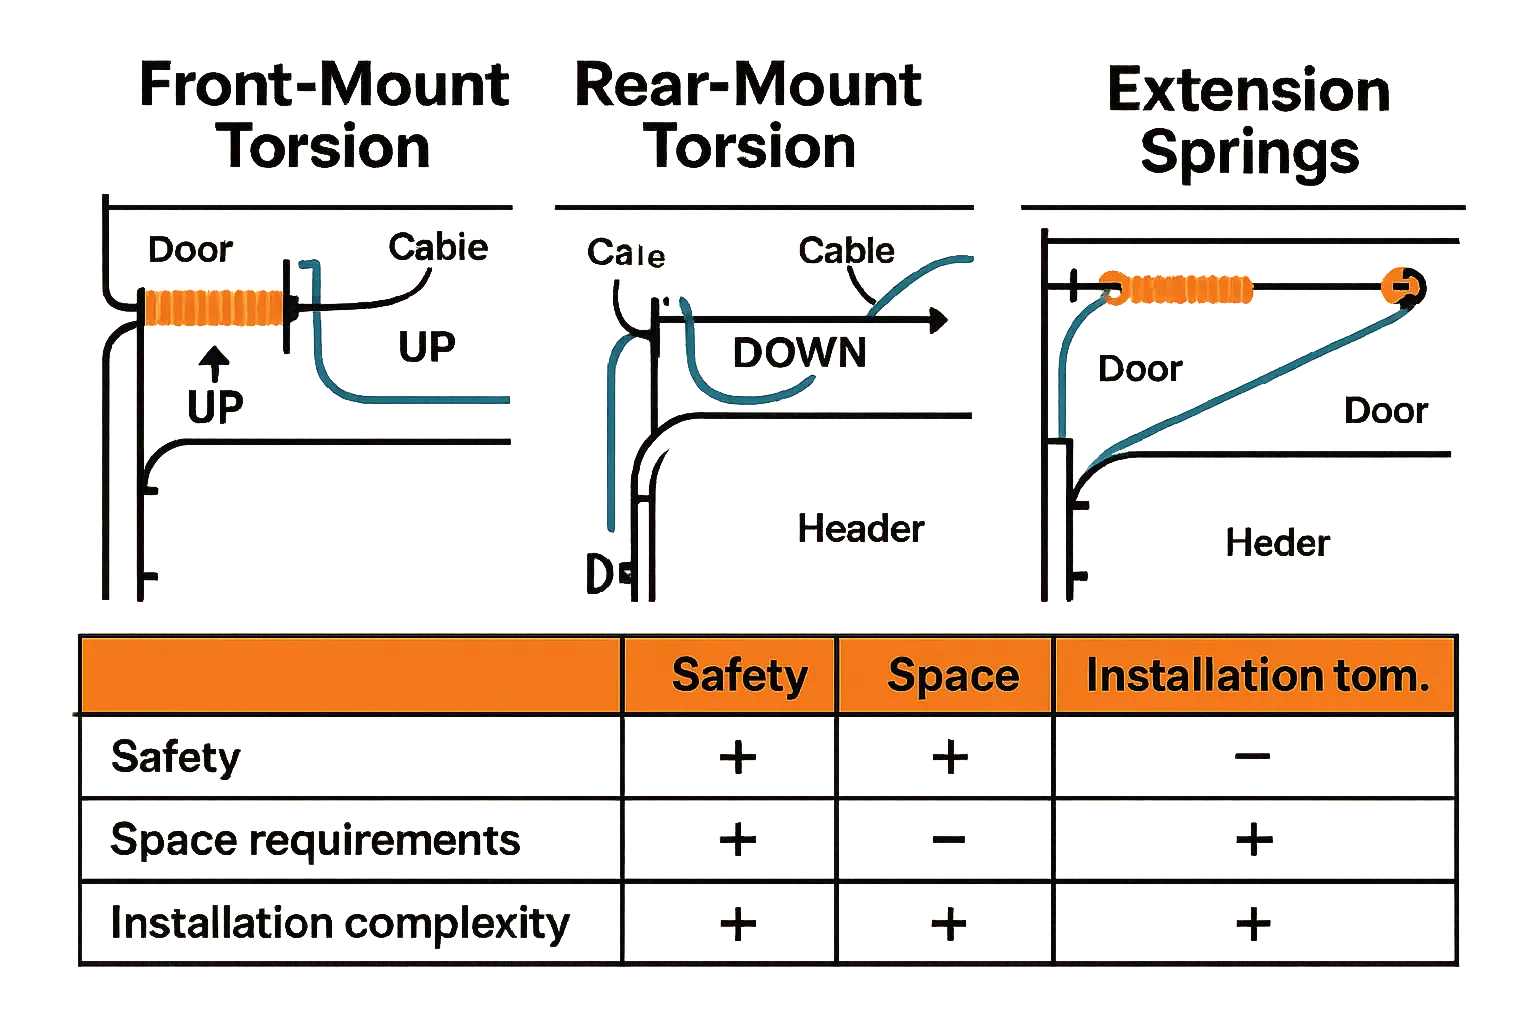
Managing low headroom requires re-engineering how your door balances its weight. The three primary low-clearance spring configurations each have unique spatial demands and mechanical principles:

  • Front-Mount Low-Headroom Torsion: Requires 6 to 9.5 inches of clearance. The torsion shaft and springs remain on the header directly above the door opening. However, the dual-track system prevents the top panel from scraping.
  • Rear-Mount Low-Headroom Torsion: Relocates the torsion shaft and spring assembly to the rear of the horizontal tracks. This setup reduces the required clearance to a critical 4.5 to 5 inches. To achieve this, the cable drums are mounted outside the end-bearing plates, the cable paths route outside the track, and the springs are wound in reverse.
  • Extension Springs (Low-Headroom Option): Requires 4.5 inches of clearance. While easier to install than rear-mount torsion, comparing a torsion spring vs extension spring shows that extension springs lack the long-term balance control and smooth operation of torsion systems.

When dealing with rear-mount torsion, executing garage door torsion spring winding safely is paramount, as the reverse-winding direction (down instead of up) reverses the traditional torque calculation and physical handling required during commissioning.

An educational comparison of front-mount and rear-mount torsion springs versus extension springs, detailing mechanical placement, cable paths, and installation trade-offs for space-constrained garage doors.

Solving the Opener Conundrum: Sideroom and Ceiling Clearances


Even after fitting the door tracks, you must address the opener. Standard trolley openers require an additional 2 to 3 inches of headroom above the high point of the door’s travel. This means a 5-inch headroom track system actually requires 7 to 8 inches of total vertical room if using a traditional ceiling rail.

To solve this, installers generally choose between two advanced setups:

  1. Side-Mount (Jackshaft) Openers: Units like the LiftMaster series bypass ceiling rails entirely by mounting directly to the torsion shaft on either side of the door. This requires at least 6 inches of lateral sideroom on the installation side.
  2. Low-Profile Trolley Retrofits: When sideroom is non-existent (under 6 inches) and ceiling room is tight, a traditional trolley can be flush-mounted using a quick-turn or “Super Sneaky” bracket, reducing the ceiling opener’s profile to under 1.5 inches.

Whether you select a wall-mounted unit or a ceiling-mounted rail, following a professional liftmaster garage door opener installation protocol ensures that limits and travel configurations do not overstress the low-profile track junction plates.

Step-by-Step Installation Nuances & Professional Secrets


A flawless low-headroom installation requires meticulous attention to tolerances. Professional-grade executions rely on three key techniques:

  • Trimming the Horizontal Rails: In ultra-tight spaces, horizontal rails may need to be trimmed by 0.5 to 1 inch to allow the cable to travel smoothly without contacting the ceiling or joists.
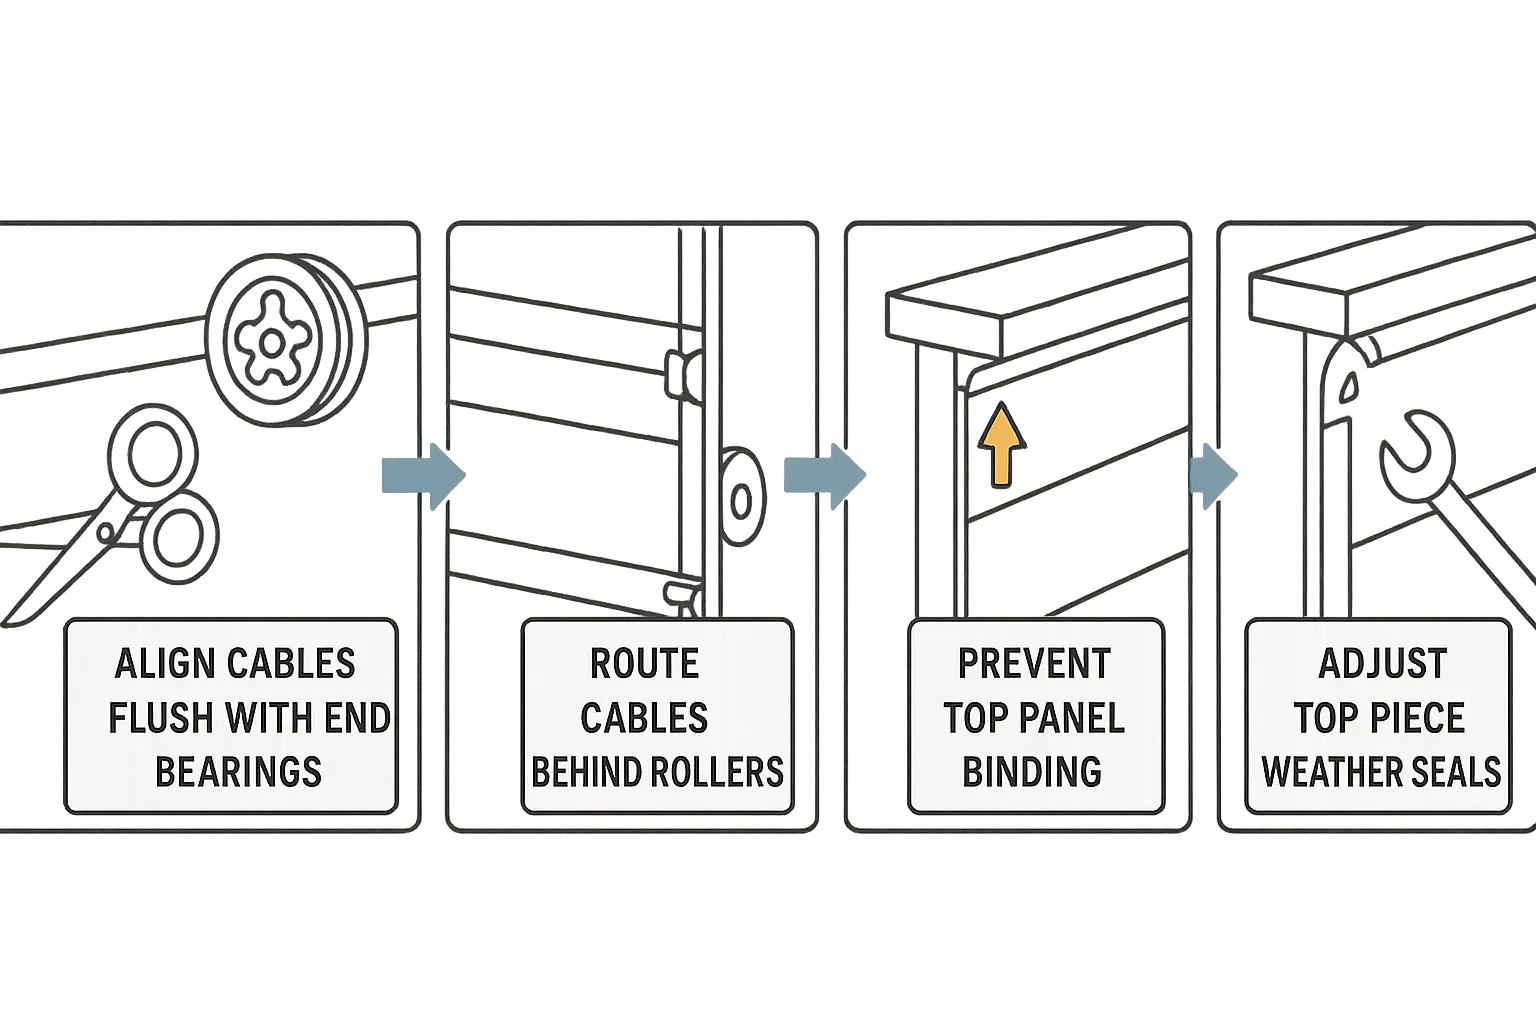
  • Zeroing Out Shaft Float: Cable drums must sit completely flush against the race of the end bearing. This prevents horizontal shaft shifting, which causes uneven cable winding and premature wear.
  • Top Fixture Calibration: Top roller fixtures must be adjusted down to pull the top panel into a perfect horizontal seal while avoiding interference with the header.

A mnemonic visual guide highlighting expert installation steps that ensure a safe, functional, and properly sealed low-headroom garage door setup.

Troubleshooting the Perfect Weather Seal


The most common failure in low-headroom setups is the “top panel gap.” Because the top panel pivots horizontally so quickly, it can fail to press firmly against the header weatherstripping when closed.

To eliminate a drafty gap at bottom of garage door or at the top header, adjust the top fixture slides downward to increase closing pressure, and utilize commercial-grade, flexible lites or dual-flap jamb seals. By calibrating these final sealing points, you ensure your space stays completely protected from wind, rain, and temperature extremes.

Frequently Asked Questions


Can I use standard torsion springs on a rear-mount low-headroom track?

Only if the springs are wound in reverse and mounted on a specialized rear-shaft assembly. Traditional front-mount torsion spring winding directions will not function in a rear-mount configuration, as the cable routing travels behind the rollers and wraps around the outside of the drum rather than the inside.

How much minimum clearance is needed for a dual-track system?

A rear-mount low-headroom torsion system can work in clearances as low as 4.5 inches of headroom. However, this tight profile typically requires a side-mount Jackshaft opener or a low-profile trolley bracket to function without ceiling interference.

Why does my top garage door panel bind when opening?

Binding usually occurs due to poor alignment between the dual upper and lower horizontal tracks, or because the top roller brackets are positioned too high. Adjusting the top fixtures downward and ensuring the tracks remain perfectly parallel solves most binding issues.

Contact / Request a Call