main logo

Programming Garage Door Remotes And Transmitters: The Complete Diagnostic Guide


Published: Jul 13, 2026

Standing in a dusty garage balanced on a ladder while trying to program a replacement remote is a frustrating rite of passage for many homeowners. Often, user manuals are either missing or filled with overly technical jargon, leaving you guessing whether your hardware is even compatible.

Programming a remote control is not a guessing game—it is an exact science determined by radio frequencies, secure rolling codes, and hardware compatibility. This master guide provides clear, field-tested instructions to sync your remotes and clear system faults without the stress.
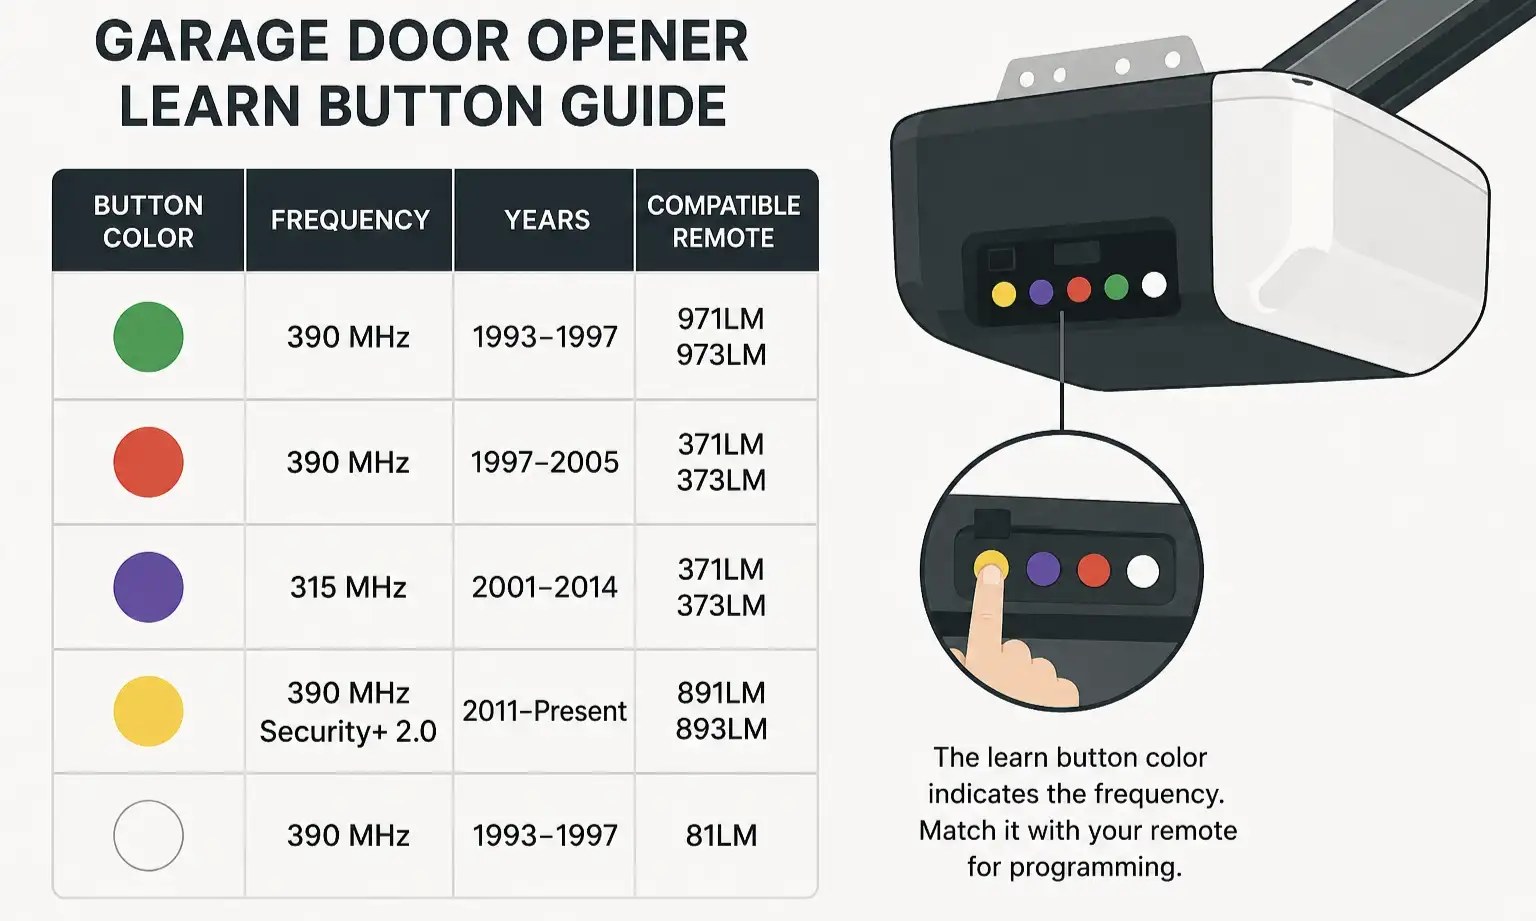
The Ultimate Learn Button & Frequency Matrix


Garage Door Opener Learn Button Guide
Before pressing any buttons, you must identify your system's core architecture. Garage door openers operate on distinct radio frequency (RF) bands determined by their manufacturing era. To determine compatibility, look at the physical "Learn" button color on your overhead motor head. If the button is faded or dusty, you can identify it by matching the color of the thin antenna wire hanging from the unit location instantly.

Garage Door Opener Learn Button Guide

Step-by-Step: Standard Handheld Remote Programming


Programming standard, single-brand transmitters (such as LiftMaster, Chamberlain, Genie, or Craftsman) is straightforward if you adhere to strict timing rules.
Transmitters Remote Programming

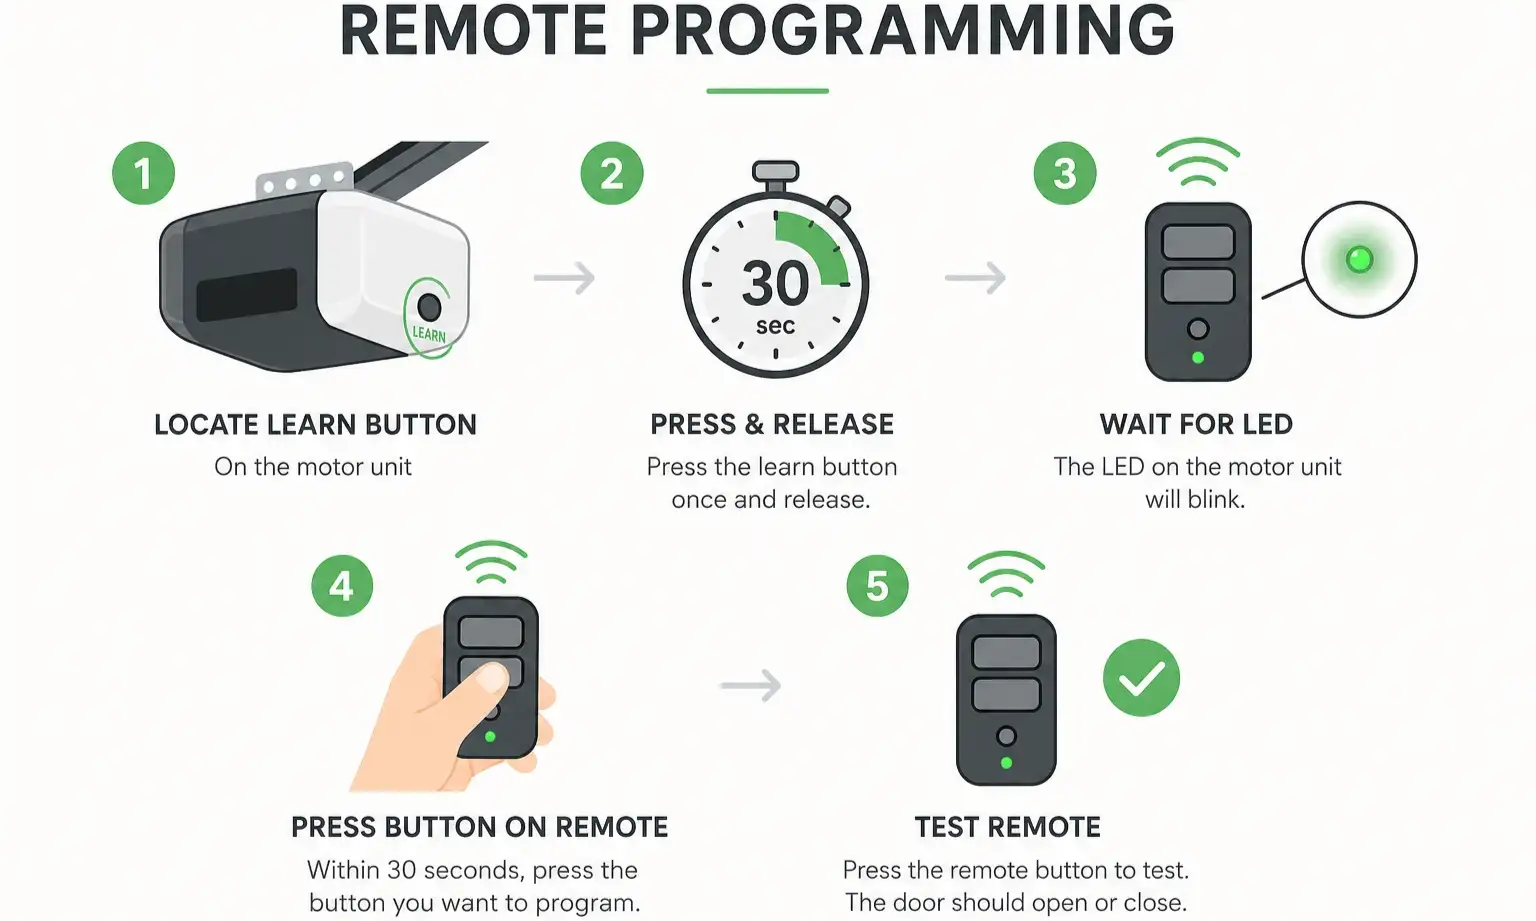
  • Access the Motor Unit: Use a sturdy ladder to safely reach the overhead console.
  • Trigger Learn Mode: Press and immediately release the "Learn" button. The small LED indicator adjacent to it will glow steadily. Do not hold the button down, as doing so will wipe the system memory.
  • Initiate Sync (The 30-Second Window): Within 30 seconds, press and hold the button on your handheld remote control.
  • Confirm Pairing: Watch for the garage motor lights to flash, or listen for two distinct clicking sounds. Release the remote button. Test the remote to ensure successful synchronization.
If you already have a functional remote, you can bypass the ladder entirely. Read our detailed blueprint on how to program a garage door remote from another remote to duplicate settings directly.
Transmitters Remote Programming

Universal Remote Control Cheat Sheet


Universal remotes like the Chamberlain Clicker or Klik5U require a multi-press code to align with the specific carrier frequency of your garage receiver. If you need to know how to program a universal remote, follow this precise click-count sequence:

Open the remote casing to locate the program button. Press it until the status LED lights up.

Press your target remote button N times based on your opener's Learn button color:

  • 1 Press: Yellow Button (Security+ 2.0)
  • 2 Presses: Purple Button (Security+ 315 MHz)
  • 3 Presses: Red/Orange Button (Security+ 390 MHz)
  • 4 Presses: Green Button (Billion Code)

Press any other button on the transmitter to lock in the selection.

Press and release the "Learn" button on your motor, then press your programmed remote button to finalize the link.

Ladder-Free: Programming from the Wall Control Console


If your ceilings are high or climbing a ladder is not an option, you can program modern remotes from your hardwired wall console:
  • Smart Control Panels (e.g., LiftMaster 880LMW): Press "Menu" -> select "Program" -> select "Remote" -> press the desired button on your remote control twice.
  • Multi-Function Panels: Locate the side program button on the wall unit. Press it twice in quick succession, then hold down the button on your hand-held remote for 3 seconds.

Security & System Reset: Memory Purging


When moving into a new home or dealing with lost remotes, you must clear old signals to prevent unauthorized access.

To execute a clean system reset:

1. Press and hold the "Learn" button on the motor unit for exactly 6 seconds. The LED will turn off, indicating all hand-held transmitters and keyless entry PINs are erased.

2. For Yellow Button systems with MyQ smart integrations, press and hold the button a second time for 6 seconds to wipe network settings.

If you need to perform a comprehensive factory reboot, review our complete guide on how to reset garage door opener systems safely.

Advanced Troubleshooting: The "Silent Failures" Diagnostic


When programming attempts fail repeatedly, invisible interference is usually to blame.
Causes Of Remote Programming Silent Failure

  • LED Bulb Electromagnetic Interference: Unshielded LED bulbs emit electromagnetic noise across the 300-400 MHz spectrum. This noise blocks weak RF signals from transmitters. To test this, unscrew your light bulbs and try programming again. If it works, switch to shielded, garage-safe LED bulbs.
  • The Vacation Lockout: If your remote won't program, check the wall console. If the indicator light is blinking, the "Lock" mode is active, which blocks all radio signals. Learn how to turn off lock button on garage door opener controls to restore functionality.
  • Memory Saturation: Most logic boards hold only 8 to 24 remote slots. Adding a new remote may be rejected if the memory is full. Perform a complete system reset to clear old slots before syncing.
  • Signal and Antenna Issues: If your remote only works within two feet of the motor, check our specialized guide on how to fix garage door remote signal issues to diagnose weak receiver antennas or aging transmitter batteries.
Causes Of Remote Programming Silent Failure

Vehicle Integration: HomeLink & Car Programming


Programming your vehicle's integrated buttons is a simple, two-stage process:

1. Teach the Car: Hold your existing handheld remote within two inches of your car's built-in HomeLink button. Press and hold both buttons simultaneously until your vehicle's indicator light flashes rapidly.

2. Sync with the Motor: Press the "Learn" button on your opener, then return to your car and press the designated HomeLink button three times to complete the connection.

If your vehicle's internal system is outdated or fails to communicate with your newer motor, check out our guide on car garage door opener hardware standards or read our troubleshooting steps on how to program garage door opener in car without remote to resolve transceiver issues.

FAQ


Can garage remotes be duplicated?

Yes. If you want to avoid scaling a ladder, cloning garage door remote devices allows you to copy RF signals directly from a working transmitter to a new cloning remote.

Why won't my remote sync despite pressing the button?

The most common cause is a full receiver memory, active "Lock" mode on the wall button, or RF interference from nearby electronics.

How do I know if my logic board is burnt out?

If the "Learn" button LED does not light up at all when pressed, or if it blinks a repeating pattern (such as 5 consecutive blinks), your internal receiver card may have suffered power surge damage. In these cases, professional liftmaster garage door repair is recommended.

You may also like


blog photo

Remote Compatibility for Garage Door Setup

You’ve been there. You have a trusty old garage door remote and a shiny new one. The package promises a simple setup. You stand in your garage, following the vague instructions, trying to get the two remotes to talk to each other. You press buttons, hold them down, and... nothing. The frustration is real, and you’re left wondering, "Why is this so complicated?" The truth is, it’s not you—it’s the technology. Getting one remote to program another isn't about magic; it's about matching the underlying security and frequency technologies. Most information online is scattered across brand-specific support pages from giants like Chamberlain and Genie, leaving you to piece together the puzzle. This guide is different. We're going to pull back the curtain and explain the fundamental reasons behind remote compatibility. By the end, you'll understand why it works (or doesn't) and be able to solve your programming puzzle with confidence.