
Ice Dams Dripping on the Garage Door Header: Protecting the Frame


Published: Oct 5, 2026

When winter temperatures plunge, a dripping wet garage door trim is rarely just a nuisance—it is often the signature of a hidden structural crisis. While many homeowners assume water pooling at the top of the opening is a simple gutter overflow, it is frequently the result of an active roof-level ice dam bypassing your home’s exterior drainage plane.

As a structural horizontal beam, your garage door header carries immense loads, spanning anywhere from 9 to 16 feet [1]. Left unchecked, water infiltrating this critical junction can lead to wood rot, sagging, and eventual failure under heavy snow loads [2]. Understanding how to triage this active leak, diagnose structural integrity, and apply permanent flashing fixes is essential to protecting your home.
Emergency Triage: Stopping the Active Drip


When you see water dripping from your garage door’s upper drywall or trim, you must act fast to halt structural damage without making the problem worse:

  • The Calcium Chloride Sock: Fill a nylon stocking with calcium chloride and lay it vertically across the ice dam on the roof [6]. This safely melts a channel through the ice, letting backed-up water drain safely.
  • Never Use Axes or Shovels: Do not strike the ice. Physical impacts easily shatter frozen asphalt shingles and destroy gutters, turning a flashing issue into a major roof replacement.
  • Temporary Interior Diversion: Inside the garage, pin plastic sheeting behind the trim to channel water away from the structural header and into buckets.

If the leak persists or structural deflection is visible, securing professional emergency garage door repair can protect your family and your property.

The Anatomy of a Flashing Bypass


To stop a header leak, you must understand how water enters. Uninsulated or partially heated garages suffer from severe thermal bridging. Heat escapes through attic hatches and unsealed fixtures, warming the roof deck and melting snow. This meltwater flows down to the cold eave, where it refreezes into an ice dam [6].

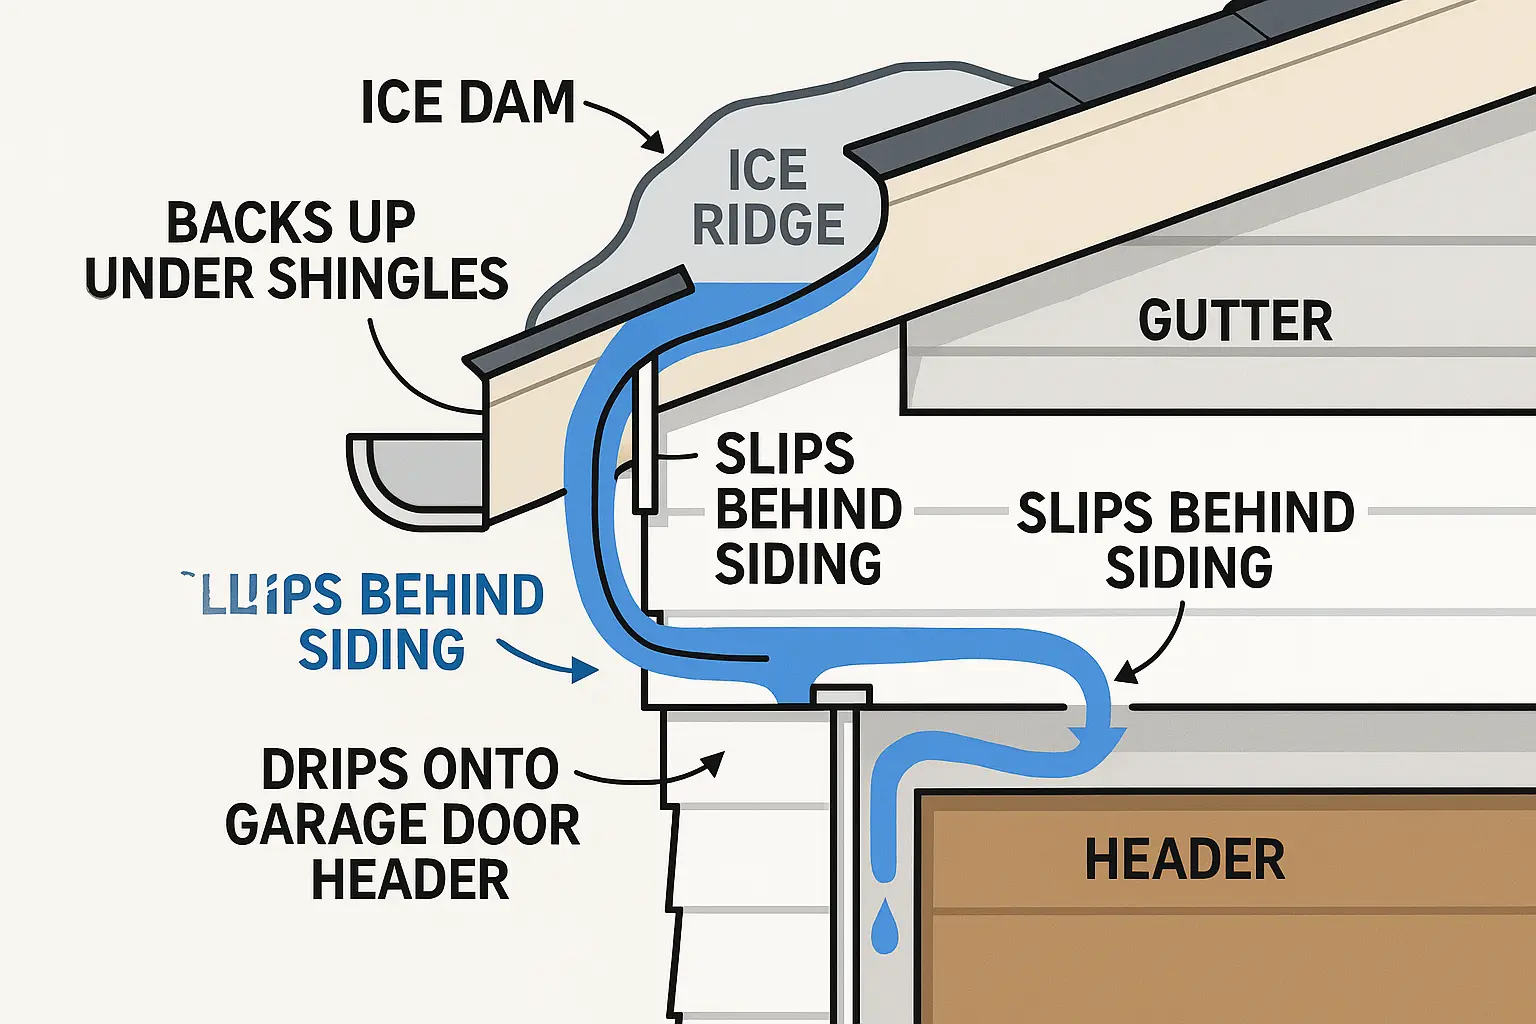
As water pools behind the dam, it backs up under shingles, bypassing the roof’s drip edge. The water then enters the soffit or wall cavity. If the exterior door trim lacks a sloped metal drip cap (Z-flashing) integrated behind the Water-Resistive Barrier (WRB), the water bypasses the siding entirely and runs directly onto the wood header [4]. This cannot be resolved by upgrading your garage door weather stripping, as the failure lies deep within the wall cavity above the door frame.

Ice Dam Bypass BlueprintIllustrates how ice dam meltwater bypasses roof edge flashing and housewrap, leaking directly onto the garage door header to cause structural damage. Understanding this pathway is key to diagnosing and preventing frame rot.
Diagnostic Checklist: Assessing Header Integrity


A rotted header can compromise the safety of your entire garage. Assess your frame’s health using these diagnostic tests:

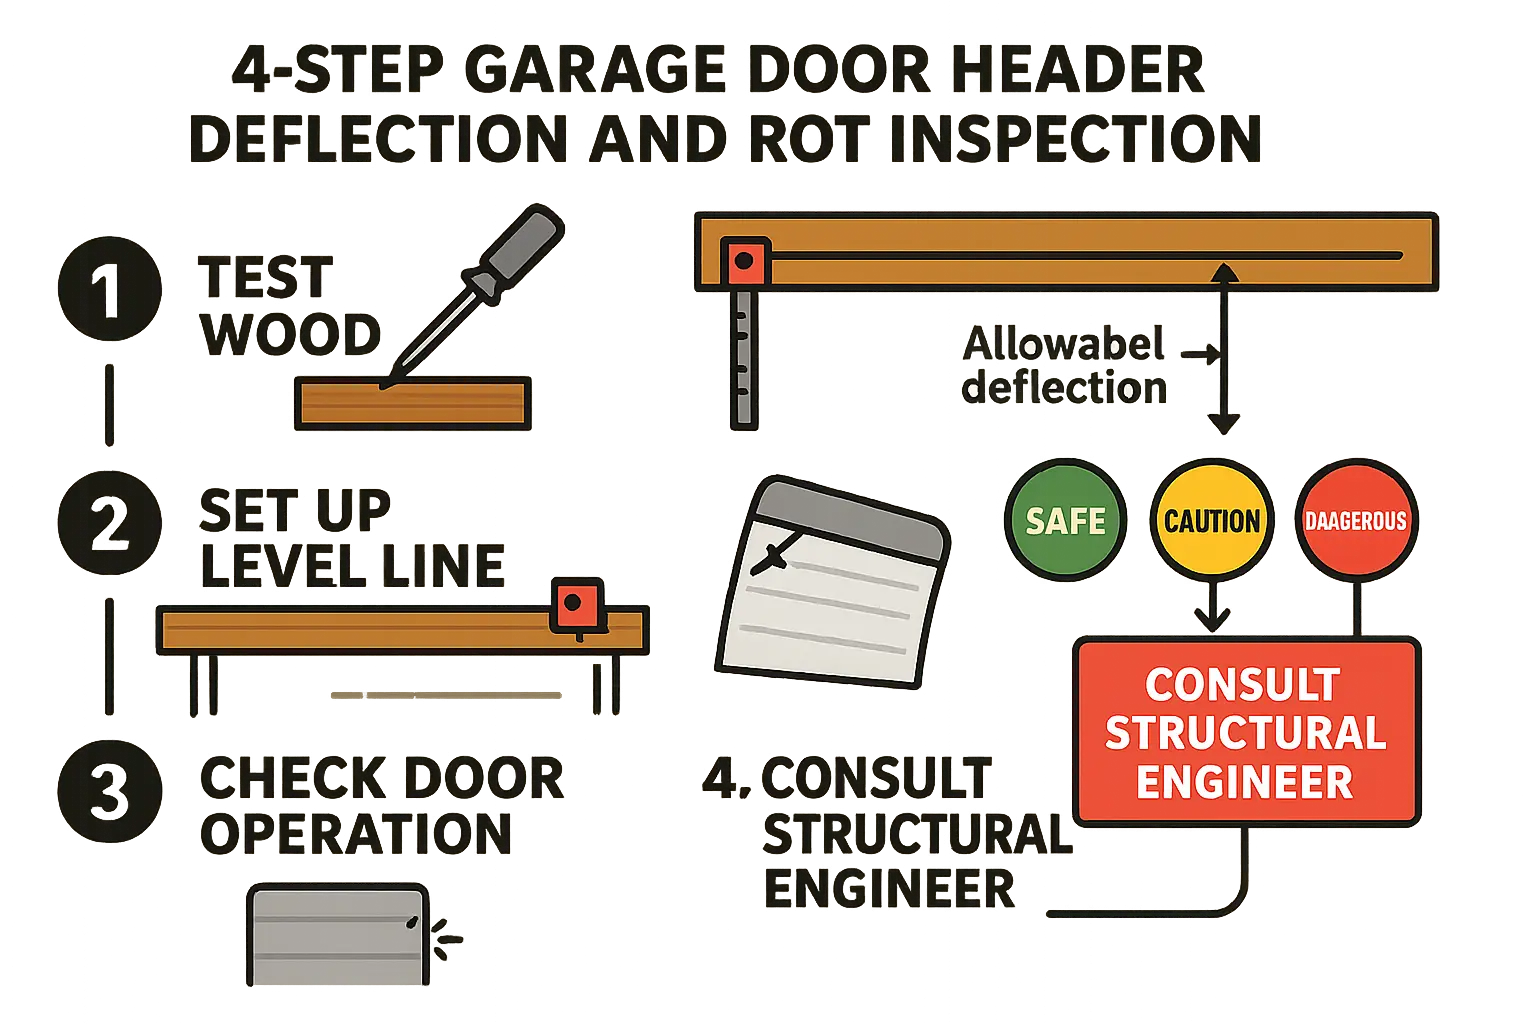
  1. The Awl Probe Test: Firmly press a flathead screwdriver or awl into the header beam. If it penetrates more than 1/4 inch, active rot is compromising the wood fibers.
  2. The String Deflection Test: Run a tight string line across the bottom edge of the header. Under IRC Table R301.7, allowable deflection is limited to L/240 (e.g., ~13/16″ for a 16-foot span) [2]. Any sag exceeding this limit indicates structural failure.
  3. The Alignment Audit: Look for binding doors, crushed weatherstripping, or instances where a garage door sensor green light blinking is triggered by physical track twisting. Structural shifting can compromise your garage door track alignment.

Diagnostic Guide DiagramStep-by-step diagnostic guide empowers homeowners to assess if their garage door header is structurally compromised, helping reduce anxiety and prompt timely professional intervention.

The Flashing and Water Management Blueprint


Per IRC Section R703.4, approved flashing must be installed at the top of all exterior door openings to maintain a continuous drainage plane [3]. To permanently protect your frame, use this flashing blueprint:

  • Expose and Wrap: Pull back siding above the header. Wrap the structural framing and corners with a premium self-adhering membrane (e.g., Vycor).
  • Install Z-Flashing: Mount a rigid metal drip cap with a sloped profile over the top casing trim [5].
  • Integrate with WRB: Slip the top flange of the metal flashing behind your housewrap, sealing the seam with high-performance construction tape [5] to prevent garage door repairs down the road.

Remediation Matrix: Comparing Repair Options


Evaluating the scale of repair depends on wood damage and structural load.

Visual summary assists homeowners in remembering and comparing key garage door header repair options based on cost, complexity, and structural capacity to make informed decisions.

  • Epoxy Consolidation: For superficial, dry rot on non-structural trim (<5% of the beam). Low cost and easy to apply.
  • “Dutchman” Wood Patch: Best for localized rot on the outer ply of a multi-ply header. Moderate cost; requires precise carpentry.
  • Sistering: Adds sister beams or steel flitch plates for structural reinforcement without removing the old beam. High cost; requires structural design validation.
  • Full Header Replacement: Restores original design load for severe rot, active insect damage, or deflection exceeding code limits [2]. Maximum cost.

To eliminate the temperature differences that drive ice damming, homeowners should also invest in attic ventilation and high-quality insulated garage doors to keep the surrounding space thermally stable.

Frequently Asked Questions


How can I tell if my dripping garage header is structurally damaged?

Perform the awl probe test and string deflection test. If a screwdriver penetrates more than 1/4 inch into the wood or the horizontal header sags more than L/240 of its span (about 13/16 inch for a double garage door) [2], the structural integrity of the beam is compromised.

Why doesn't standard garage weatherstripping prevent this leak?

Weatherstripping only seals air gaps around the perimeter of the door itself. Ice dam leaks bypass the exterior envelope entirely, flowing down through the soffits and wall cavities directly onto the header beam from above [4].

What is the average cost to replace a rotted structural header?

While minor superficial rot can be stabilized with epoxy or a Dutchman patch for under $600, a complete, code-compliant header replacement typically costs between $3,000 and $5,000 due to the temporary structural shoring and siding integration required.

Contact / Request a Call