When a garage door reverses mid-travel, generic troubleshooting guides almost always focus on dirty lenses or misaligned photo-eye sensors. However, professional field diagnostics reveal that unbraced hanger flex accounts for 15% to 20% of persistent, non-sensor reversals. Homeowners facing this issue are dealing with a structural rigidity and dynamic force problem: the pushing action of the motor head causes an inadequately braced ceiling assembly to sway, twist, or lift.
Opener Hanger Flex Causing Door Reversal: Diagnosis and Structural Solutions
Published: Nov 13, 2026
The Physics of Hanger Flex and Door Reversal
Understanding why this occurs requires examining Newton’s Third Law of Motion within garage opener mechanics. When the opener motor pushes the heavy door panel down the track, it generates substantial horizontal pushback force. If the ceiling hanger assembly relies on thin 18-gauge perforated straps or flexible plumber’s tape, an equal and opposite upward reaction force occurs, causing the motor housing to bow upward or sway side-to-side by 0.75 to 1.25 inches.
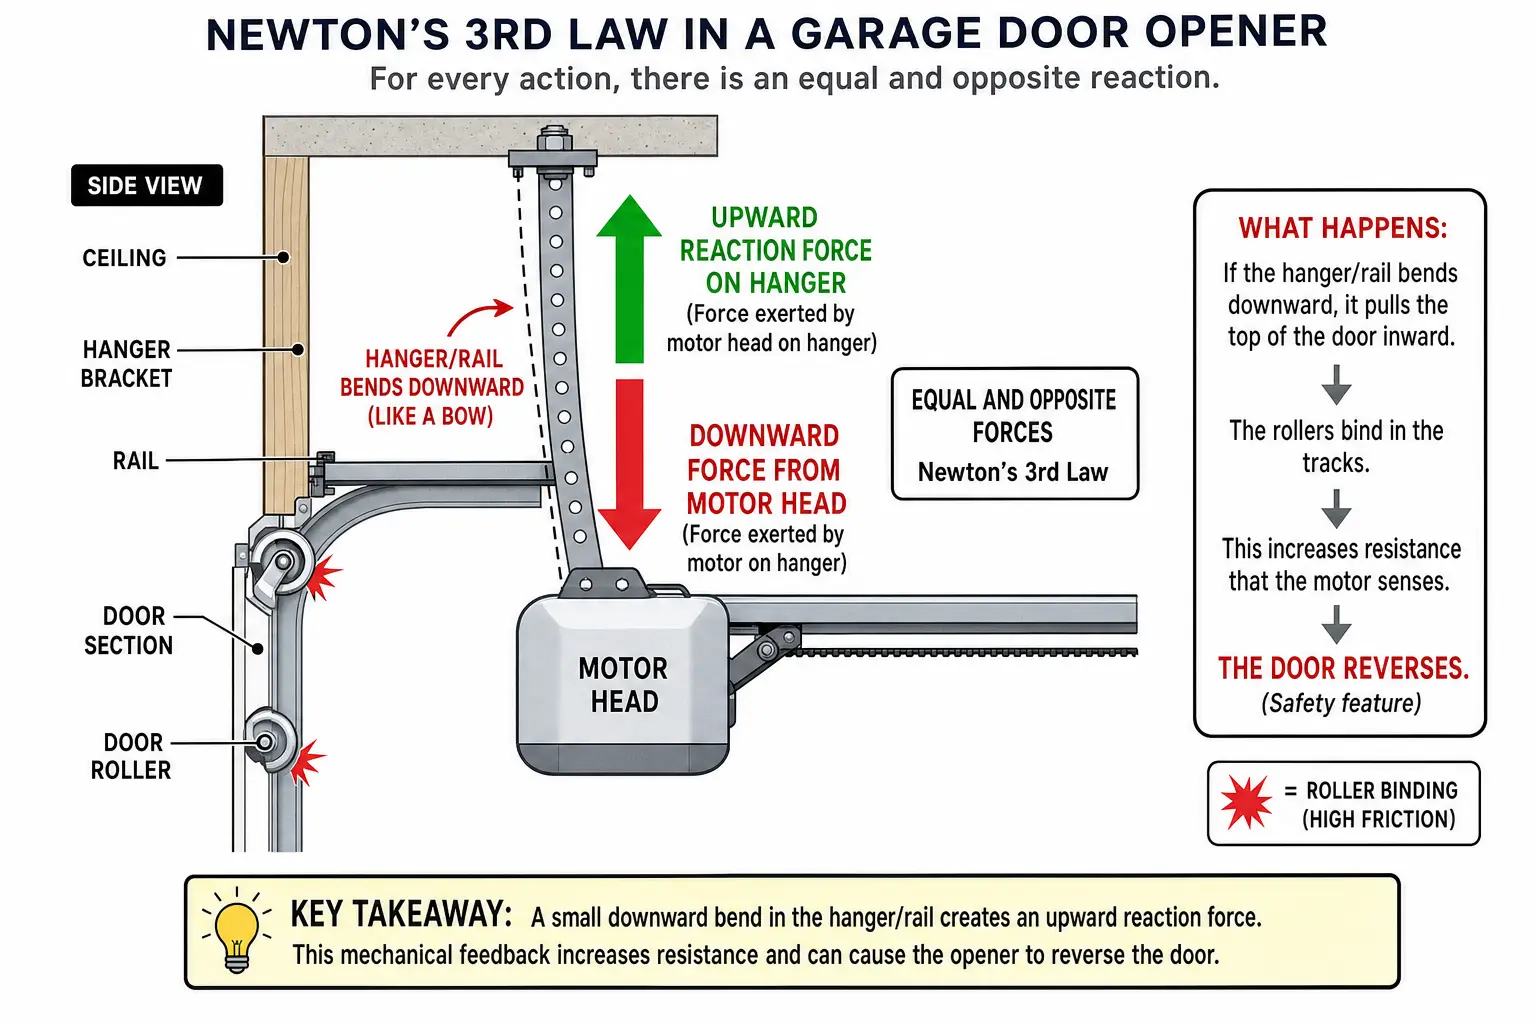
This sudden upward shift alters the operating angle of the curved door arm, binding top rollers against the track radiuses. The motor’s internal RPM sensors register this physical resistance as an obstruction, initiating a safety reversal. If your garage door reverses before hitting the floor, structural flex in the overhead mounting frame is often the true cause.
Still stuck? Get it fixed today.
24/7 emergency service from licensed local technicians.
3-Minute Diagnostic Test: Hanger Flex vs. Sensor Failure
Before purchasing hardware or altering force limits, execute this quick diagnostic sequence to isolate mechanical deflection from optical sensor failures.
- Observe the Motor Housing: Stand at a safe distance and run the opener. Watch the motor head as the door moves downward. If the motor lifts upward by more than 1/2 inch or twists laterally when dynamic load shifts, your ceiling mounts lack structural stability.
- Inspect the T-Rail/I-Beam: Look down the length of the rail during operation. An unbraced motor head allows the rail to bow upward like an archer’s bow during movement.
- Verify LED Sensor State: Check your optical safety eyes during a reversal. If the indicator lights stay solid green and amber while the door stops and reverses, your optical path is intact. The opener is reacting to internal force thresholds triggered by physical track binding. Isolating whether you have a faulty garage door obstruction sensor or dynamic frame flex prevents wasted spending on unnecessary electronic replacement parts.
Ceiling Hanger Flex vs. Top Door Section Flex
It is essential to distinguish ceiling hanger flex from door panel flex, as each requires a distinct hardware solution:
- Ceiling Hanger Flex: The motor housing shifts or sways relative to ceiling joists. Fix: Install 14-gauge perforated angle iron ceiling cross-bracing.
- Top Door Section Flex: The top sheet-metal door section cracks or bows inward where the opener arm connects. Fix: Attach a heavy-duty 21-inch Operator Reinforcement Bracket (ORB) to distribute push force across the door section.
How to Eliminate Hanger Flex with Triangulation
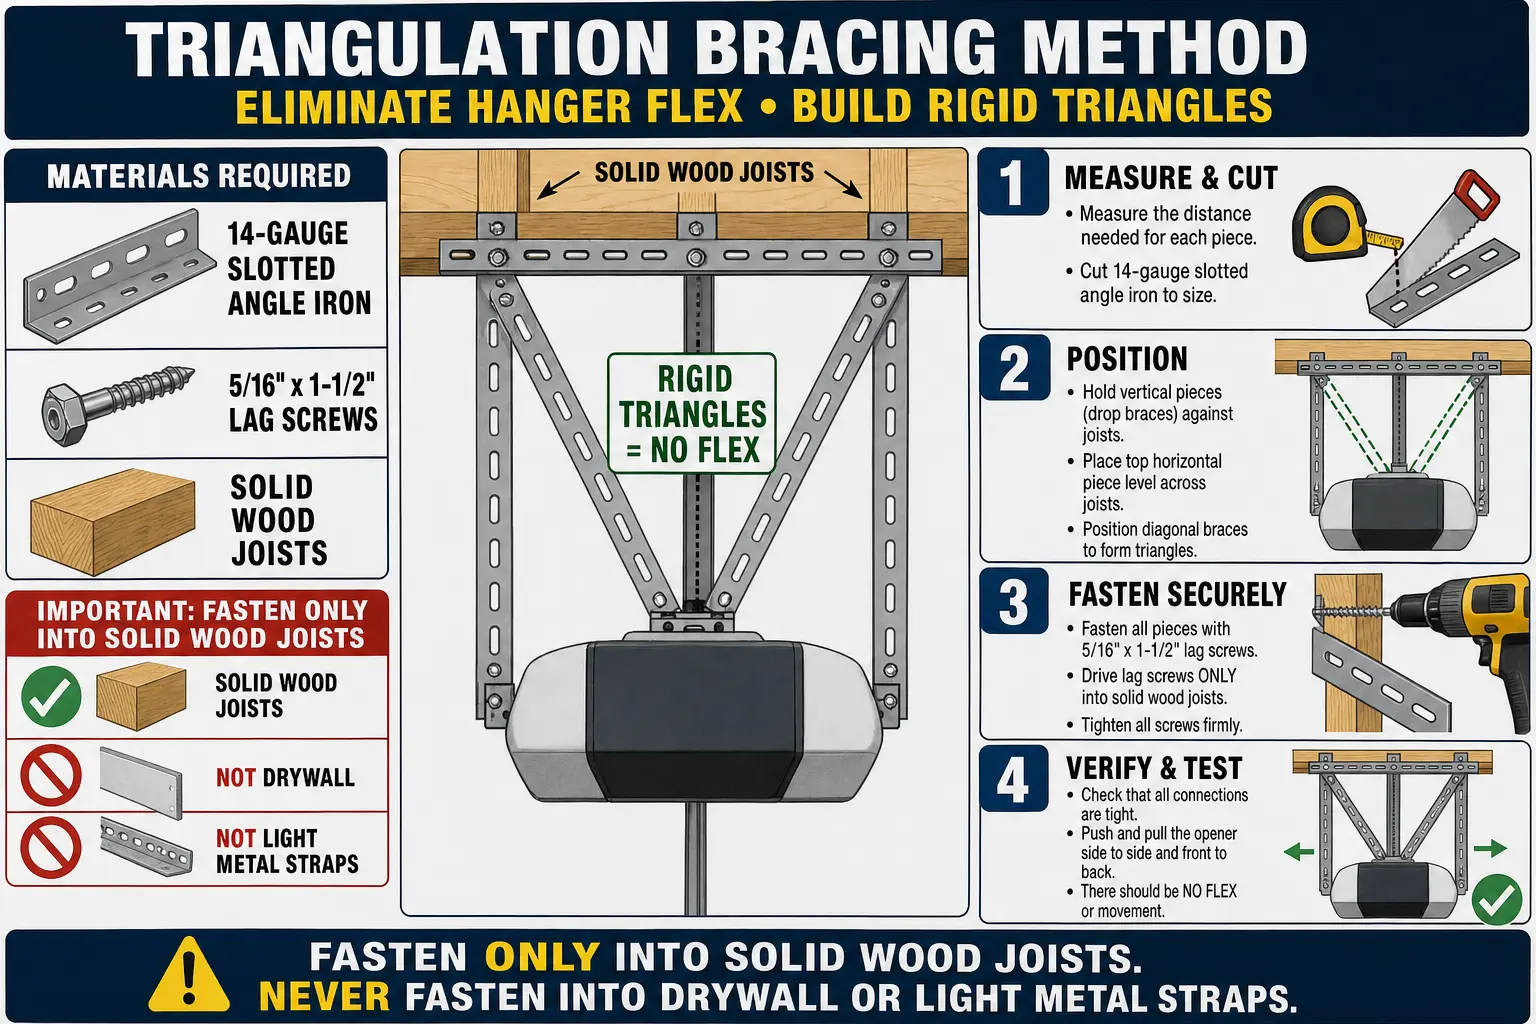
To achieve complete mechanical stability, your opener framework must utilize diagonal triangulation. Straight vertical drop straps accommodate downward gravity load but fail entirely against dynamic sway and pushback forces. Proper garage door opener installation requires structural steel framework whenever drop height exceeds 12 inches.
Materials Required
- 14-Gauge Slotted Galvanized Angle Iron (minimum 1-1/8″ x 1-1/8″)
- 5/16″ x 1-1/2″ Zinc-Plated Lag Screws (for wood joists)
- 5/16″ x 3/4″ Grade-5 Bolts and Locking Flange Nuts
Installation Blueprint
- Anchor Vertical Supports: Fasten two lengths of 14-gauge angle iron directly into solid structural wood joists using 5/16″ lag screws centered in the wood framing. Never anchor into drywall alone.
- Build Horizontal Bridge: Bolt a horizontal cross-member between the vertical drops directly over the opener power head to establish a rigid box frame.
- Add Diagonal Triangulation Braces: Mount a third section of angle iron diagonally at a 45-degree angle from the upper ceiling joist anchor down to the lower motor mount bracket. This diagonal cross-brace prevents lateral sway and counters upward reaction forces during startup and stop cycles.
Solution Comparison Matrix and Safety Compliance
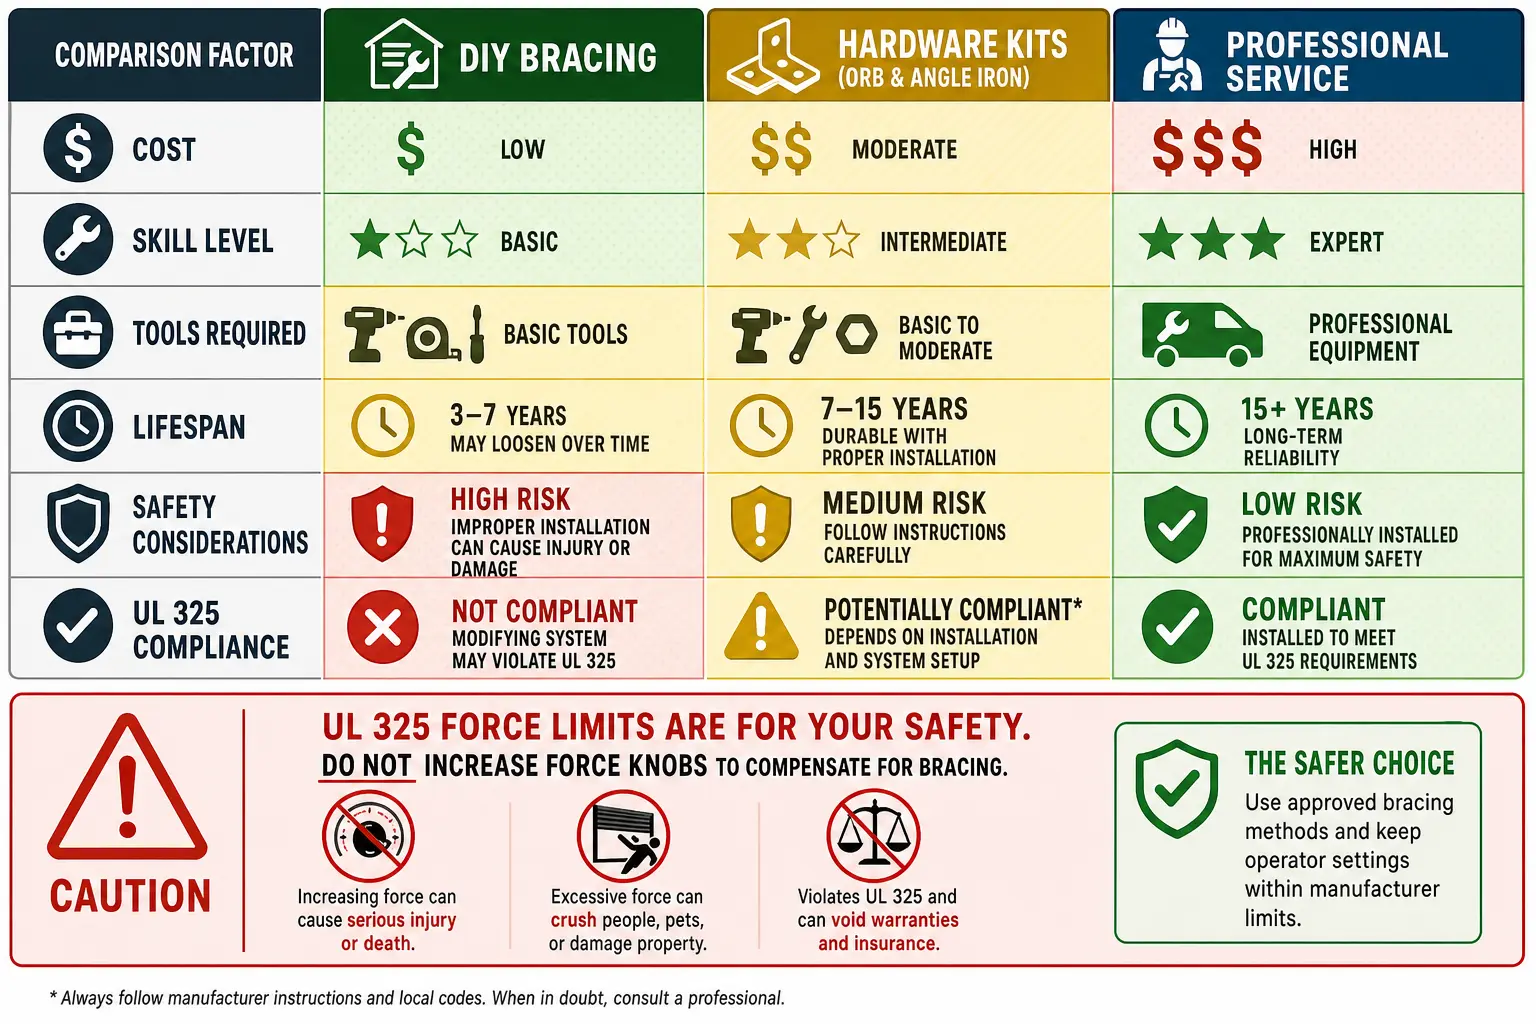
Homeowners attempting quick fixes often turn up force dials on the motor head. However, masking mechanical binding with increased force creates severe safety risks.
| Solution Method | Estimated Material / Service Cost | Skill Level Required | Structural Rigidity | Safety & Compliance |
|---|---|---|---|---|
| DIY Triangulated Angle Iron Frame | $18 – $35 | Moderate | High (Permanent Fix) | Fully Compliant |
| Pre-Punched Kit Assembly | $20 – $40 | Moderate | High | Fully Compliant |
| Increasing Opener Force Settings | $0 | Low | Zero (Masks Problem) | Violates UL 325 Safety Caps |
| Professional Technical Service | $120 – $220 | None (Turnkey) | Professional Grade | Audited & Guaranteed |
Artificially increasing close force limits to override structural flex violates ul 325 compliance standards, which restrict maximum downward entrapment force to 59 lbs. Over-tightening force knobs puts unnecessary strain on internal drive gears and can cause a bent garage door track.
Once structural bracing is correctly anchored, you can fine-tune your force limits using standard adjust garage door pressure sensor procedures to ensure peak operation. If structural deflection has damaged your ceiling framing or track alignment, schedule an evaluation with certified garage door opener repair services to restore safe operating performance.
Frequently Asked Questions
Why does my garage door reverse even when the safety sensor lights are solid?
Solid sensor lights confirm that the optical safety beam is uninterrupted. Reversals occurring under solid sensor conditions stem from mechanical friction, structural hanger flex, or track binding. This resistance trips the opener’s electronic force sensor or RPM encoder, causing an immediate reversal to prevent damage or entrapment.
Can I just turn up the force settings on my opener to stop the reversal?
No. Increasing force settings forces the motor to push harder against mechanical binding without eliminating the hanger flex causing the issue. This creates an entrapment hazard that violates UL 325 safety caps (maximum 59 lbs of contact force), accelerates motor gear stripping, and risks damaging top door panels.
What gauge of angle iron is required to stop hanger flex?
Garage door industry structural standards require a minimum of 14-gauge galvanized slotted angle iron (measuring 1-1/8″ x 1-1/8″). Lighter materials, such as 18-gauge thin straps or plumber’s tape, lack the cross-sectional stiffness needed to eliminate dynamic reaction movement under load.