Reconnect Your Smart Garage After a Wi-Fi Change
Published: Jun 15, 2026
It’s a familiar story. You’ve just upgraded your home internet—faster speeds, a new router, maybe a more secure password. Everything feels zippier, until you pull into your driveway and realize your smart garage door opener is suddenly not so smart. It’s disconnected, unresponsive, and has left you reaching for that old-fashioned physical remote.
You’re not alone. This is one of the most common hiccups for smart homeowners. Your garage opener was perfectly happy talking to your old Wi-Fi network, but now that the network name or password has changed, it’s like a tourist in a foreign country without a map.
The good news? Getting it reconnected is usually a simple process, and you don’t need to be a tech expert to do it. This guide will walk you through every step, for any brand, from the straightforward app method to a little-known manual trick for when things get stubborn.
The Pre-Flight Checklist: 4 Things to Do Before You Begin
- 1. Know Your Wi-Fi Password: This sounds obvious, but you’d be surprised. Write down the password for your new Wi-Fi network. Remember, it’s case-sensitive.
- 2. Stay Close to the Opener: Your smartphone needs to communicate with the garage door opener motor unit during setup. Stand in the garage, near the motor, for the strongest connection.
- 3. Enable Bluetooth on Your Phone: Many modern openers use Bluetooth to simplify the initial handshake during Wi-Fi setup. Make sure it’s turned on.
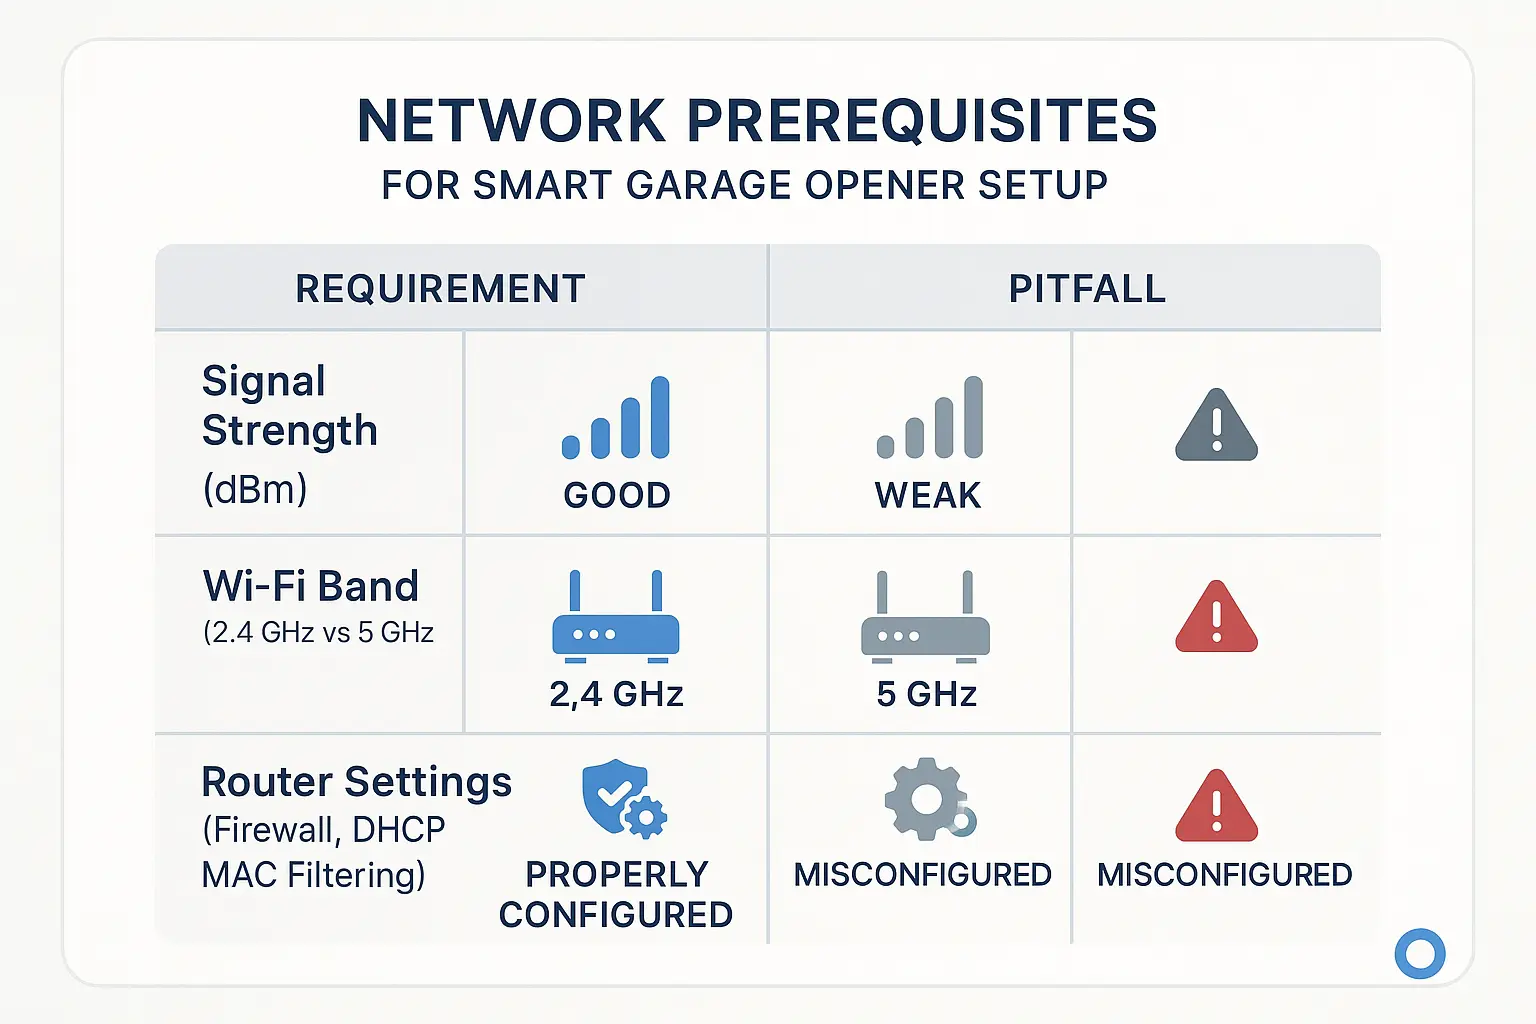
- 4. Confirm Your 2.4 GHz Network: Nearly all smart garage openers operate on a 2.4 GHz Wi-Fi band. Modern routers often broadcast both 2.4 GHz and 5 GHz networks. Ensure your phone is connected to the 2.4 GHz network before you begin, as the opener won't be able to see or connect to the 5 GHz band.
With these things ready, you’re prepared for a smooth reconnection.
The 2-Minute App Method (Works for 80% of Users)

- 1. Open Your Opener’s App: Launch the app you use to control your garage door (e.g., myQ, Aladdin Connect).
- 2. Find Your Device Settings: Navigate to the specific garage door opener within the app. Look for a gear icon, a "Device Settings" menu, or an "Edit" option.
- 3. Locate the Wi-Fi Menu: Inside the device settings, you should see an option labeled "Wi-Fi," "Update Wi-Fi Settings," or "Change Network."
- 4. Follow the On-Screen Prompts: The app will now guide you through the process. It will typically ask you to press the "Learn" button on your garage door opener motor to put it into Wi-Fi setup mode. Once you do, the app will search for available networks.
- 5. Select Your New Network and Enter the Password: Choose your new home Wi-Fi network from the list and carefully type in your new password.
When the App Fails: The Manual Reconnect Method
This "secret" method involves connecting your phone directly to a temporary Wi-Fi network broadcast by the garage door opener itself.

- 1. Activate Wi-Fi Setup Mode on the Opener: Press the "Learn" button on your motor unit (usually 3 times, but check your model) until you hear a beep and see a blinking blue light. This tells you the opener is now broadcasting its own temporary Wi-Fi network.
- 2. Go to Your Phone's Wi-Fi Settings: Open the Wi-Fi settings on your smartphone or laptop, just like you would at a coffee shop.
- 3. Connect to the Opener's Network: Look for a new, open network in your list. It will typically be named something like
MyQ-XXXorAladdin-XXX. Connect to it. Your phone may warn you that this network has no internet access—that's normal. - 4. Open a Web Browser: Once connected, open a web browser (like Chrome or Safari) on your phone. In the address bar, type
setup.myqdevice.com(for myQ/Chamberlain/LiftMaster) or the IP address specified in your manual (often192.168.1.1). - 5. Configure from the Webpage: This will load a simple setup page served directly from your garage opener. Here, you can scan for your home Wi-Fi network, select it, and enter the password.
- 6. Confirm and Reconnect: After you save the settings, the opener will disconnect from your phone and connect to your home network. Don't forget to switch your phone’s Wi-Fi back to your home network.
A Visual Guide to Finding Your Opener's "Learn" Button
- Chamberlain / LiftMaster / Craftsman: Look for a square button, typically colored yellow, purple, red/orange, or green. It’s often located on the back or side of the motor unit, near the antenna wire.
- Genie / Overhead Door: This is usually a small black button labeled "Program" or "Learn Code." It’s often found behind the light cover.
- Ryobi: The programming buttons are typically grouped together on the side of the unit and are clearly labeled.
Still Stuck? Your Ultimate Troubleshooting Checklist
Is your Wi-Fi signal strong enough in the garage?
Are you sure you’re using the 2.4 GHz network?
Did you type the password correctly?
Is there a firewall or parental control blocking the device?
Some advanced router settings can prevent new devices from joining the network. Check your router's app or admin panel to ensure the garage opener isn't being blocked.
Have you tried a quick power cycle?
If your device is online but still not working correctly, it might be a mechanical or electrical issue. Our general guide can help you fix garage door opener problems beyond connectivity.
FAQ: Your Top Questions About Reconnecting Your Garage Opener
Will I have to reprogram my remotes and keypad after reconnecting to Wi-Fi?
Why can't my garage opener just use the 5 GHz Wi-Fi band?
The app is giving me an error code. What does it mean?
Can I still use my regular remote if the Wi-Fi is down?
You may also like