Sensor Wires Chewed by Rodents: Diagnostic Signs and Repair Options


Published: Oct 2, 2026

Discovering a dashboard full of warning lights can cause immediate panic. Often, the culprit is not a catastrophic mechanical failure, but a tiny rodent seeking warmth. When mice, rats, or squirrels nest under your hood or inside your garage, they chew through delicate wiring to control their continuously growing teeth.

Understanding how to diagnose this damage, compare your repair paths, and execute a high-fidelity fix will save you thousands of dollars in unnecessary parts.

The Panic Phase: Immediate Action & Symptom Diagnostic


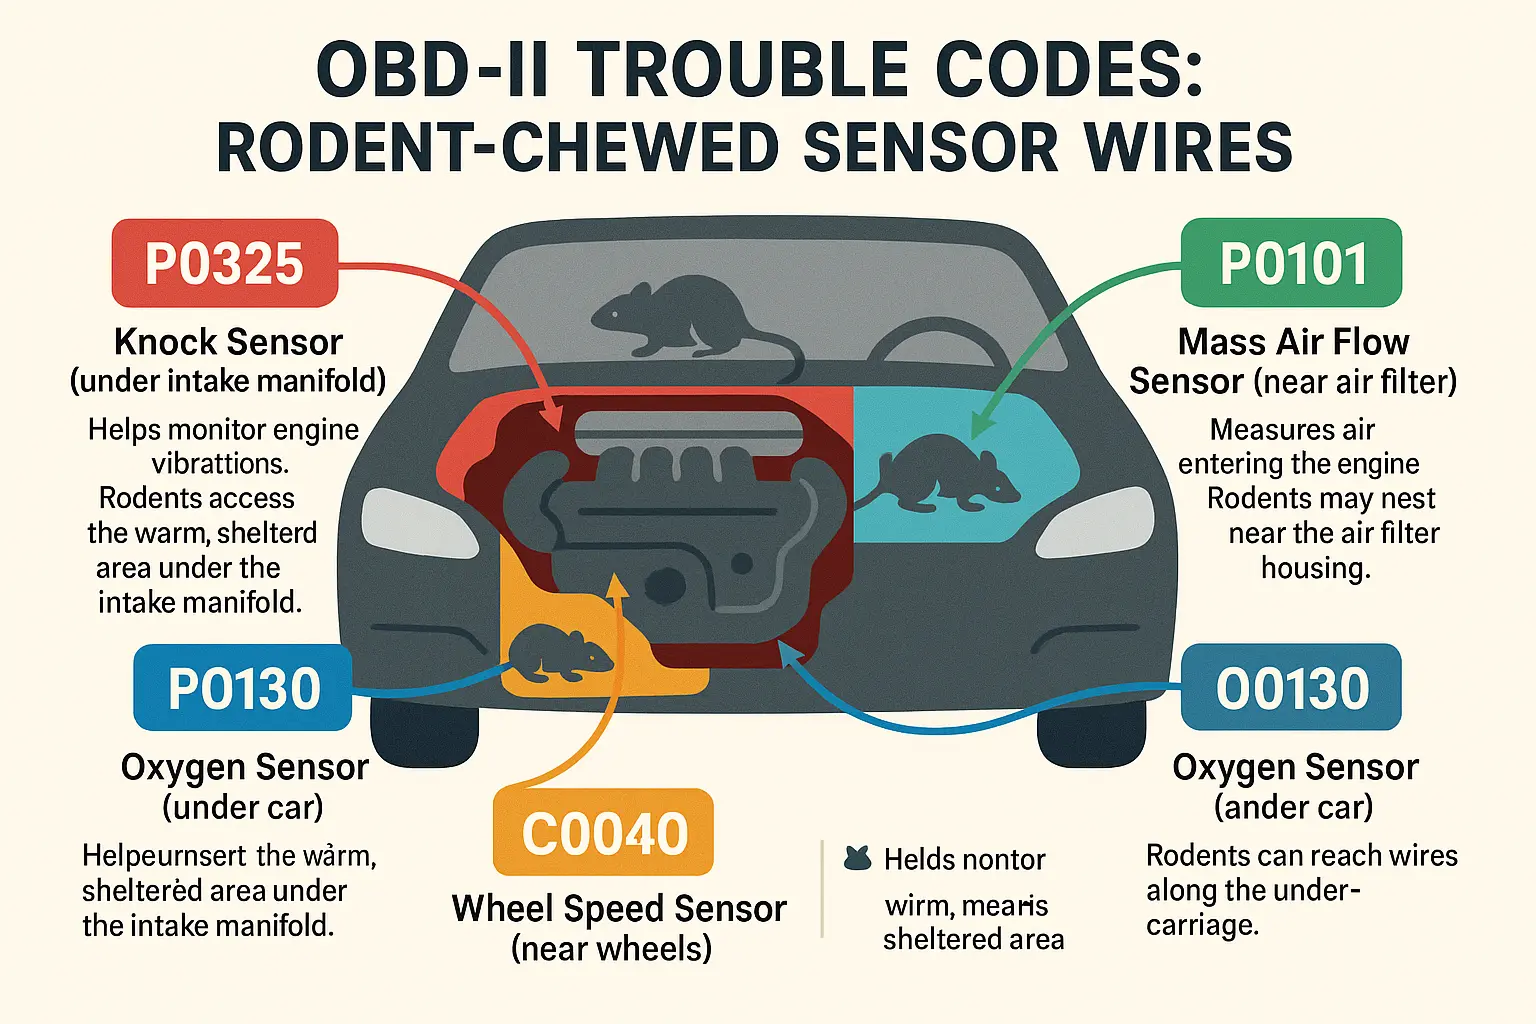
How do you know if rodents have targeted your wiring? Your vehicle’s onboard diagnostics system (OBD-II) will trigger specific diagnostic trouble codes (DTCs) linked to your engine’s critical sensors:

  • P0325 / P0330: Knock Sensor (buried under the intake manifold where mice love to nest).
  • P0130 – P0161: Oxygen (O2) Sensor (located underneath the vehicle, highly exposed to climbing pests).
  • P0100 – P0104: Mass Air Flow (MAF) Sensor (placed near the warm air filter box, a prime nesting zone).
  • ABS / Traction Control Light: Wheel Speed Sensors (fragile wiring exposed near the wheel wells).

Similarly, if you discover your garage automation is offline, you might wonder do garage door sensors go bad due to age, or if nesting pests have severed the connection.

This diagram connects engine warning codes to typical rodent damage spots, clarifying where sensor wires are commonly chewed and triggering specific Check Engine alerts.

Science-Backed Prevention: How to Stop Rodents Forever


Why do rodents target your vehicle or garage?

  • Biological Drivers: A rodent’s incisors grow 4 to 5 inches per year. Gnawing is an essential survival mechanism to prevent lock-jaw.
  • Soy-Based Insulation: Since the early 2000s, automakers transitioned to biodegradable, soy-based wire insulation, unintentionally creating an attractive scent trail.

To stop future infestations, pair physical exclusion with targeted deterrents:

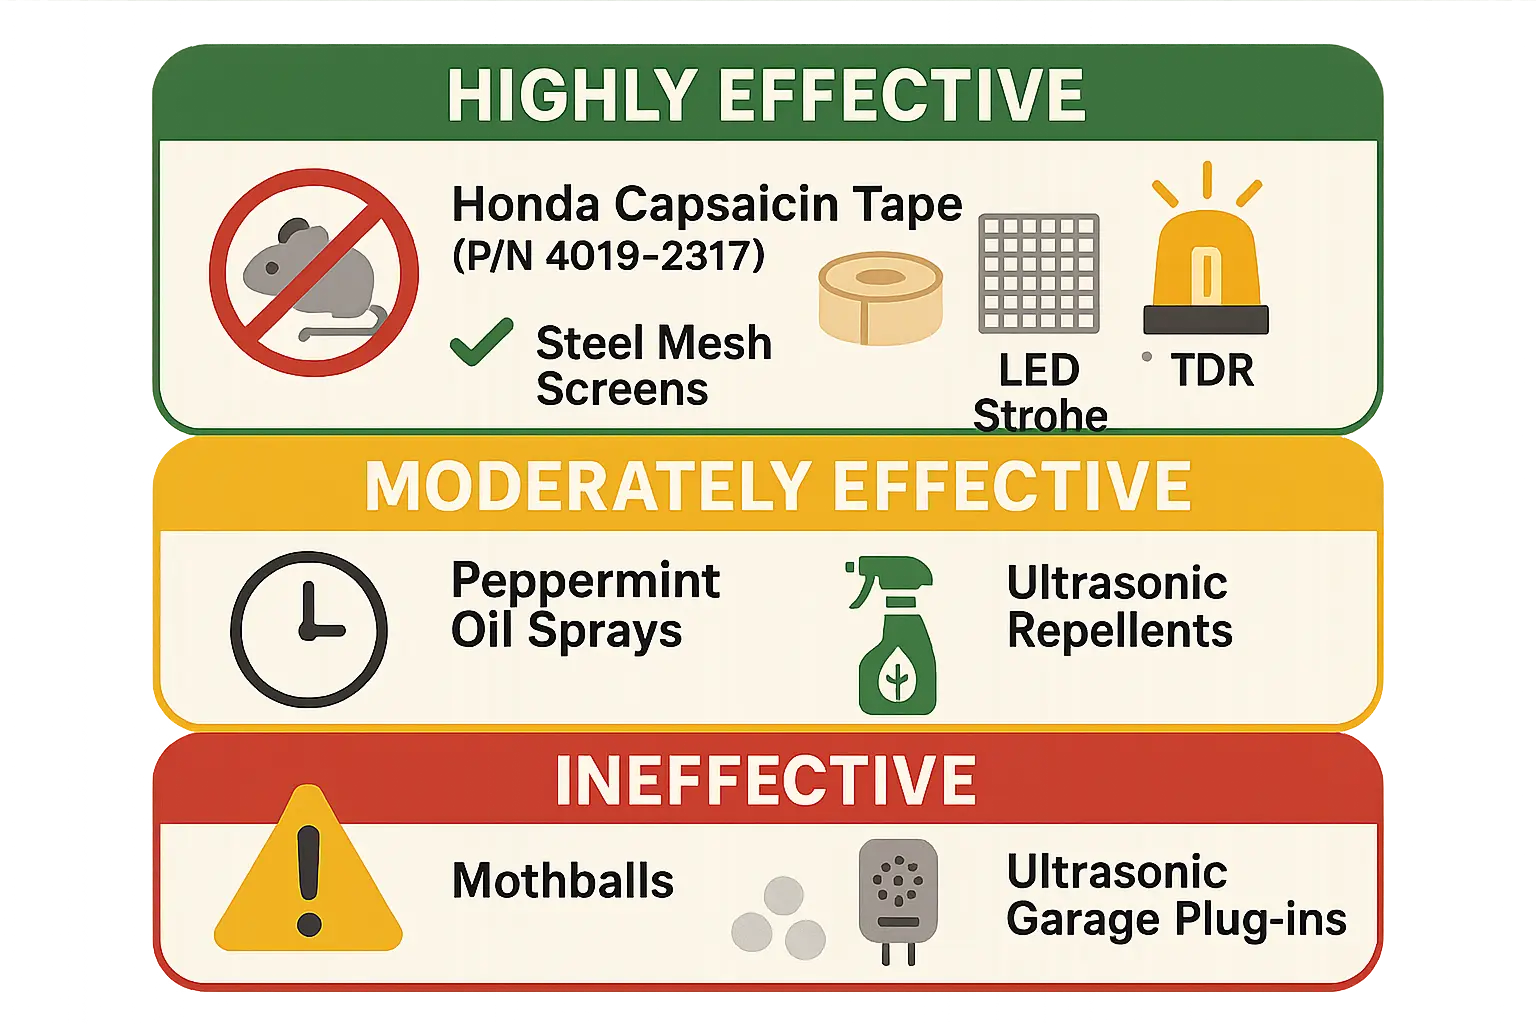
  • Highly Effective: Wrap vulnerable wire segments in Honda’s official capsaicin-infused electrical tape (Part Number: 4019-2317). Seal entry points to your garage by installing a durable, high-density garage door bottom seal. Place LED strobe lights under the vehicle’s hood, as rodents despise flashing lights.
  • Moderately Effective: Spray peppermint oil around the engine bay weekly, or utilize under-hood ultrasonic mouse blockers.
  • Ineffective: Avoid mothballs, which degrade interior cabin air quality and do not reliably deter pests.

This infographic visually anchors the best and worst rodent deterrent methods for protecting vehicle wiring, helping users remember how to prevent re-infestations effectively.

Does Insurance Cover Rodent Damage? (How to Navigate the Claim)


Rodent chewing falls under the Comprehensive Coverage portion of your auto policy, categorized as an “Act of Nature” or “Other-Than-Collision” claim. If your repair estimate exceeds $1,000, filing a claim is highly beneficial. Here is how to navigate the process:

  1. Document Everything: Take clear photos of the chewed wiring, nests, and droppings.
  2. Get an Estimate: Secure a written repair estimate from a certified shop.
  3. Compare Your Deductible: If your deductible is $500 and the quote is $2,500, file the claim. If the quote is $600, pay out-of-pocket to protect your premium.

The Ultimate DIY Repair Guide: Splicing Sensitive Sensor Wires (Step-by-Step)


Repairing delicate sensor wires presents a unique obstacle: The Resistance Paradox. Sensors communicate using minor fluctuations in voltage and electrical resistance. If you use cheap plastic crimps or simple twist-and-tape methods, moisture will enter the joint, creating resistance spikes that trigger persistent check engine lights.

To repair your wires professionally, utilize Self-Soldering Heat-Shrink Butt Connectors (Solder Sleeves) and a professional stagger splicing technique:

  1. Prep the Wire: Strip 1/4 inch of insulation from the broken wire ends.
  2. Stagger Your Splices: If repairing multiple adjacent wires, cut them at staggered lengths. This prevents a bulky, bulging harness joint.
  3. Slide and Solder: Slip a solder sleeve over one end, join the copper strands, center the solder ring over the joint, and apply heat. The solder melts while the outer tubing shrinks and seals.
  4. Inspect the Connection: If the plug itself is chewed, buy a matching “pigtail connector” instead of a whole harness.

Before working on the electrical components, verify your power source is disconnected. For complex issues, you may also need to conduct a large electric garage door failure analysis or consult manual system diagnostics to trace power drops.
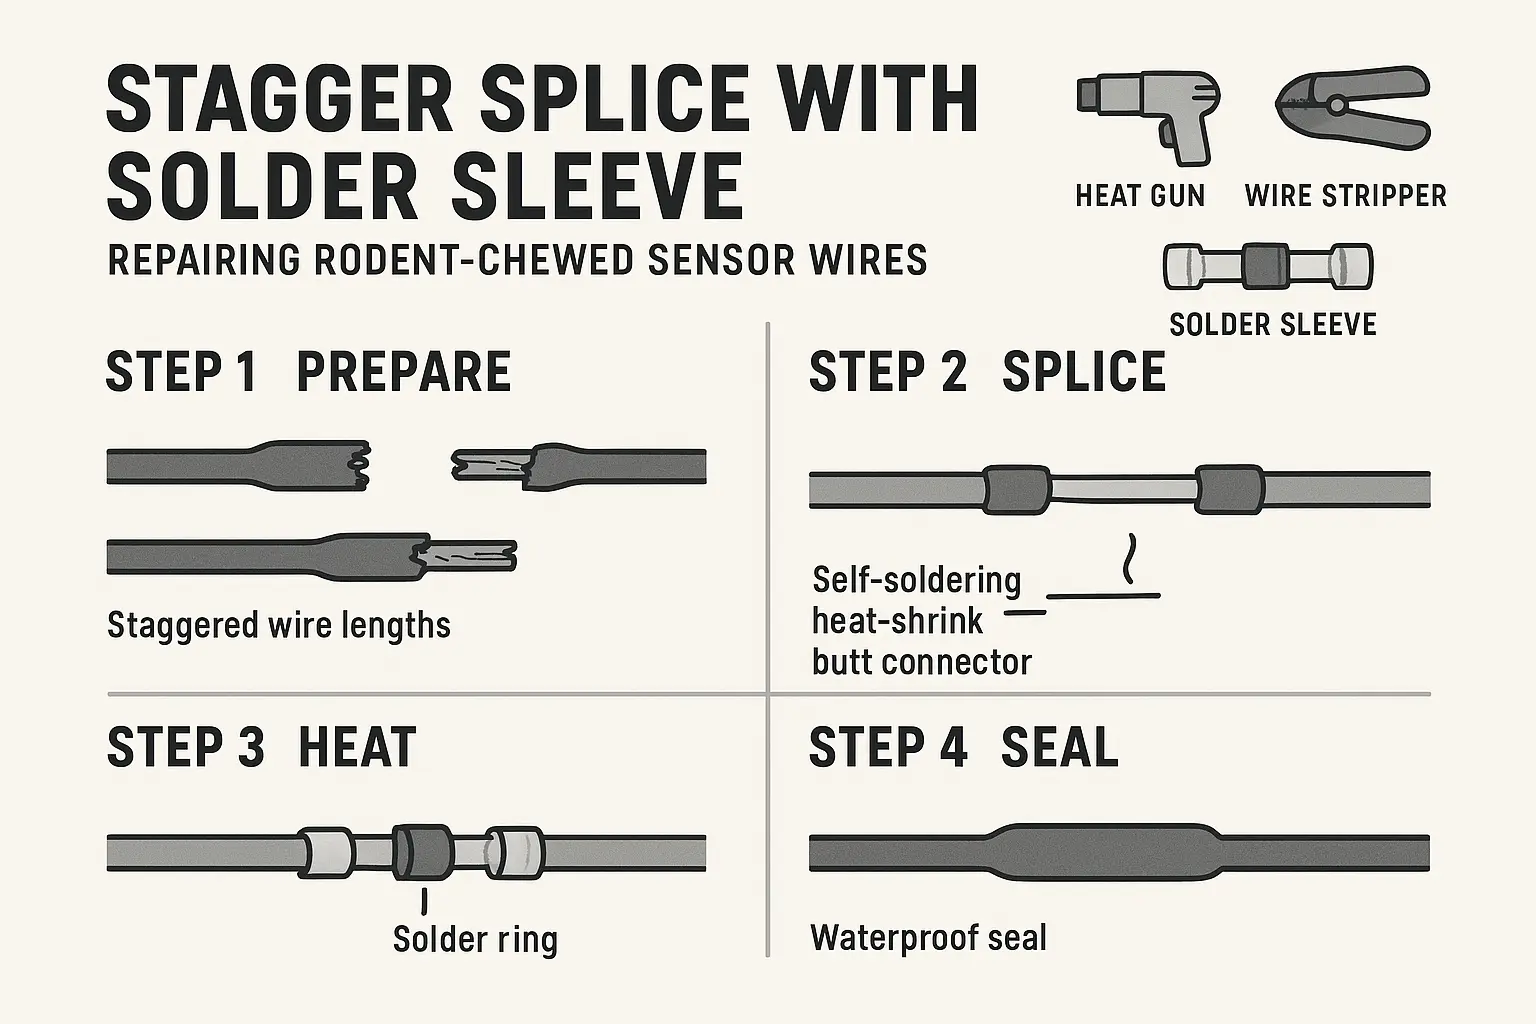

This stepwise diagram teaches how to perform professional stagger splicing repairs that maintain electrical resistance integrity and prevent future failures from rodent damage.

Frequently Asked Questions


Does comprehensive auto insurance cover rodent damage?

Yes. Most major auto insurance providers cover chewed wiring under comprehensive policies. If the cost to replace or repair the wiring exceeds your deductible, filing a claim is a highly viable path to offset high repair costs.

Why do rodents chew on wire insulation?

Rodents must chew continuously because their teeth grow 4 to 5 inches annually. Additionally, modern vehicles utilize soy-based biodegradable wire insulation which emits a faint food-like scent that attracts nesting pests.

Can I splice a chewed sensor wire instead of replacing the entire harness?

Yes. While dealerships will recommend replacing the complete wiring harness for liability reasons, manual splicing using waterproof solder sleeves is a safe, effective, and economical repair that maintains proper circuit resistance.

Contact / Request a Call