Replacing Two Single Garage Doors With One Double Door: The Complete Conversion Guide


Published: Sep 25, 2026

Every day, thousands of homeowners squeeze their vehicles through narrow 8-foot or 9-foot garage openings, risking scraped mirrors and dented side panels. If you are tired of this daily parking tightrope walk, converting your two single openings into a single, expansive double garage door is the ultimate modern upgrade. Beyond the immediate lifestyle benefits, a premium garage door replacement consistently yields a 90% to 102% Return on Investment (ROI), making it one of the highest-value home improvement projects you can undertake.

However, removing the center pillar to create a continuous 16-foot or 18-foot span is more than a cosmetic facelift—it is a significant structural modification. This guide demystifies the engineering, real-world costs, and practical choices involved in a single-to-double garage door conversion.
The Structural Reality Check: Load-Bearing vs. Non-Load-Bearing Pillars


The golden rule of garage conversions is simple: you cannot just knock down the center post. That column is currently dividing two independent overhead headers. To remove it safely, you must replace those two short headers with a single, continuous, heavy-duty beam capable of spanning the entire width of the new opening.

Before starting, you must determine whether your center pillar is load-bearing.

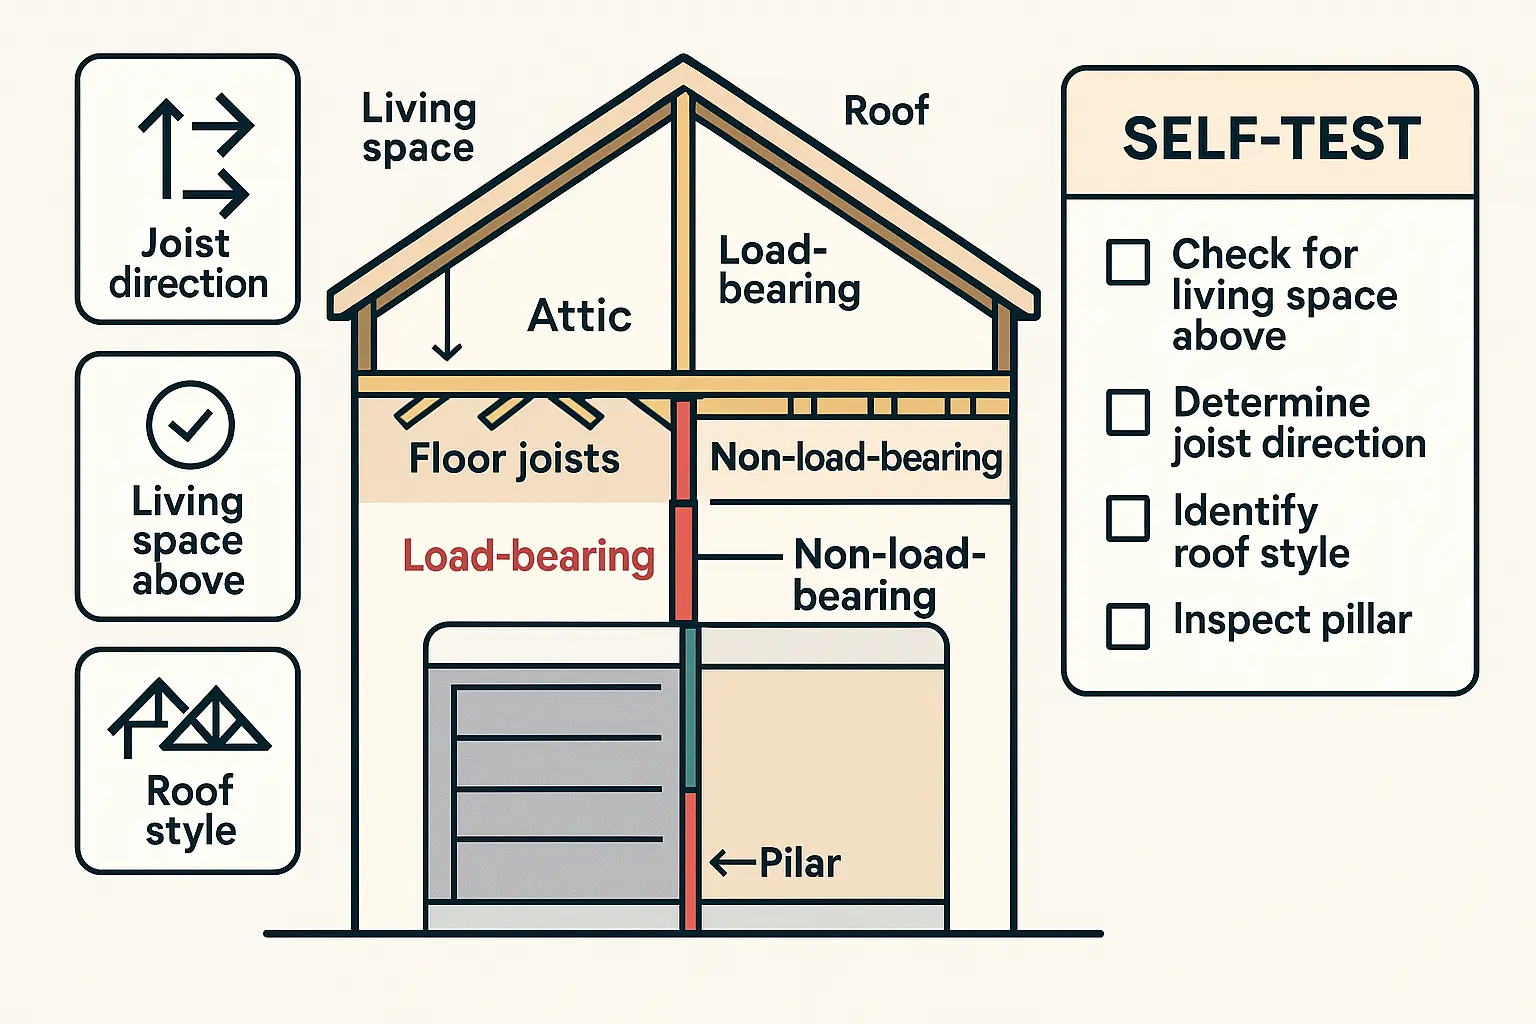
  • Joist Direction: Look into your garage ceiling or attic. If the ceiling joists run perpendicular to the garage door opening, the wall is load-bearing. If they run parallel, the load is distributed to the side walls.
  • Living Space: Is there a bedroom or bonus room located directly above your garage? If so, the center pillar is almost certainly load-bearing, holding up the weight of that entire second-story living space.
  • Roof Construction: Traditional hand-framed roofs rely heavily on load-bearing support walls, whereas modern pre-engineered truss systems often span from outside wall to outside wall without requiring mid-span structural supports.

This diagram teaches how to determine if your garage's center column supports structural loads by examining attic joist directions, upstairs rooms, and roof framing styles. Understanding this prevents costly mistakes during door conversion.

Header Selection: Demystifying LVL vs. Steel Beams


Standard dimensional lumber (like double 2x12s) cannot safely span 16 to 18 feet without bowing under structural loads over time. To ensure long-term stability and prevent roof sagging, professionals use engineered materials:

  • Laminated Veneer Lumber (LVL): This is the industry standard for most residential conversions. Typically, a multi-ply (double or triple) 11-7/8″ or 14″ LVL beam is engineered to easily handle typical roof and joist loads.
  • Steel Beams (RSJ / I-Beams): When structural space is extremely tight or there is a heavy second story above, a steel I-beam is used. It offers maximum structural integrity with a much shallower profile than timber.

The Real-World Cost Matrix: Scenario-Based Pricing


A successful conversion requires professional planning, building permits, and specialized materials.

  • Scenario A: Standard Non-Load-Bearing (Simple Truss Roof): Costs range from $2,500 to $5,500. This includes basic framing adjustments, a continuous LVL header, a mid-range insulated double door, and a standard opener.
  • Scenario B: Load-Bearing with Living Space Above: Costs range from $8,000 to $15,000+. This requires extensive structural engineering plans, heavy-duty steel or multi-ply LVL beams, temporary shoring walls, and exterior siding repairs.

Additional Line-Item Costs:

  • Structural Engineer Assessment: $300 to $2,500 (with hourly consulting rates sitting at $100 to $200/hr).
  • Local Municipal Permits: $150 to $500 for structural framing modifications.
  • Exterior Finishing & Trim Work: $200 to $1,500 depending on siding materials.

De-risking the Double Door: Solving the "Trapped Car" Anxiety


The most common concern homeowners raise in DIY forums is: “If my single double door breaks down, are both of my cars trapped?” This is a valid operational risk, but it is easily mitigated with three simple upgrades:

  1. Add a Battery Backup: Modern code requirements and safety practices recommend installing a battery backup garage door opener so you can safely operate your door even during a total power outage.
  2. Upgrade the Springs: Standard configurations use 10,000-cycle springs. Request a heavy-duty torsion spring vs extension spring setup rated for 20,000 to 25,000 cycles. This significantly reduces the likelihood of sudden mechanical failures.
  3. Install an External Release: Ensure your system has an exterior garage door emergency release lock. This allows you to manually disengage the opener from the outside if power is lost and you have no other entry point.

Two Singles vs. One Double: The Ultimate Comparison Matrix


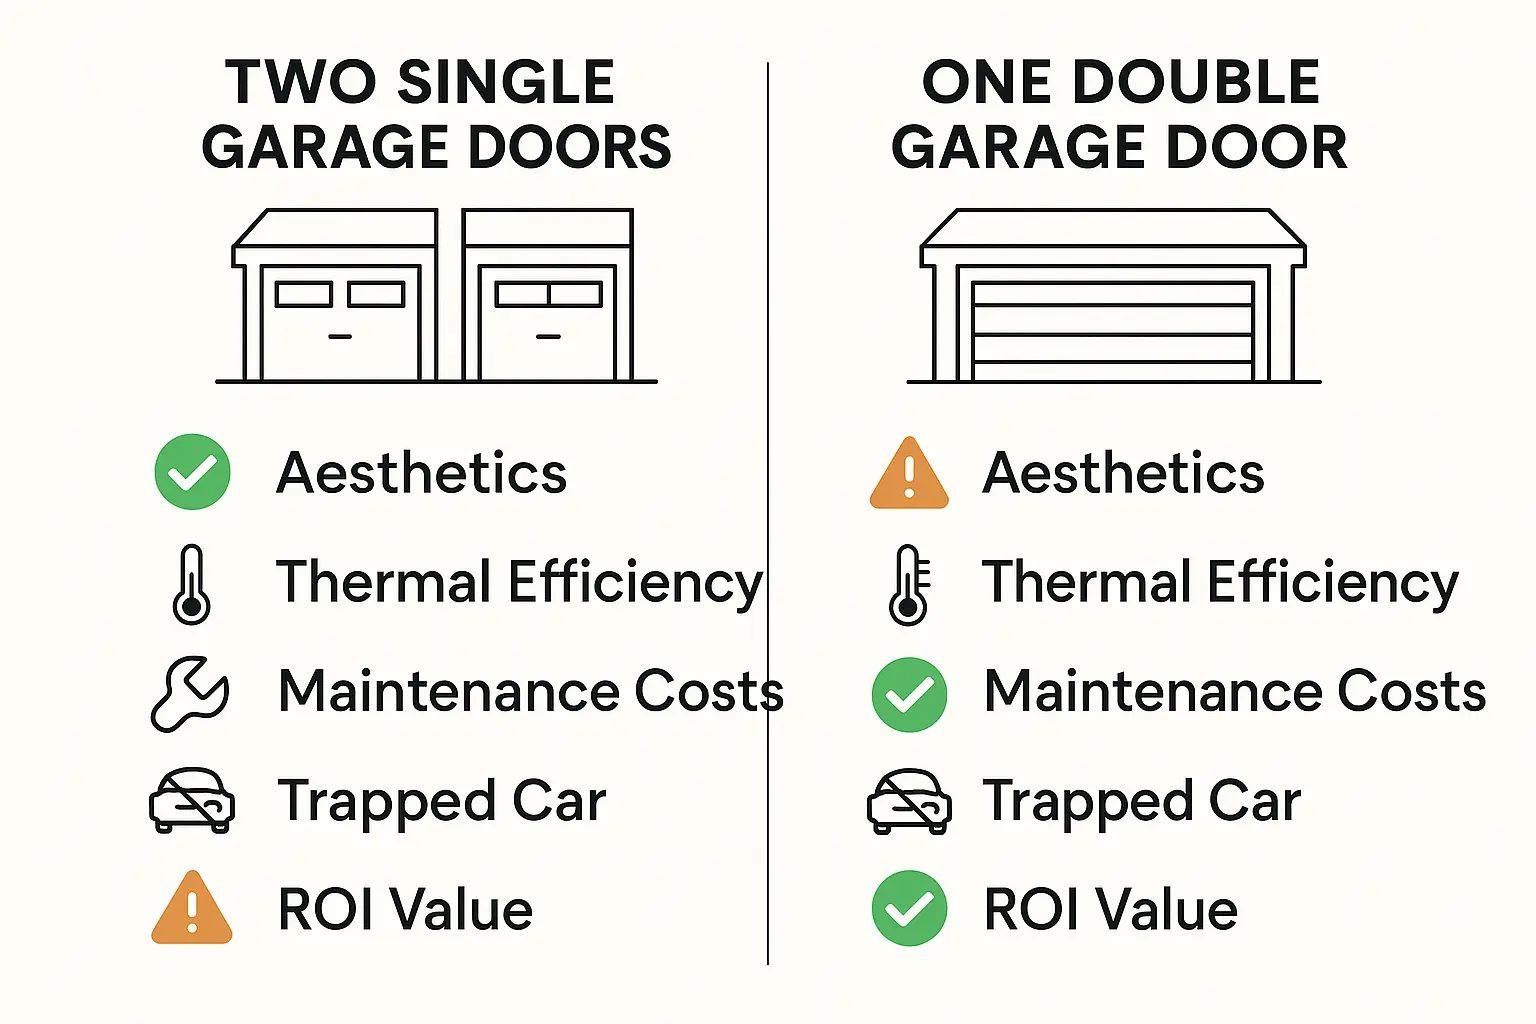
Choosing between these configurations involves balancing aesthetics, thermal performance, and ongoing maintenance. While two single doors look traditional, a single double door offers a cleaner, more contemporary look.

Thermal efficiency is also a key factor. When evaluating the garage door insulation r value, a single double door minimizes drafts by reducing the perimeter gaps where cold air leaks in. Additionally, managing one double door reduces long-term garage door maintenance expenses, as you only need to service one opener and one spring system rather than two.

This comparison infographic helps homeowners remember the key differences between maintaining two garage doors versus converting to one double door to support better evaluation and decision-making.

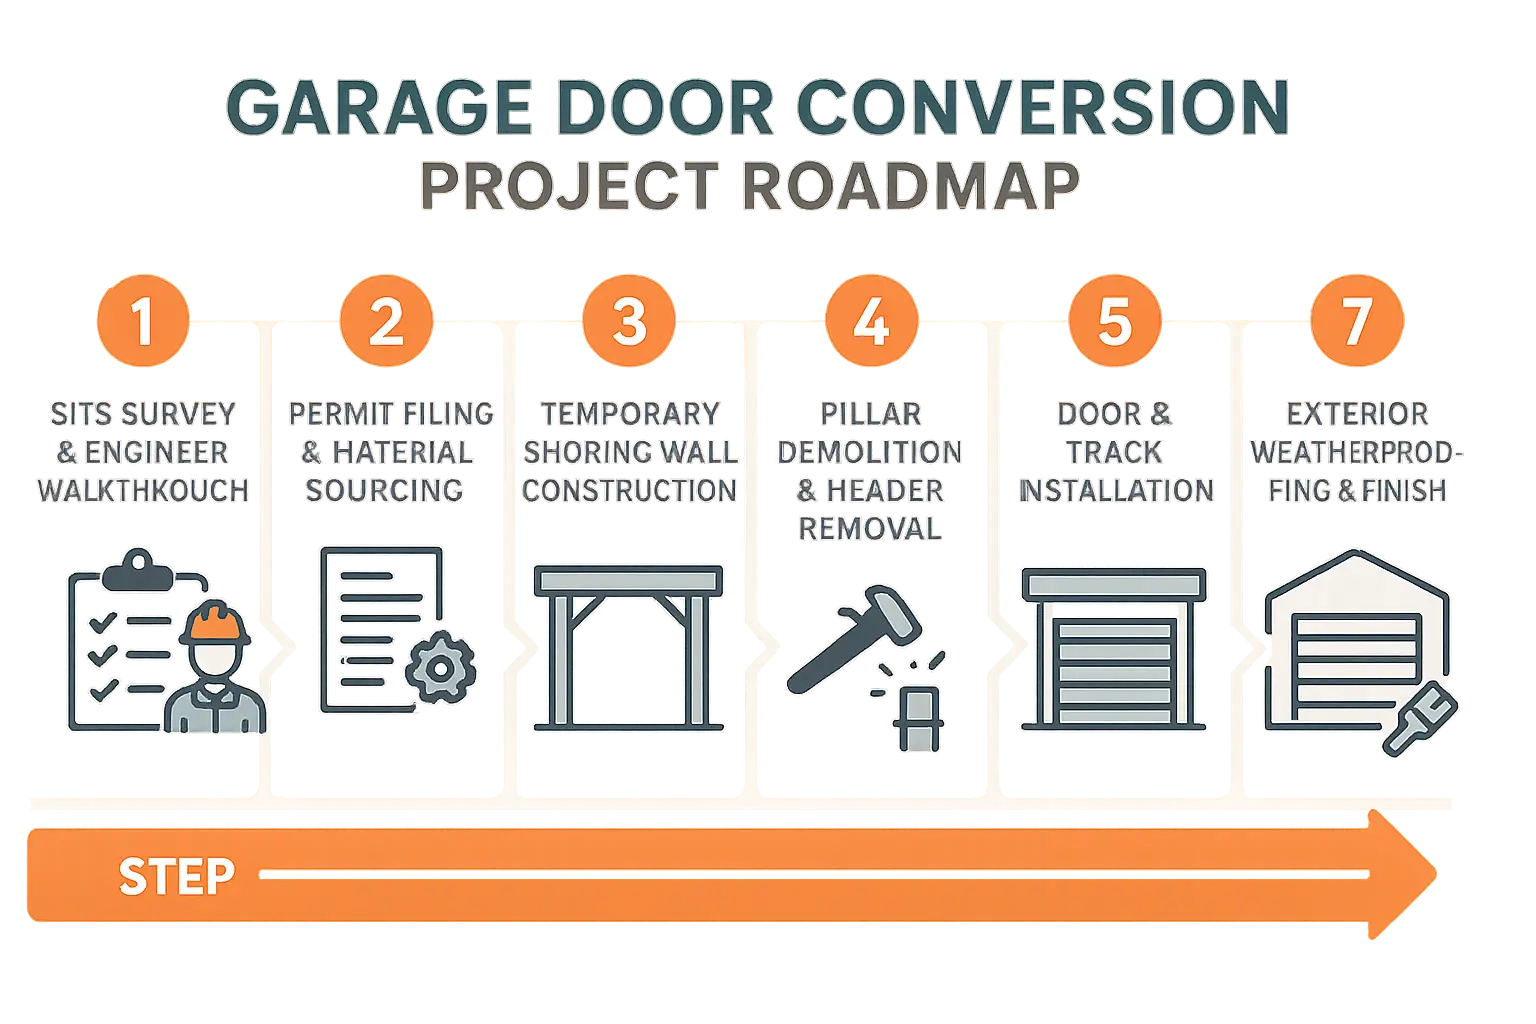
Step-by-Step Project Roadmap (What to Expect)


Executing a seamless single-to-double conversion follows a strict, safety-first timeline:

  1. Site Survey & Engineering: An expert measures and calculates structural loads.
  2. Permitting: Pulling proper municipal permits ensures safety and protects home equity.
  3. Shoring Wall Construction: Building temporary support walls to sustain roof loads during demolition.
  4. Pillar & Header Removal: Safe demolition of the center column and old headers.
  5. New Header Installation: Raising and anchoring the new continuous LVL or steel beam.
  6. Door and Track Installation: Setting up the new tracks, springs, and door panels with precise garage door track alignment.
  7. Weatherproofing & Finishing: Wrapping the exterior trim to match your home’s siding.

This step-by-step flowchart guides homeowners through the entire garage door conversion process, demystifying the sequence of technical and permit actions involved.

Frequently Asked Questions


Do I need a structural engineer for a garage door conversion?

Yes. If the center column is load-bearing, an engineer must calculate the load to design the new header. This ensures your home remains structurally sound and compliant with local building codes.

Will my roof collapse if the center column is removed?

No, provided proper temporary shoring walls are constructed before demolition and a correctly sized engineered beam (LVL or steel) is installed to support the load. This is why professional installation is critical.

What size garage door opener do I need?

A double garage door is significantly heavier than a single door. To ensure smooth, safe operation and prevent premature wear, you should consult a professional garage door opener installation service to determine what size garage door opener do i need, typically requiring a 1/2 HP or 3/4 HP belt-drive motor.

Contact / Request a Call