Garage Door Cable Rubbing the Door Edge: Drum Spacing & Diagnostic Guide


Published: Nov 12, 2026

Friction between a lifting cable and the aluminum edge of your garage door section is more than an annoying scraping noise—it is a clear signal of mechanical misalignment. Under standard operating conditions, overhead doors require a minimum lateral gap of 1/2″ (12.7 mm) to 3/4″ (19 mm) between the active cable winding path and the outer door panel edge.

When component drift reduces this tolerance, the steel cable repeatedly grinds against the door trim. Research from garage door engineering guidelines shows that continuous edge friction can destroy up to 50% of a cable’s structural load capacity within just 30 to 60 operational cycles. Before attempting an emergency fix, identifying whether your problem stems from safe track adjustments or high-risk drum displacement is essential.
Mechanical Root Causes: Why Is the Cable Rubbing the Door Edge?


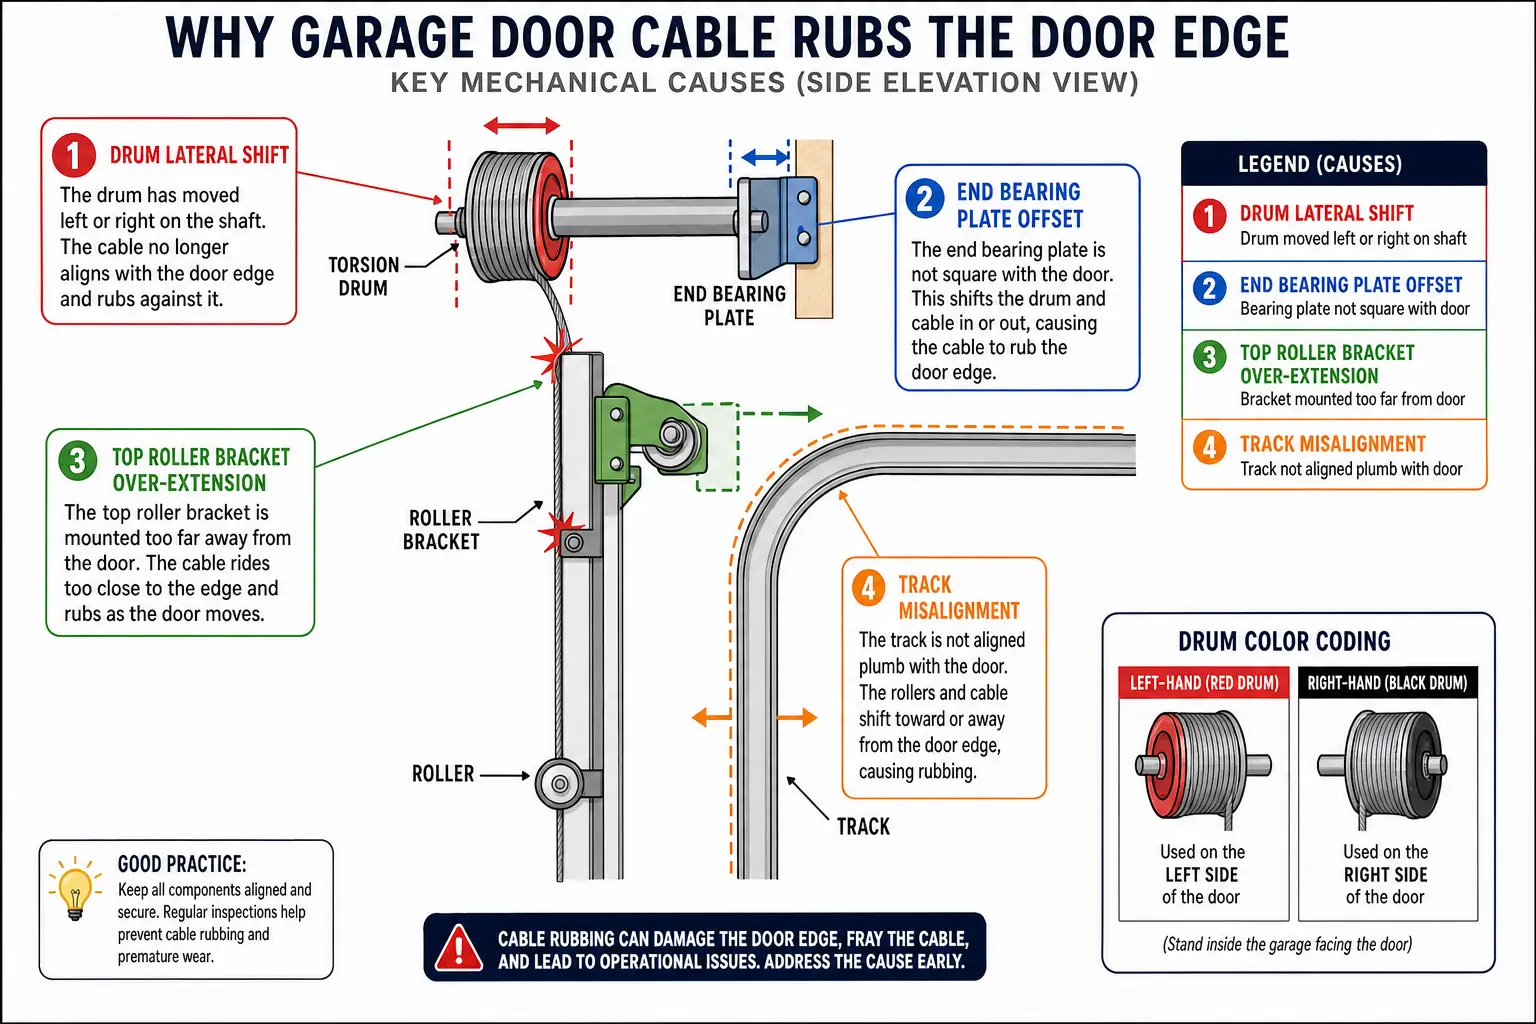
This diagram clarifies the five main mechanical reasons why a garage door cable might rub the door edge, using color-coded areas to identify issues such as lateral drum shift and track misalignment, making abstract mechanical problems concrete and easy to visualize.

Cable scraping is rarely a random symptom. Five specific component shifts account for almost every edge-friction issue in residential overhead doors:

  1. Torsion Drum Lateral Shift (Set-Screw Movement): Cable drums sit secured to the upper torsion shaft by hardened square-head set-screws. If these screws loosen, spring vibration causes the drum to migrate inward along the tube. This shift pulls the active cable line toward the center of the door, causing it to scrape the top section edge. Severe drift often results in uneven garage door cable winding.
  2. Incorrect End Bearing Plate Offset: According to DASMA manufacturing standards, end bearing plates require a precise setback—typically 3-3/8″ to 3-3/4″ from the jamb wall. If a mounting plate bends or settles out of square, the entire shaft tilts out of parallel alignment, bringing the drum too close to the panel line.
  3. Top Roller Fixture Over-Extension: The top roller brackets control how tightly the top section rests against the door header. Over-adjusting these brackets pushes the upper door panel outward into the vertical cable plane.
  4. Track Misalignment & Bracket Shift: Vertical track assemblies can shift inward due to loose wall lag screws. When the track pinches the door panel laterally, the clearance gap vanishes, creating friction that often requires a bent garage door track correction.
  5. Reversed Torsion Drums: Drum grooves are directionally engineered. Standard systems use industry color coding: Red designates the Left-Hand (LH) side and Black designates the Right-Hand (RH) side (viewed from inside the garage looking out). Installing drums on the wrong side forces the cable to feed off the incorrect face of the drum straight into the door trim.
Still stuck? Get it fixed today.
24/7 emergency service from licensed local technicians.
Call (860) 362-3018

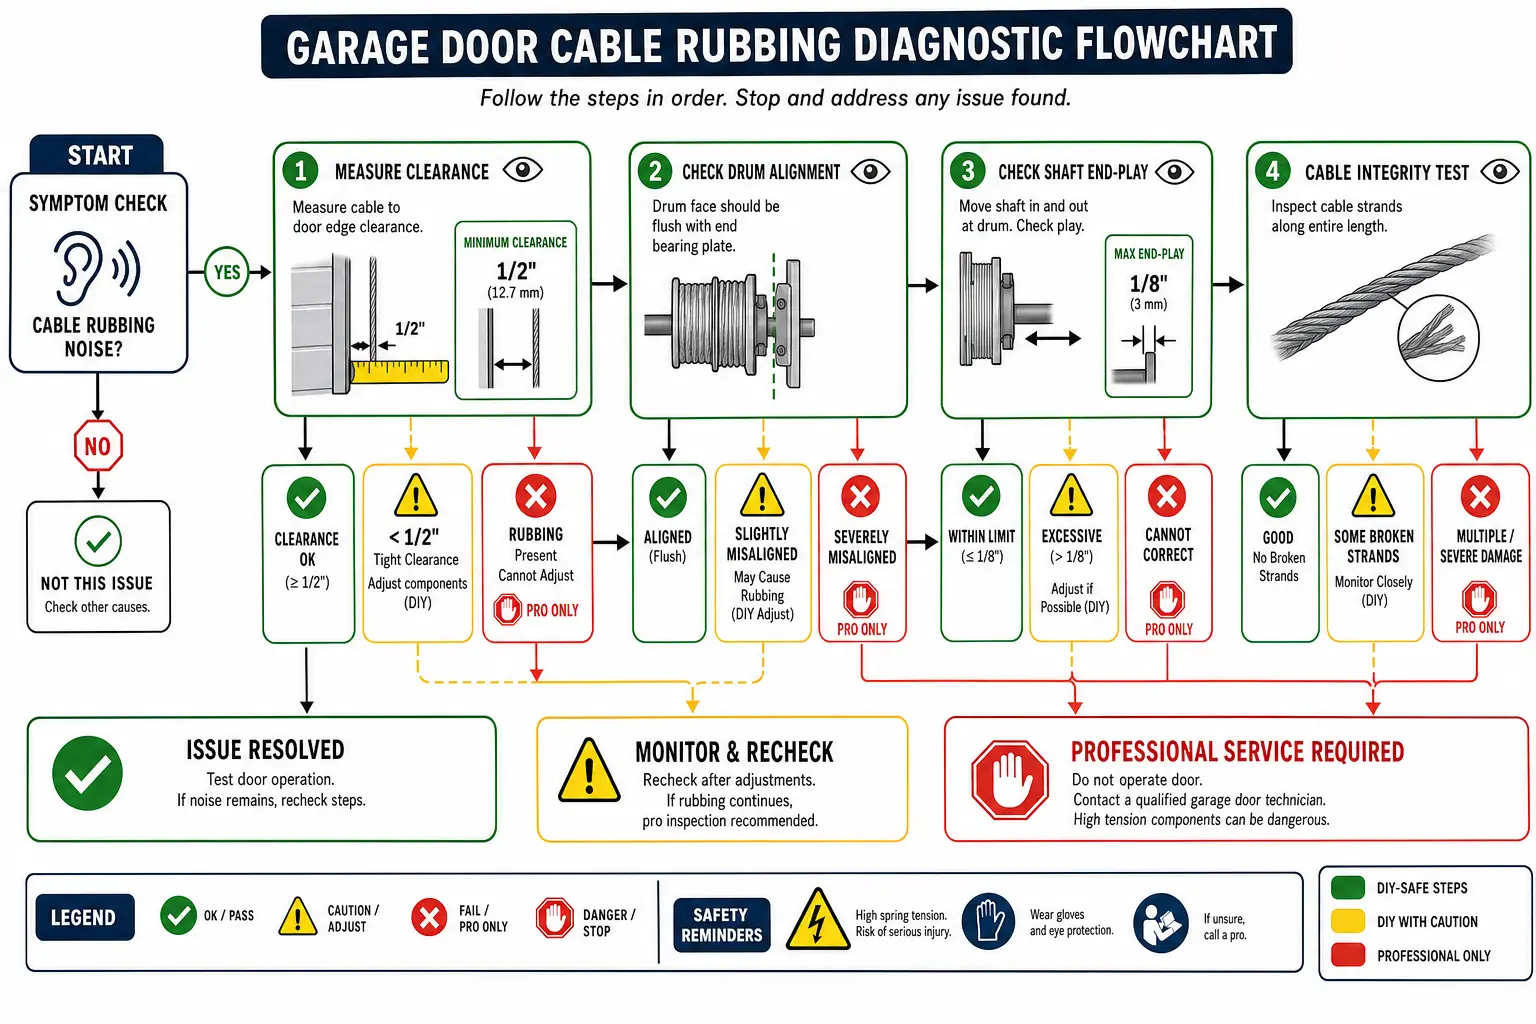
Step-by-Step Diagnostic Inspection Procedure


This diagnostic flowchart simplifies the complex inspection process into easy, safe steps, distinguishing when homeowners can safely troubleshoot and when professional intervention is needed.

Perform this visual inspection with the garage door fully closed to pinpoint the mechanical cause without risking injury:

  • Measure the Clearance Gap: Check the space between the tight lifting cable and the top door panel. If the distance is under 1/2″, clearance is compromised.
  • Inspect Shaft End-Play and Drum Position: Examine the space between the outer face of the cable drum hub and the inner race of the end bearing plate. The drum should sit flush against the bearing race (with no more than a 1/16″ gap). If you see 1/4″ to 1/2″ of exposed shaft, the drum has slipped inward and may require a dedicated garage door drum repair.
  • Perform a Cable Integrity Test: Inspect the cable using a flashlight. Look for metal shavings near the top section edge, crushed strands, or “bird-caging” (outer wire loops separating from the core). Frayed cables require immediate garage door cable repair near me.
  • Verify Drum Color-Coding: Ensure the red drum is installed on your left and the black drum is on your right (facing the door from inside).

DIY vs. Professional Repair: The Safety Triage Matrix


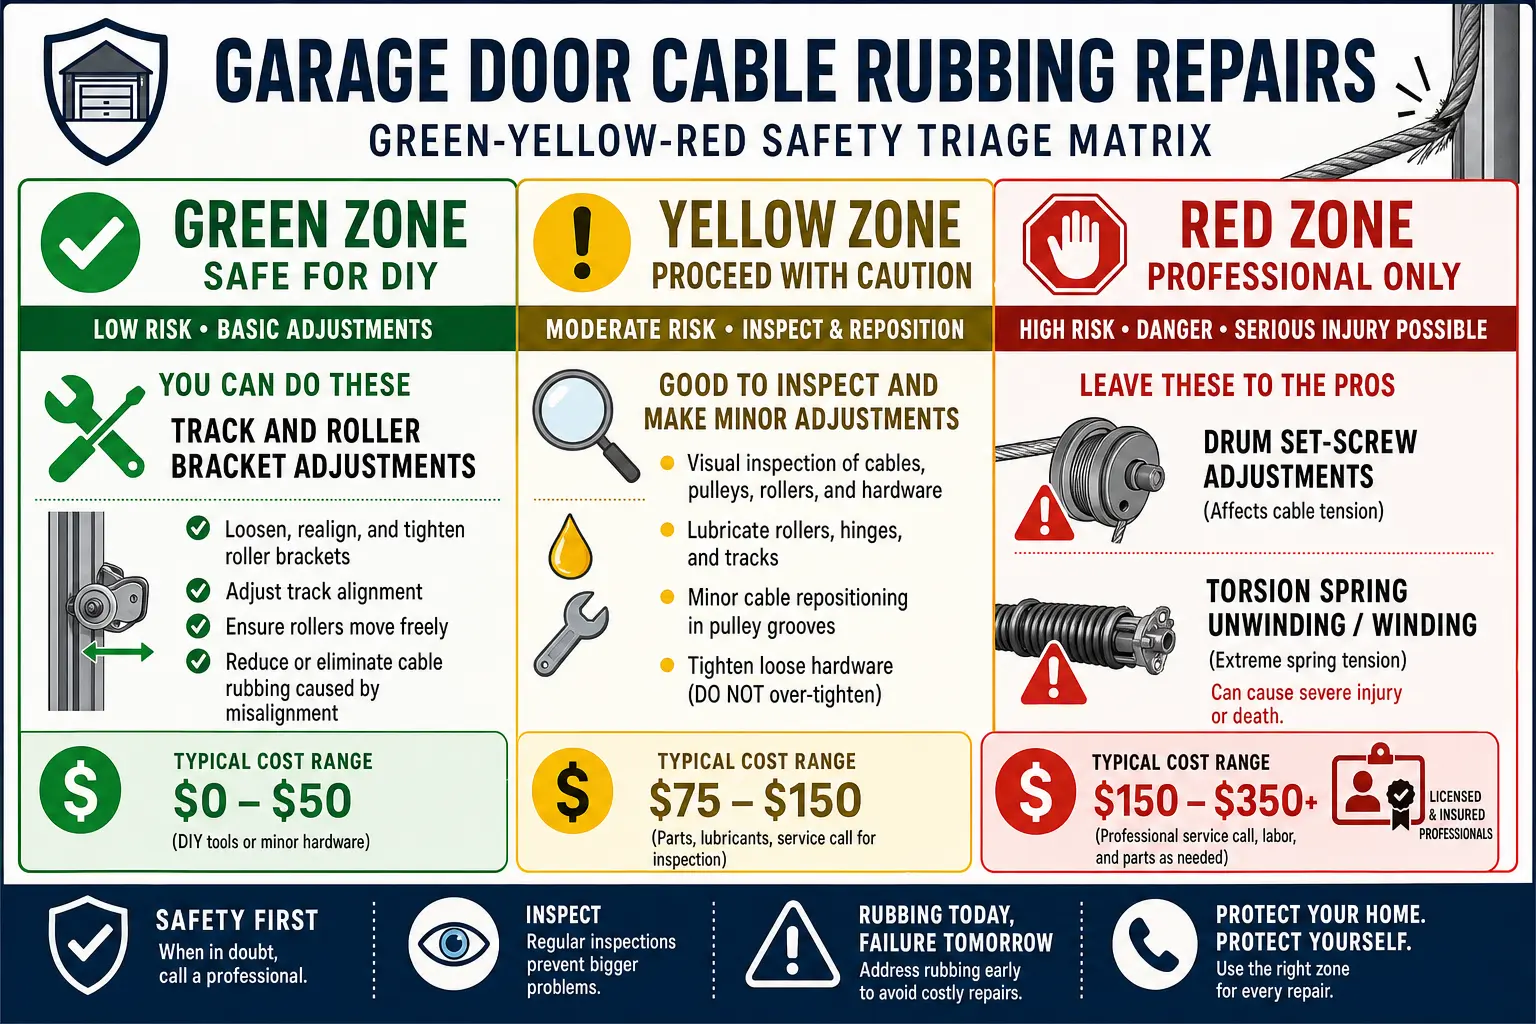
This safety triage infographic memorably categorizes garage door cable rubbing repairs by risk level and cost, helping users quickly recall when to DIY and when to hire a pro.

Evaluating whether to fix this issue yourself or hire a qualified service provider depends entirely on which component requires adjustment. Standard residential torsion springs store 200 to over 400 lbs of rotational force. According to Consumer Product Safety Commission (CPSC) data, attempting to loosen drum set-screws without winding down spring tension is one of the leading causes of overhead door DIY injuries.

Safety Zoning Guidelines

  • Green Zone (DIY Feasible): Adjusting track wall brackets or loosening top roller fixture bolts to restore panel clearance. These parts sit completely independent of spring tension.
  • Red Zone (Professional Only): Loosening cable drum set-screws, shifting the torsion tube laterally, unwinding springs, or replacing frayed steel cables.

Comparative Repair & Risk Breakdown

Repair Option Typical Cost Personal Safety Risk Scope of Work
DIY Track Adjustments $0 – $15 Low (Green Zone) Re-aligning track brackets to restore panel-to-cable clearance.
Professional Drum Realignment $150 – $250 Zero Personal Risk (Red Zone) Safely unwinding torsion springs, resetting drum flush to bearing race, re-tensioning assembly.
Neglected Structural Damage $450 – $900+ High Hazard Replacing snapped cables, gouged door panels, bent tracks, or handling an emergency garage door off track repair cost.

When dealing with high-tension mechanical components, relying on certified professionals for garage door spring repair prevents catastrophic equipment failure and keeps your home safe.

Frequently Asked Questions


Can I lubricate the cable to stop the rubbing noise?

No. Applying grease or oil might temporarily silence scraping noises, but it will not correct drum spacing or track misalignment. Heavy lubricants also collect grit and debris, forming an abrasive paste that speeds up cable strand failure.

How far should the garage door drum be from the bearing plate?

The cable drum hub should sit virtually flush against the inner race of the end bearing plate, maintaining a maximum gap of 1/16″. An exposed gap of 1/4″ or more indicates the set-screws have slipped and the drum has drifted inward.

What happens if a garage door cable snaps under tension?

When a cable breaks under load, the door instantly loses balance and drops toward the damaged side. This sudden shift can bind the rollers, buckle door panels, and pull the entire assembly out of its tracks, leading to extensive property damage.


Restoring proper drum spacing and cable clearance protects your entire garage door system from costly structural damage. If your diagnostic checks reveal Red Zone drum slippage or severe strand fraying, scheduling a professional inspection ensures your door operates smoothly, quietly, and safely for years to come.

Contact / Request a Call