main logo

One Keypad to Rule Them All: Your Guide to Controlling Multiple Garage Doors


Published: Jul 15, 2026

Ever stood in your driveway, fumbling for the right remote, wondering if there’s a simpler way to manage your two—or even three—garage doors? You’re not alone. The great news is that you can absolutely ditch the juggling act. It’s entirely possible to control multiple garage doors with a single, conveniently mounted keypad.

The common misconception is that you just enter one code and all your doors magically open. The reality is a little different, but just as simple once you understand the "aha" moment: you're teaching each garage door opener to listen to the same keypad, but respond to slightly different commands.

Think of it like having two phones with the same ringtone. When a call comes in, you need a way to know which one to pick up. Your keypad does something similar by sending a unique signal for each door. In this guide, we'll walk you through the entire process, from checking compatibility to programming your keypad like a pro.
Before You Begin Programming


Jumping straight to pressing buttons can lead to frustration. A few minutes of prep work will ensure a smooth process.

Step 1: The All-Important Compatibility Check

Not all keypads can talk to all openers, especially when you're mixing and matching. Here’s what to look for:

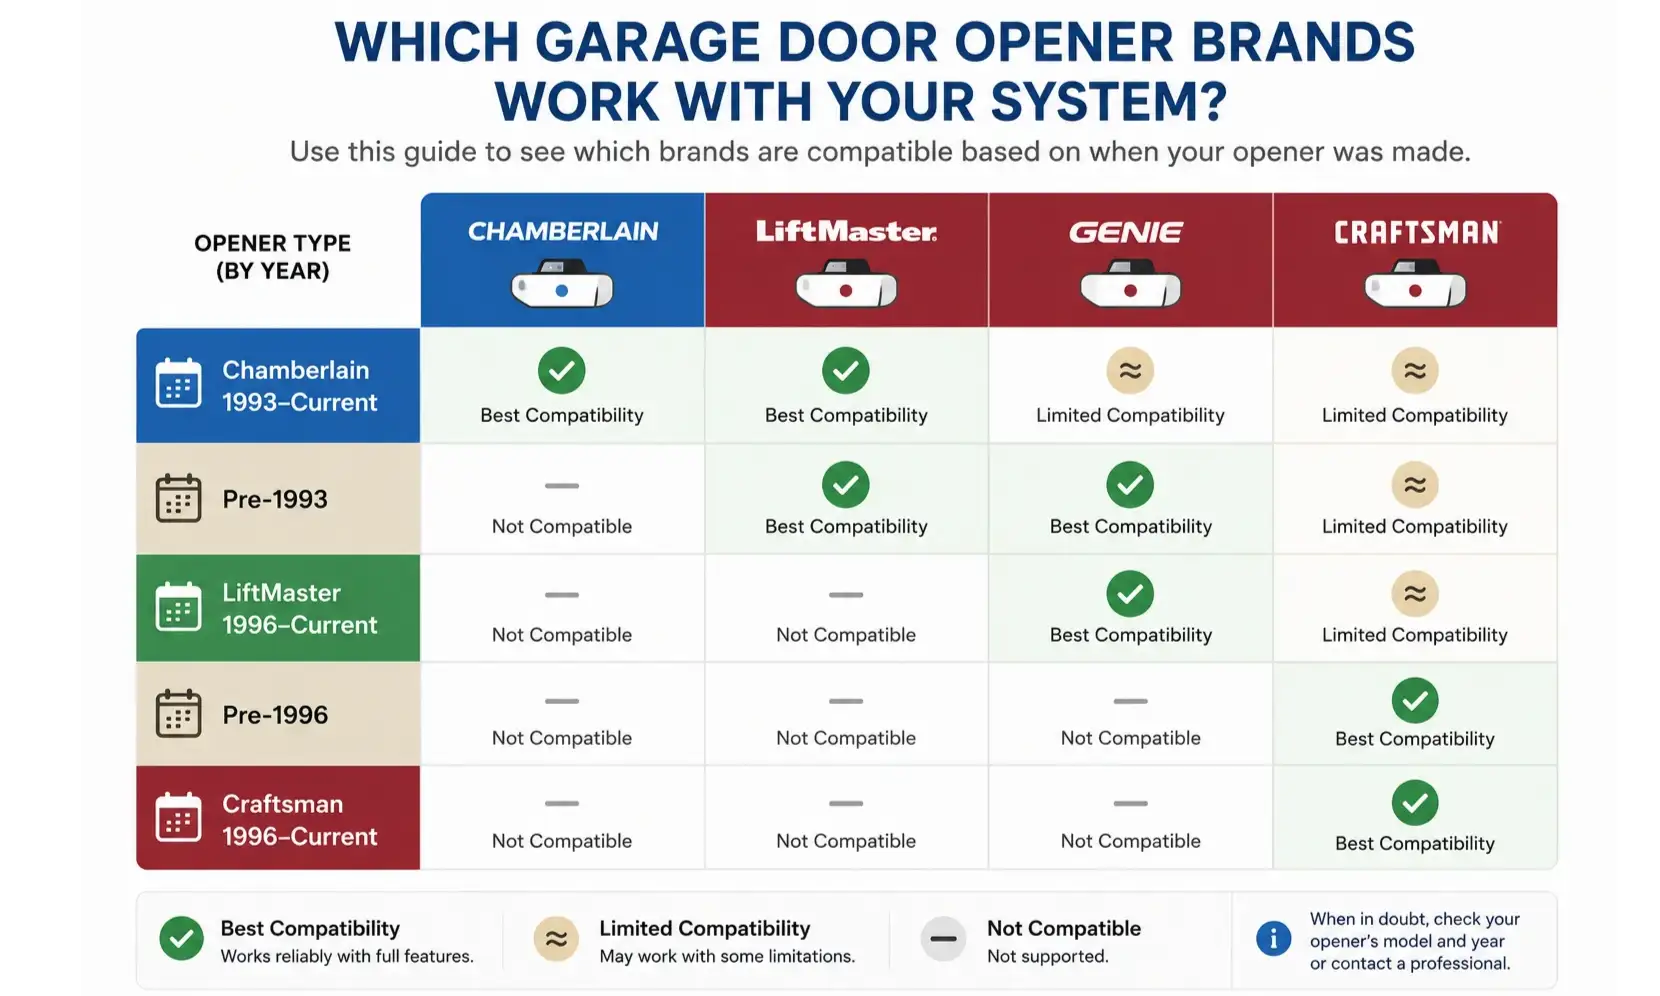
Brand Harmony: The easiest setup is when your keypad and both of your garage door openers are from the same manufacturer (e.g., Chamberlain keypad with two Chamberlain openers).

Universal Keypads: If you have openers from different brands, a universal keypad is your best friend. These are designed to speak the language of most major manufacturers.

Rolling Code vs. Fixed Code: Modern openers use "rolling code" technology, which changes the access code every time you use it to prevent theft. Older models might use a fixed code. Your keypad must be compatible with your opener's technology.
Compatibility chart to quickly evaluate which keypad models support your garage door opener brand and year, simplifying the purchase decision for multi-door keypad setups.

Step 2: Gather Your Tools

You won't need much, but having these on hand will save you a trip back inside:

• Your wireless garage door keypad

• A sturdy ladder to safely reach your garage door opener units

• The user manuals for your keypad and openers (if you have them)

Step 3: The Golden Rule of Multi-Door Programming

Here’s the most important concept to grasp: You must program one door completely, then start the process over for the second door. You are creating two separate connections. Trying to do both at once is the number one reason for failure, often causing the first door to stop working after you program the second.
Compatibility chart to quickly evaluate which keypad models support your garage door opener brand and year, simplifying the purchase decision for multi-door keypad setups.

The Universal Programming Process: A 4-Step Overview


While specific steps vary by brand, the general garage door keypad programming follows a universal logic:

1. Activate "Learn" Mode: You'll press a "Learn" or "Program" button on the motor unit of your first garage door opener.

2. Enter Your Code: On the keypad, you'll type in your desired Personal Identification Number (PIN).

3. Send the Signal: You'll press a specific button on the keypad (often the "Enter" or "#" key) to send the PIN to the opener.

4. Confirm the Connection: The opener's lights will blink, or you'll hear a click, confirming it has learned the new keypad code.

You'll then repeat this exact process for your second garage door, using the same PIN but telling the keypad to operate Door #2.

Brand-Specific Programming Walkthroughs


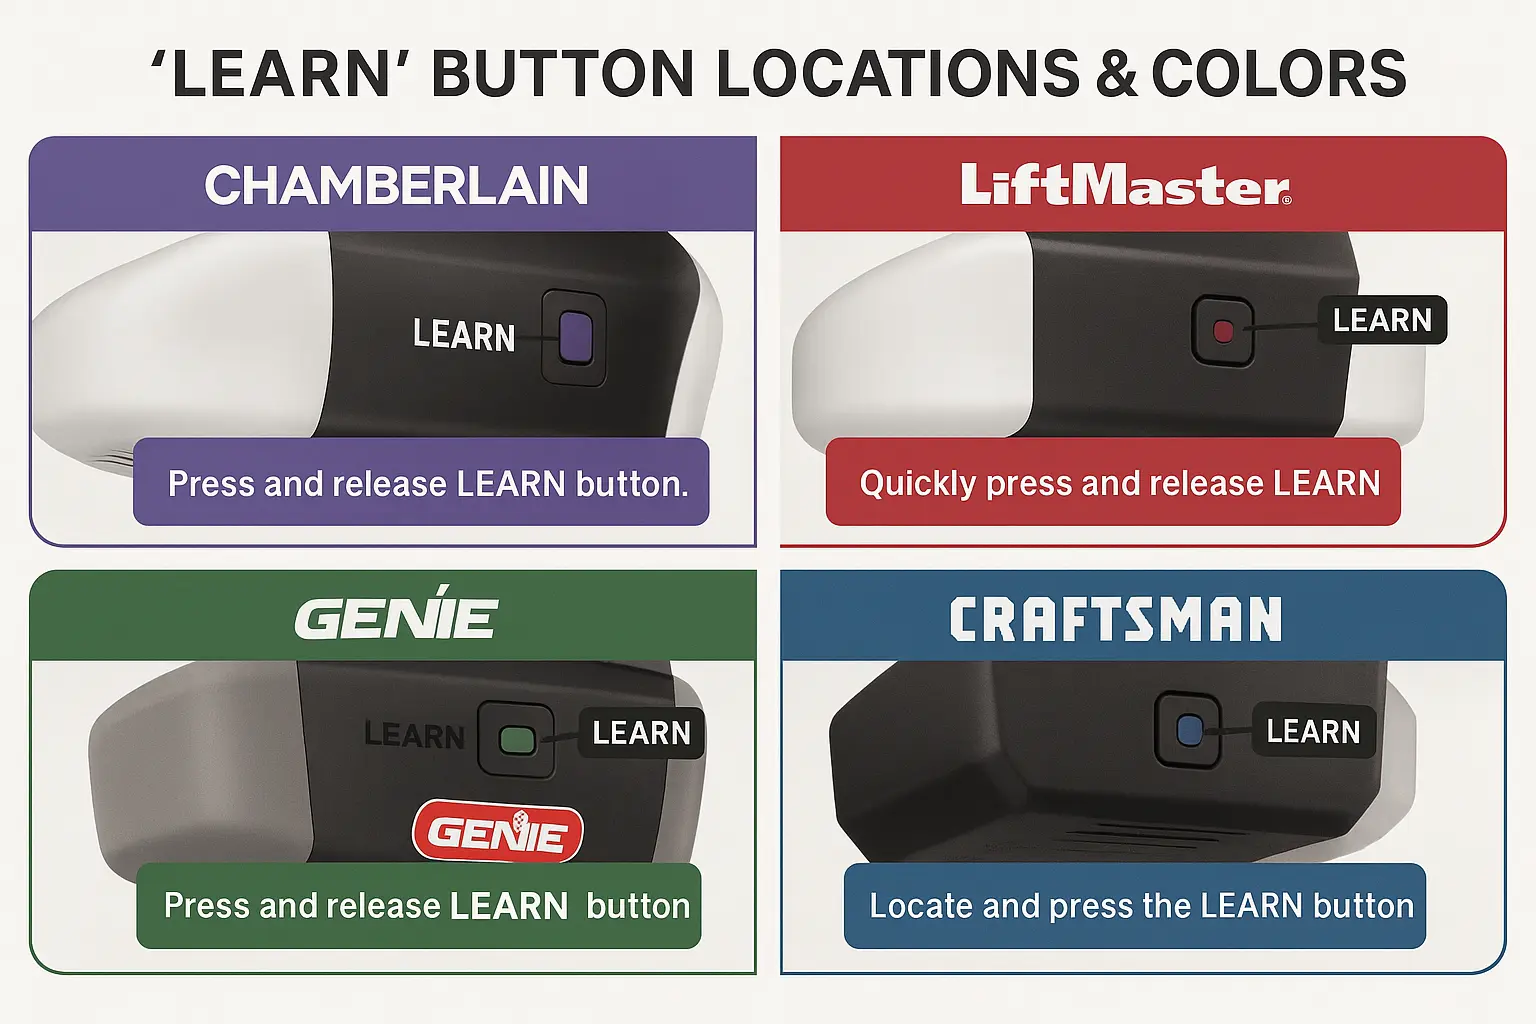
This is where the details matter. The color and location of the "Learn" button are your primary guides.

For Chamberlain, LiftMaster & Craftsman (with "Learn" Buttons)

These brands often use a similar programming sequence.
Programming Door #1:
1. Press and release the "Learn" button on the first garage door opener motor unit. The indicator light will glow steadily for about 30 seconds.
2. Within those 30 seconds, enter your chosen 4-digit PIN on the keypad.
3. Press and hold the ENTER button until the opener light blinks or you hear two clicks.
4. Test the keypad by entering your PIN and pressing ENTER. The first door should operate.
Visual guide of 'Learn' button locations and colors for major garage door brands to enhance programming confidence and reduce setup errors when using a single keypad for multiple doors.
Programming Door #2:
1. Press and release the "Learn" button on the second garage door opener.
2. Within 30 seconds, enter the same 4-digit PIN on the keypad.
3. Press the ENTER button the number of times that corresponds to your opener type (often just once for modern systems, but check your manual).
4. To exit programming mode, press and hold the 0 key on the keypad.
5. Wait for the keypad lights to turn off. The key is telling the system which door to control, a step often missed in other guides.

For Genie & Overhead Door (Intellicode)

Genie systems have a slightly different but equally straightforward process.
Programming Door #1:
1. Press and release the "Program/Set" button on the first opener until the round LED turns blue.
2. Once the long LED blinks purple, enter your 3-8 digit PIN on the keypad.
3. Press the Up/Down key on the keypad once. The LEDs on the opener will change.
4. Press the Up/Down key again to confirm. The first door is now programmed.
Programming Door #2:
1. Repeat the process on the second opener motor unit.
2. When programming is complete for both doors, you'll typically enter your PIN, press Up/Down, then press 1 for the first door or 2 for the second.

Visual guide of 'Learn' button locations and colors for major garage door brands to enhance programming confidence and reduce setup errors when using a single keypad for multiple doors.

Troubleshooting: When Things Go Wrong


Even with careful steps, you might hit a snag. Before you panic, let's walk through the most common issues. If you find yourself completely stuck, sometimes the best option is to reset garage door keypad memory and start fresh.

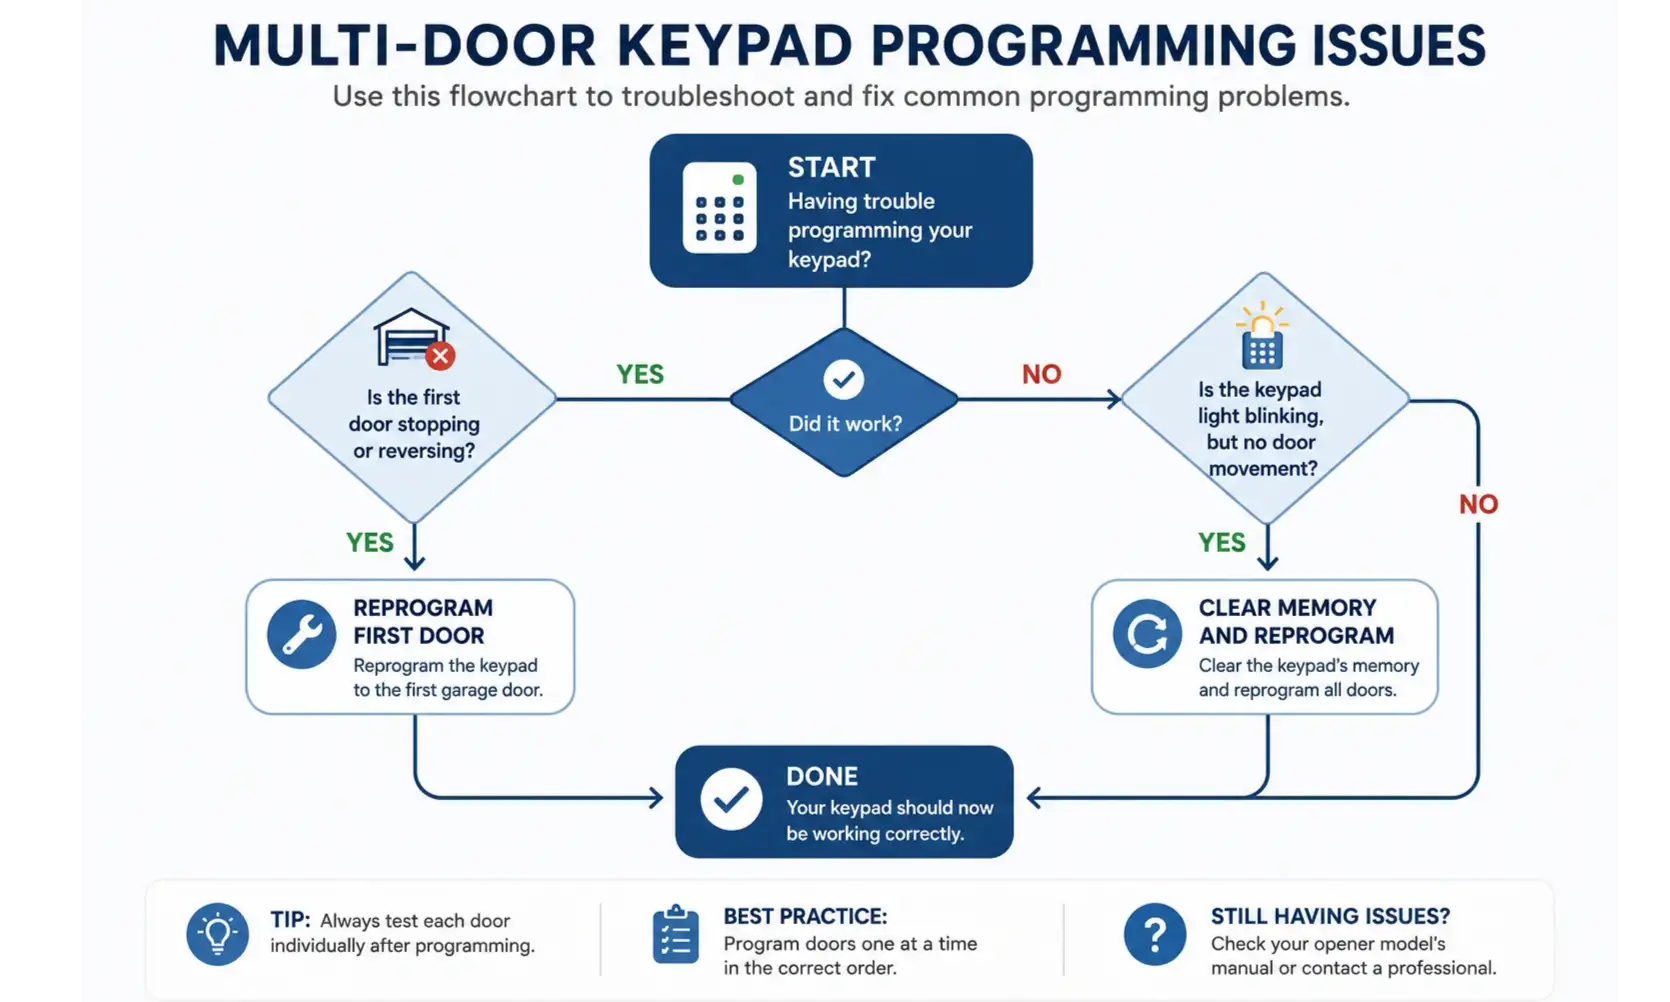
Problem: "My first door stopped working after I programmed the second one!"

- Solution: This is the classic symptom of not exiting programming mode correctly or the keypad overwriting the first door's code. The fix is to reprogram garage door keypad for both doors, making sure to follow the exit steps (like pressing "0" on a Chamberlain) precisely before testing.
Step-by-step troubleshooting flowchart to resolve frequent issues in programming multiple garage doors with one keypad, reducing user anxiety and encouraging completion of setup.


Problem: "The keypad lights up, but the door doesn't move."

- Solution: First, replace the battery in the keypad. Cold weather can drain batteries surprisingly fast. If that doesn't work, check if the wall control panel inside your garage is "locked." This feature deactivates all remotes and keypads for security. Finally, a power surge can sometimes cause issues; you may need to look into power surge garage door opener solutions if this happens frequently.


Problem: "I can't get the opener into 'Learn' mode."

- Solution: Pressing the "Learn" button for too long (over 6 seconds on most models) can erase all programmed remotes and keypads. A short, firm press-and-release is all that's needed. If the button isn't responding at all, it might signal a deeper issue requiring a professional to repair garage door opener.
Step-by-step troubleshooting flowchart to resolve frequent issues in programming multiple garage doors with one keypad, reducing user anxiety and encouraging completion of setup.

Using Your Multi-Door Keypad Day-to-Day


Congratulations, the hard part is over! Now, how do you use it? The "door selection" step is key.
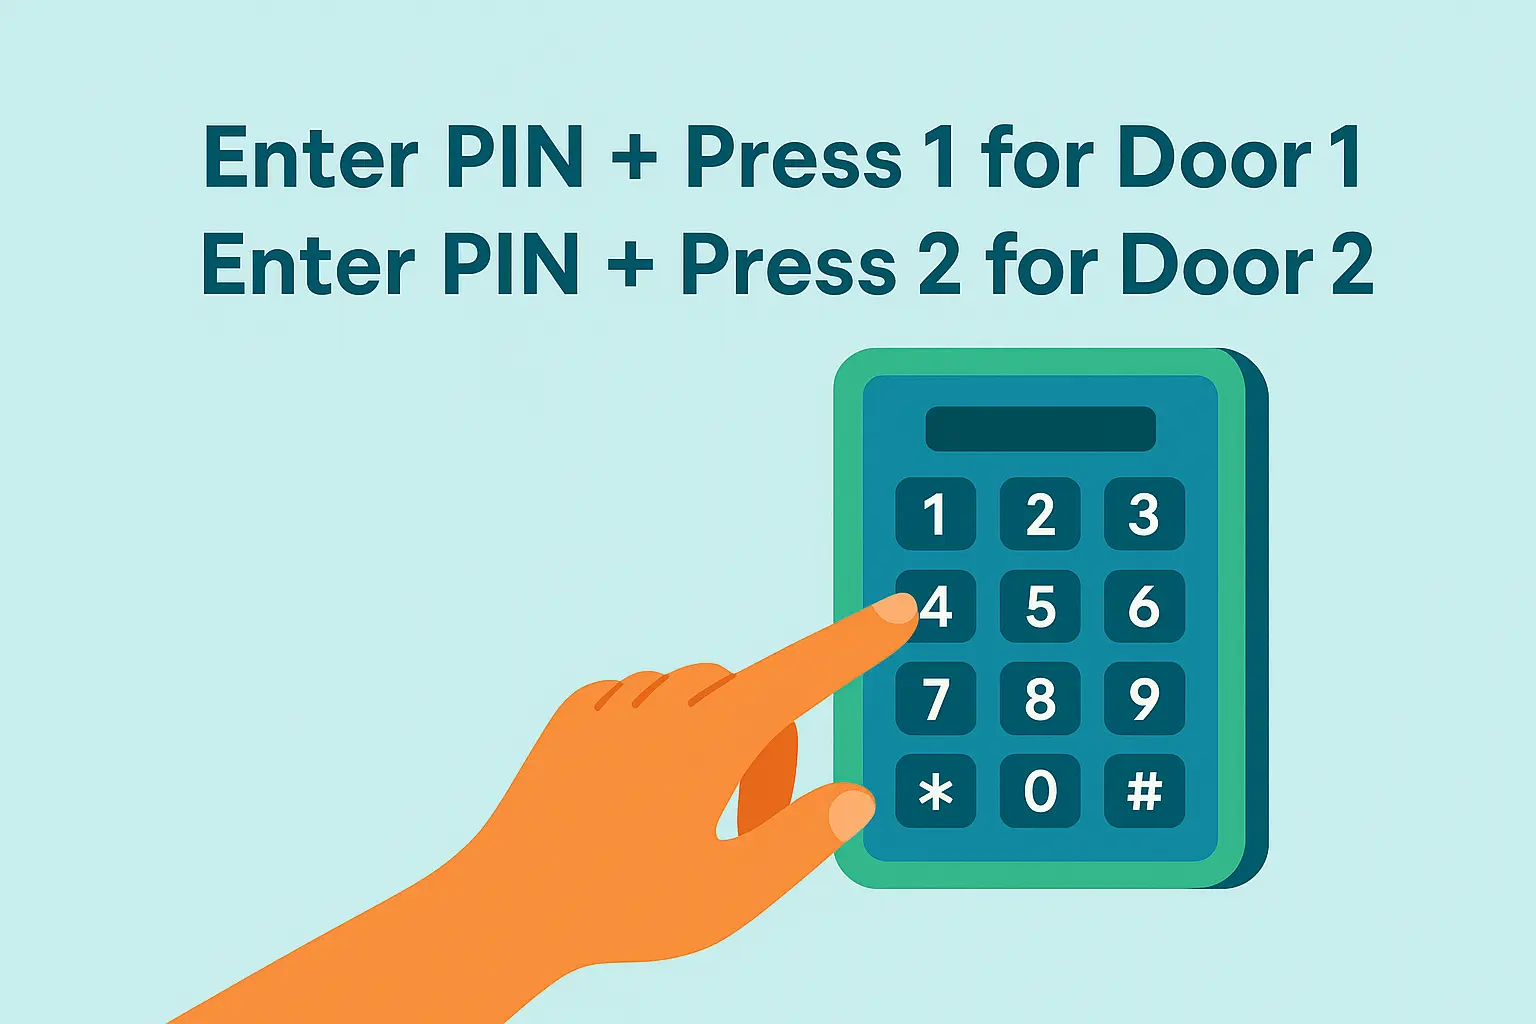
Simple user instruction visual clarifying how to operate multiple garage doors with one keypad, empowering confident everyday use and choice clarity.


For most systems, the daily operation looks like this:

1. Enter your 4-digit PIN.

2. Press the ENTER or Up/Down button.

3. Press 1 to operate Door #1 or 2 to operate Door #2.

The door you selected will then open or close. It’s a simple, elegant solution that consolidates access and reduces clutter. For those who also use handheld remotes, learning how to program multiple garage door openers to a single device follows a similar logic.
Simple user instruction visual clarifying how to operate multiple garage doors with one keypad, empowering confident everyday use and choice clarity.

Frequently Asked Questions (FAQ)


Do I absolutely need two separate keypads for two garage doors?

No, you don't. A single multi-door or universal keypad is designed specifically for this purpose, saving you money and hassle.

What exactly is a universal garage door keypad?

A universal keypad is an aftermarket device built to communicate with openers from various manufacturers. It's the perfect solution if you have, for example, a LiftMaster opener on one bay and a Genie on the other.

Is there a specific order I should program the doors in?

No, the order doesn't matter. What matters is that you complete the programming for the first door entirely before you begin the process for the second door.

What if my keypad is blinking but nothing is happening?

A blinking light is usually an error code. Most often, it means the battery is low or you've entered the wrong PIN. Check the battery first, then try re-entering your code slowly and deliberately.

How far away can I mount the keypad from the garage door?

Wireless keypads have a limited range, typically 30-60 feet. For best results, mount it within a clear line of sight to the garage door antennas. The full process of garage door keypad installation provides more detail on optimal placement.

Your Path to a Simpler Garage


Setting up a single keypad for multiple doors is a project that adds immense convenience to your daily routine. By understanding the core concept—that you're creating individual connections to each door—and following the specific steps for your brand, you can easily achieve a streamlined, one-touch-access system.

If you're building a new home with multiple garage bays or considering a full system upgrade, professional garage door installation near me can ensure that your openers, remotes, and keypads are perfectly integrated from day one.