Master the Mount: The Complete DIY Guide to Garage Door Keypad Installation and Programming


Published: Sep 16, 2026

Adding a wireless exterior keypad is one of the quickest ways to upgrade your home’s security and convenience. For most homeowners, the decision comes down to a simple trade-off: is this a quick weekend project, or do you need to hire a professional?

Fortunately, modern keypads are 100% wireless, run on 9V batteries, and communicate via radio frequencies. This means you do not need to run complex high-voltage wiring down your siding. With a ladder, a screwdriver, and about fifteen minutes, you can successfully configure your system. This guide walks you through the core evaluation criteria, technical programming decoders, and physical mounting strategies to ensure a seamless installation.
The DIY vs. Professional Installation Decision Matrix


Before purchasing a keypad, decide whether a DIY path fits your specific setup. A basic retail keypad costs between $30 and $60. If you choose to install garage door keypad accessories yourself, your only investment is the hardware and your time.

However, professional installation offers distinct advantages if you are dealing with legacy systems, complex multi-door programming, or integrated smart-home ecosystems like myQ. While a local professional ensures your physical hardware is perfectly synced and carries a service warranty, a standard wireless installation is highly manageable for any confident DIYer who understands frequency compatibility.

The Universal Learn Button Decoder


The single biggest roadblock DIYers face is cross-brand compatibility. Most homeowners assume that the brand name on the front of their garage door motor dictates the programming protocol. In reality, the manufacturing landscape is highly consolidated.

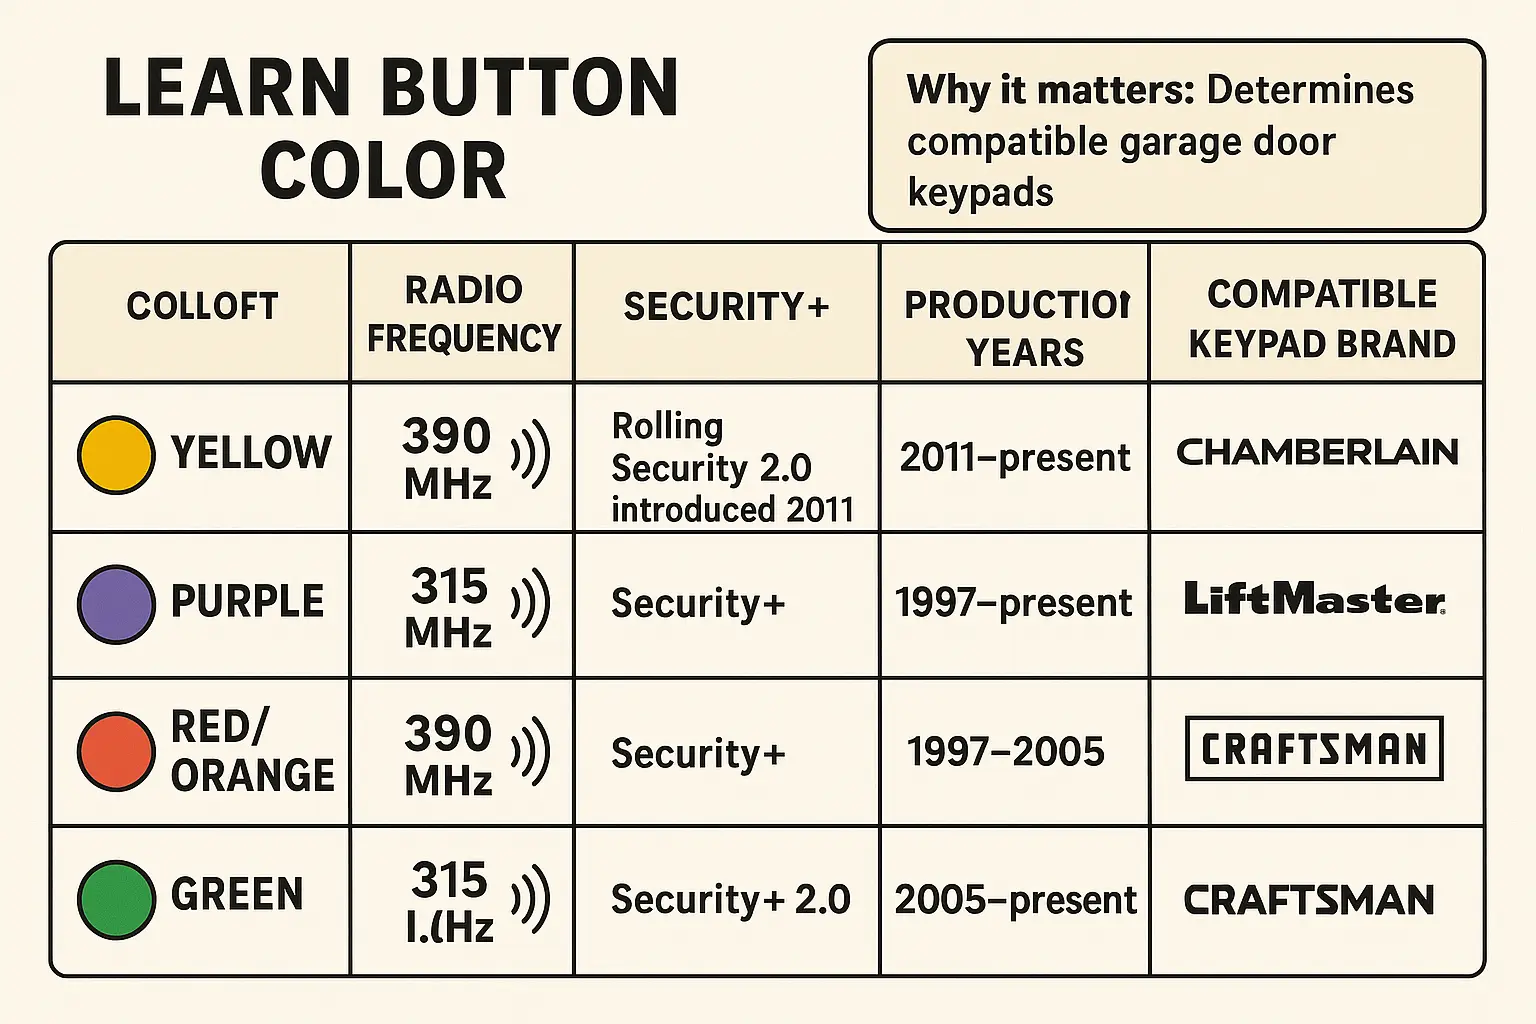
For instance, Chamberlain, LiftMaster, and Craftsman units are mechanically identical and built by the Chamberlain Group. The definitive key to unlocking your system is not the logo—it is the color of the physical programming button on your motor head. You must locate this button to match your keypad’s programming frequency. If you are unsure of its physical location, consult our comprehensive guide on where is the learn button on garage door opener units to identify it instantly.

  • Yellow Button (Security+ 2.0 / 310 MHz): Manufactured from 2011 to Present.
  • Purple Button (Security+ / 315 MHz): Manufactured from 2005 to 2015.
  • Orange/Red Button (Security+ / 390 MHz): Manufactured from 1997 to 2005.
  • Green Button (Billion Code / 390 MHz): Manufactured from 1993 to 1997.
  • Genie & Overhead Door (Intellicode): Typically utilizes a physical learn button under the light lens cover, working on dual frequencies (315/390 MHz).
  • Legacy Systems: Older systems (pre-1993) often rely on manual slide switches. To configure these, you must understand what is a dip switch garage door opener coding to manually align your physical switches.

This Learn Button Decoder visually links button color with radio frequency and brand compatibility, helping DIYers instantly identify which keypad programming method to use.

Physical Installation and Optimal Mounting Placement


Where you physically mount your keypad directly impacts its signal strength, mechanical lifespan, and physical security. Follow these structural best practices:

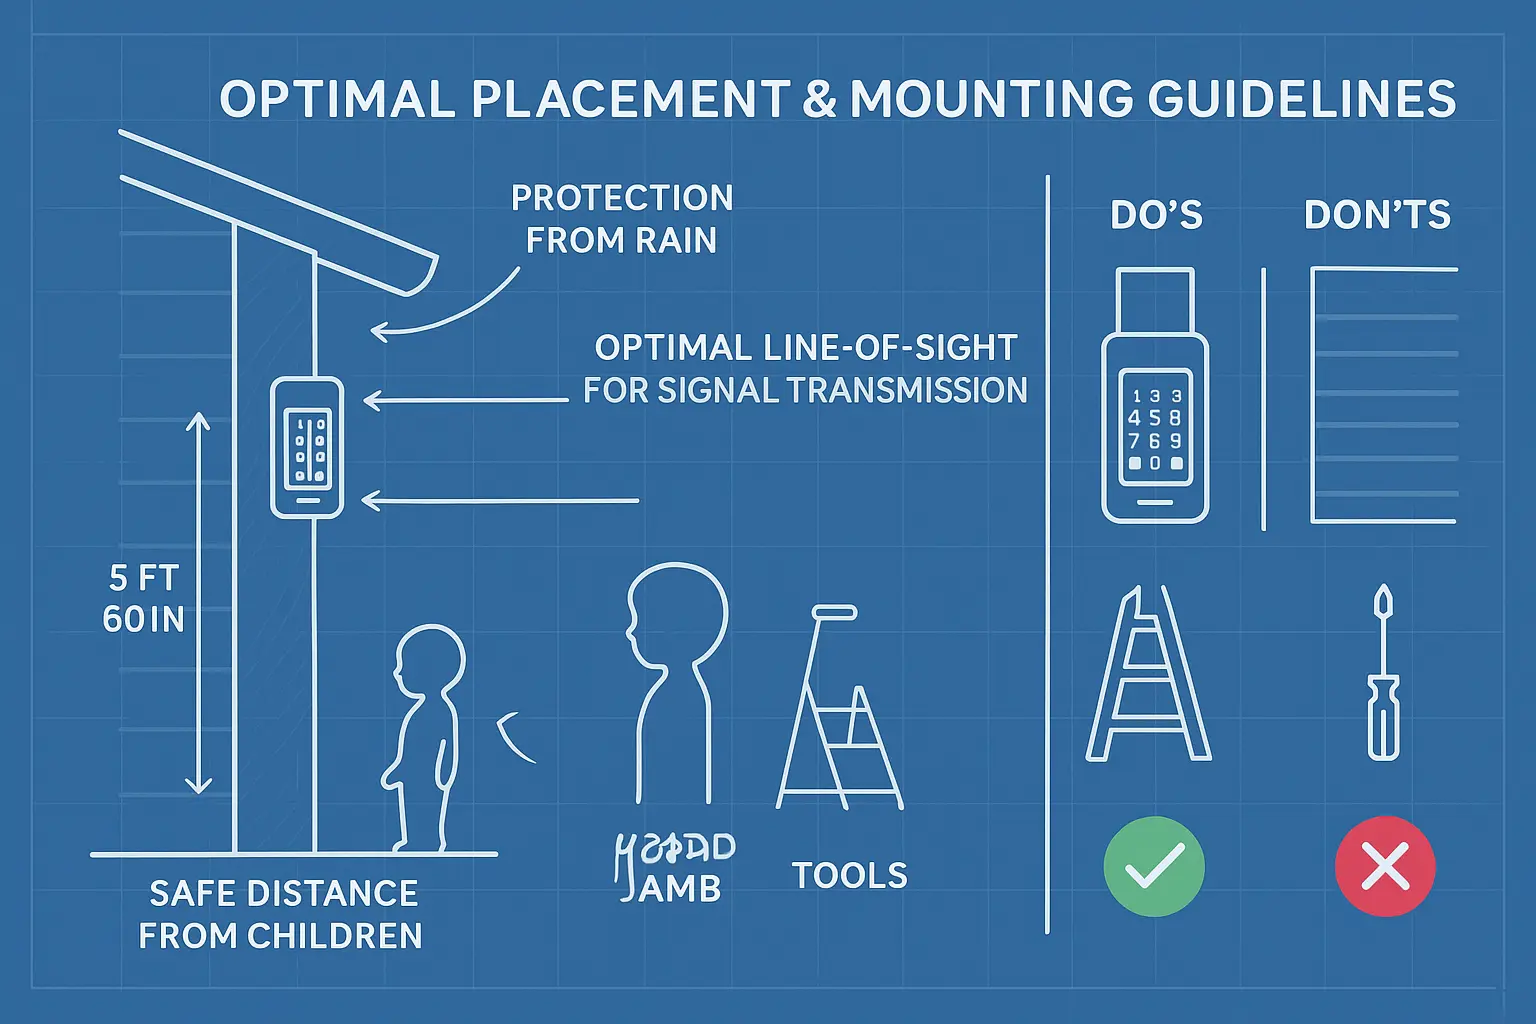
  1. Height: Mount the keypad exactly 5 feet (60 inches) off the ground. This height keeps the pad out of reach of small toddlers, complies with general ADA accessibility standards, and provides a clear line-of-sight signal to your garage receiver.
  2. Substrate Selection: Always mount the keypad directly to the exterior wooden door jamb. Avoid mounting directly onto metal siding, aluminum wrapping, or steel frames. Metal absorbs and blocks radio frequency signals, severely degrading your range and leading to intermittent button responses.
  3. Environmental Protection: While modern keypads are weather-resistant, mounting them in a location partially sheltered from direct rainfall prevents moisture intrusion and stops the keypad buttons from wearing down prematurely.

This mounting blueprint guides homeowners through best practices for physically installing their garage keypad for optimal performance, safety, and durability.

Step-by-Step Programming Masterclass


To program your keypad, start by clearing out any outdated configuration data. Knowing how to reset garage door code parameters before programming prevents software signal conflicts.

  1. Prep the Opener: Climb your ladder and access the motor head. Press and hold the Learn Button until the adjacent indicator LED turns off (approximately 6 seconds). This clears the receiver’s memory.
  2. Initiate Programming: For a standard Chamberlain, LiftMaster, or Craftsman keypad, press the physical Learn Button on the motor once (do not hold it). The indicator LED will glow steadily for 30 seconds.
  3. Enter Your PIN: Within those 30 seconds, walk to your keypad, type in your desired 4-digit PIN, and hold down the ENTER button.
  4. Confirm Sync: Hold ENTER until the overhead light bulbs on your garage opener motor blink, or you hear two distinct clicking sounds. This audible or visual signal confirms the programming is complete. If you are configuring a dedicated LiftMaster system, you can find hyper-focused steps in our guide on how to program liftmaster garage door opener units.

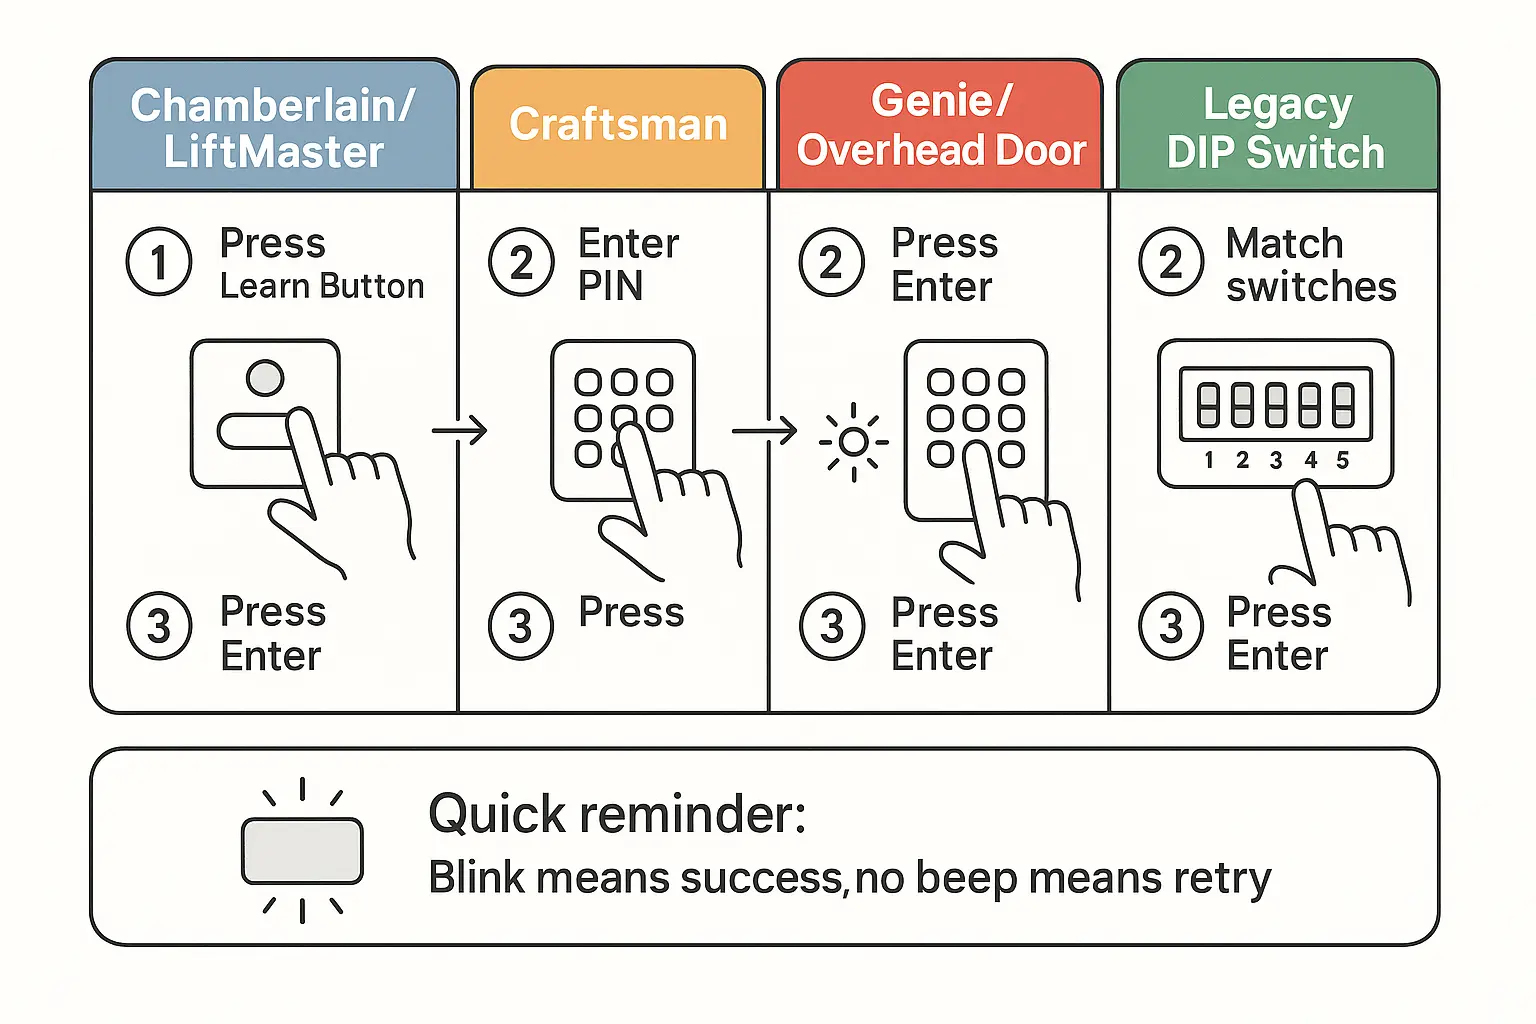
This programming cheatsheet uses color-coded tabs and simple visual steps to help users memorize and confidently execute keypad programming sequences by brand.

Advanced Troubleshooting and Edge Cases


If your keypad fails to operate after following the standard programming sequence, check for these common physical issues:

  • The Lockout Feature: If your wall-mounted interior console has its vacation lock button engaged, the receiver will reject all exterior radio signals. Learn how to turn off lock button on garage door opener controls to restore wireless access.
  • Battery Degradation: Extremely cold winter temperatures drain standard 9V batteries rapidly, leading to delayed button responses or sticky keys. Follow our simple steps on how to change battery in garage door keypad compartments to quickly swap out a dead cell.
  • Corrupted System Memory: If multiple hand-held remotes and keypads are clashing, a full factory refresh is your best option. Read our specialized guide on how to reset garage door keypad systems to clear the memory board and start fresh.

If you run into persistent programming issues or prefer to have a professional handle your installation with a service guarantee, contact the experienced team at 24H Garage Doors. Our technicians provide fast support to keep your home secure and functional.

Frequently Asked Questions


Can I program a single wireless keypad to operate multiple garage doors?

Yes, most multi-brand and universal keypads allow you to control up to physical doors. This process requires assigning a unique PIN to each door channel or using a specific key sequence to let the keypad know which receiver to communicate with.

Why does my keypad only close the garage door but won't open it?

This is typically caused by dirty or misaligned safety reversal sensors at the bottom of your garage door. Most openers allow a door to close if you hold down the button, but require a clean signal to open. Clean the lenses and make sure the sensor LEDs are glowing steadily.

How secure are wireless garage door keypads against code grabbing?

Modern keypads are highly secure because they use rolling code technology (like Security+ 2.0). Every time you enter your PIN, the system selects a brand-new, encrypted radio code from billions of combinations. This prevents intercept devices from capturing and copying your signal.

Contact / Request a Call