Garage Door Cable Troubleshooting And Diagnosis


Published: Aug 28, 2026

When a garage door hangs unevenly, screeches during operation, or suddenly refuses to budge, the culprit is almost always a compromised lift cable. As the physical link transferring the immense energy of your overhead springs to the heavy door panel, these cables are under constant mechanical stress.

Before diving into diagnostics, you must prioritize safety. A standard double-car garage door spring stores between 250 and 350 pounds of rotational tension. If a stressed cable snaps, it can lash out at speeds exceeding 100 miles per hour, acting as a high-velocity steel whip.

If your door is stuck or crooked, immediately secure the system. Pull the garage door emergency release cord to disconnect the automatic opener, which prevents motor burnout. If you must leave the door partially open temporarily, clamp locking pliers (vice grips) tightly to the vertical tracks directly beneath the bottom rollers to prevent a sudden, catastrophic drop. Once safe, you can learn how to reset garage door opener after pulling red cord systems to test manual operation.
Anatomy of the Lift System: Torsion vs. Extension


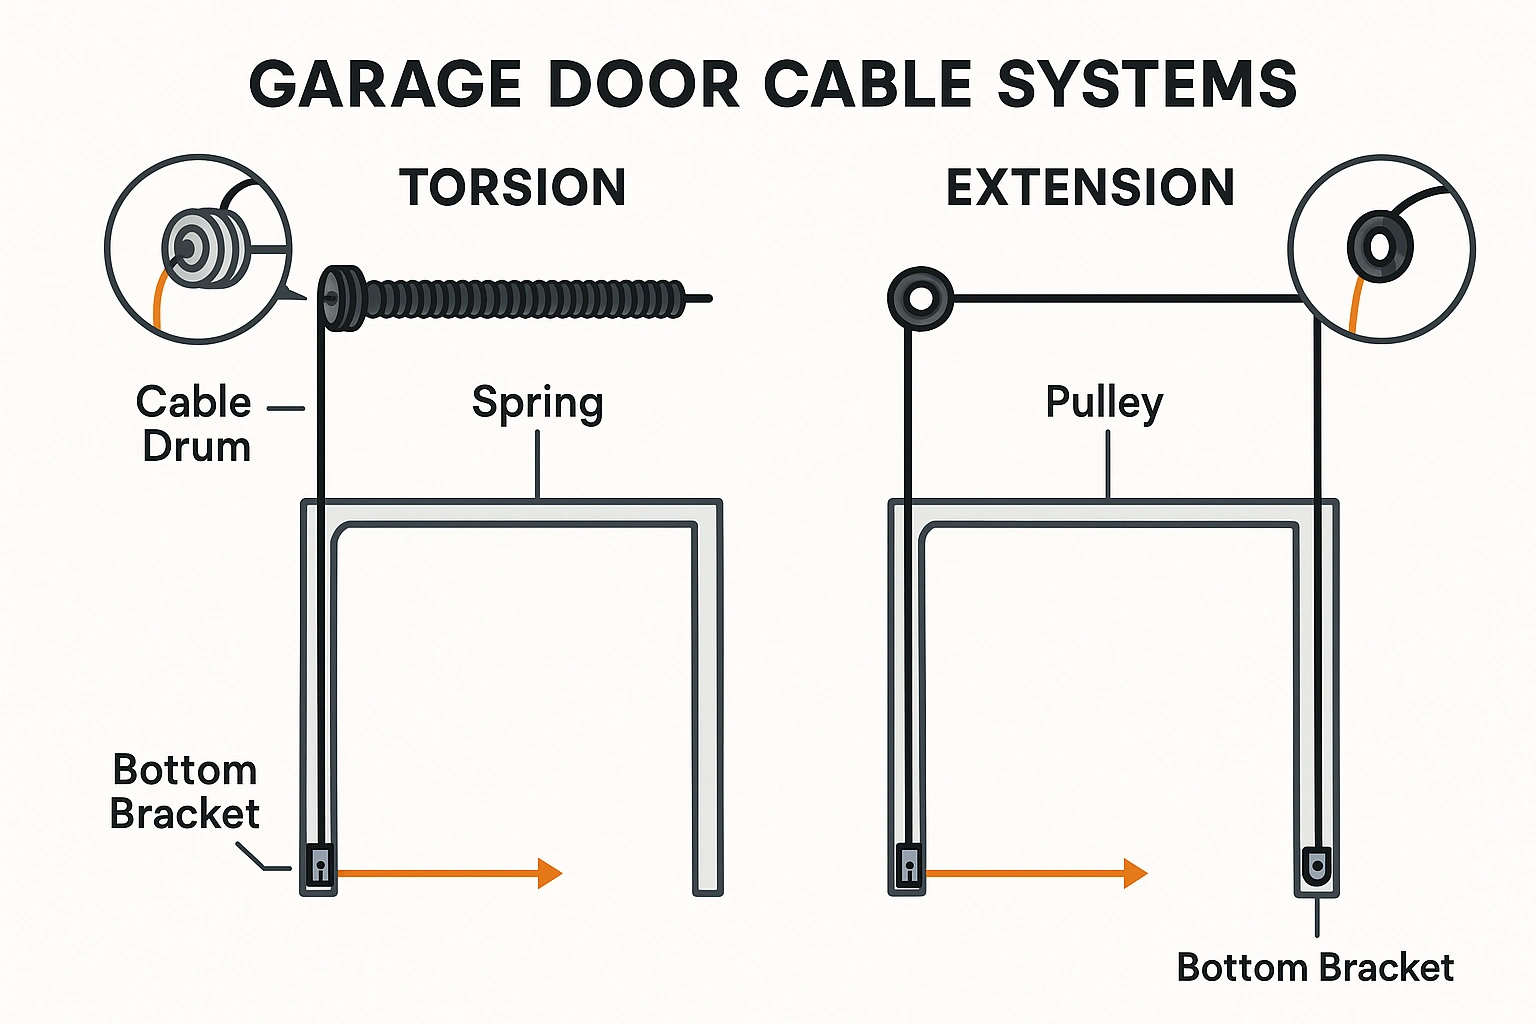
Visual comparison of torsion and extension cable systems clarifies how cables route differently, helping readers identify their door type and understand component functions.

Understanding how your door transfers weight is essential for accurate diagnostics. Residential systems generally fall into two categories: torsion spring systems or extension spring systems. Recognizing which layout you own determines the cable path and the forces at play. You can read more about the core mechanical differences between a torsion spring vs extension spring configuration to fully grasp your setup.

  • Torsion Systems: These feature a solid steel shaft mounted horizontally above the header. High-tension torsion springs wind around this shaft. Cast aluminum drums (such as APCO or OMI models) sit at both ends. The lift cables attach to the bottom brackets of the door, travel straight up, and wrap cleanly into the grooves of these drums as the door rises.
  • Extension Systems: These utilize long springs running horizontally along the upper tracks. This configuration relies on a more complex pulley arrangement. The cable attaches to the bottom door bracket, runs over a stationary pulley, loops through a pulley attached directly to the extension spring, and anchors to a three-hole adjustment plate on the track frame.

Symptom-to-Diagnosis Troubleshooting Tree


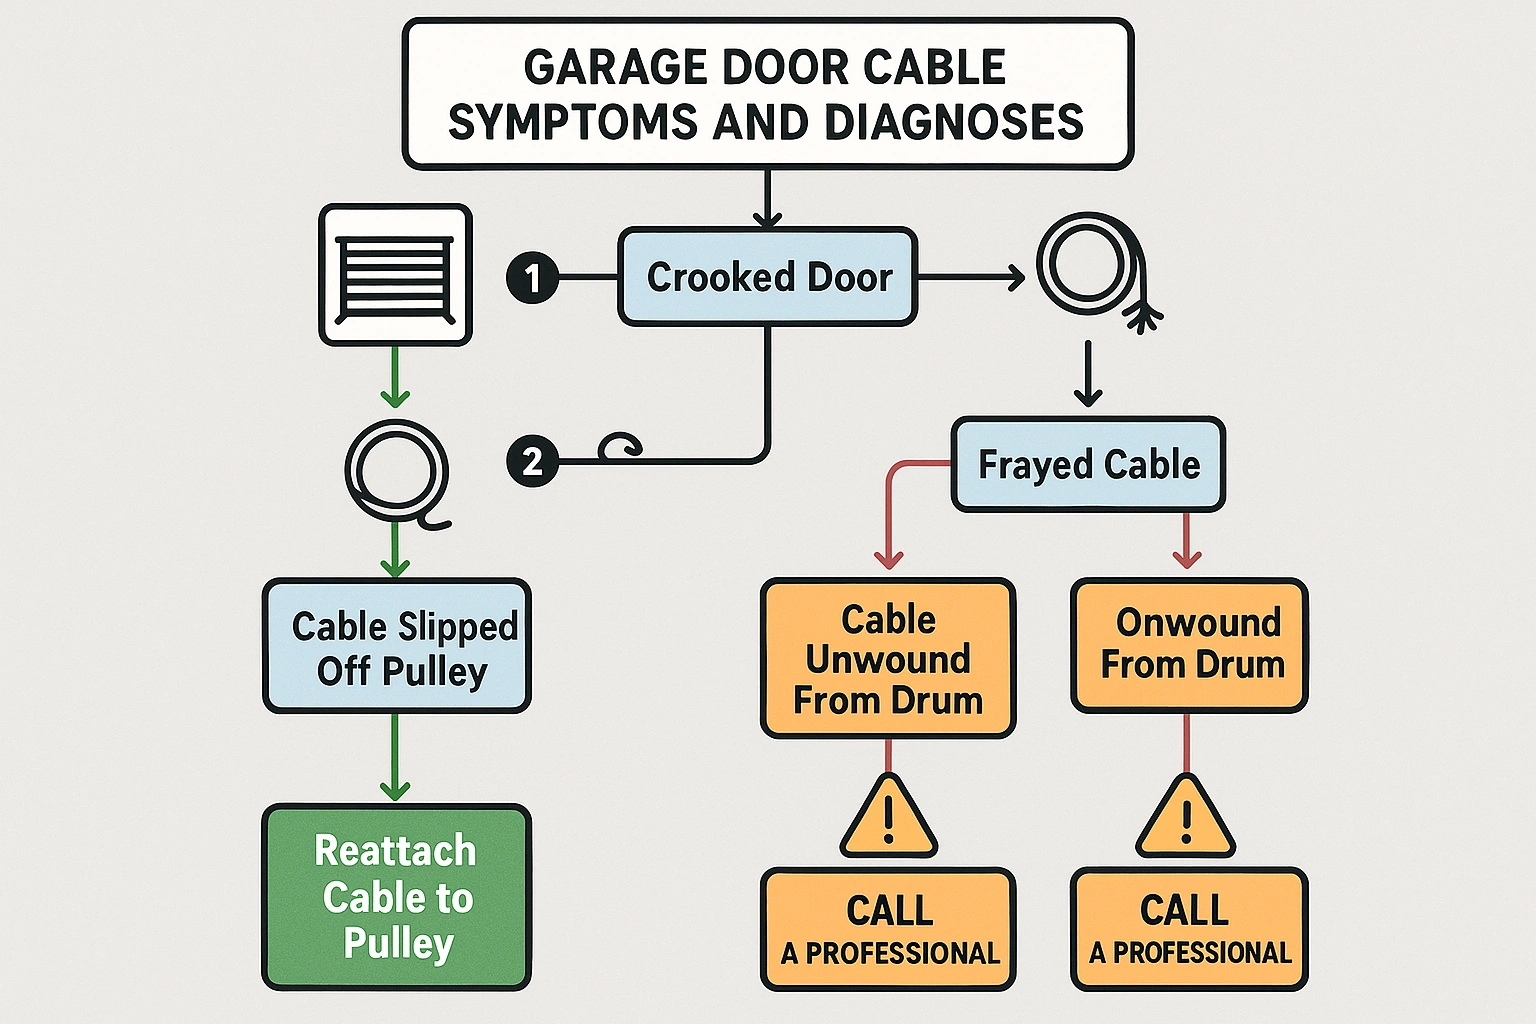
Step-by-step troubleshooting guide for garage door cable issues helps users identify symptoms, understand causes, and choose safe solutions or professional help when needed.

Identifying the visual and auditory warning signs of a failing cable allows you to address the root issue before structural damage occurs.

  • Symptom A: The Door Hangs Crookedly. If one side of the door is noticeably lower than the other, you are likely dealing with uneven garage door cable winding or a cable that has slipped entirely off its drum grooves.
  • Symptom B: Loose, Sagging, or Looping Cables. If you notice slack when the door is closed, your springs may have lost tension, or the cables may have stretched beyond their design tolerance. This slack often causes the cable to jump its track.
  • Symptom C: Squeaking, Metal Grinding, or Scraping. This points to worn pulleys in an extension system or misaligned drums in a torsion setup, which causes the steel cable to rub aggressively against the track or frame.
  • Symptom D: Fraying, Bird-Caging, or Rusting. “Bird-caging” refers to the physical separation of individual outer wire strands. This indicates severe bending fatigue, meaning the cable is structurally compromised and could snap at any moment. If your door has jumped completely out of the track due to a cable failure, refer to a professional to estimate the garage door off track repair cost to avoid further structural damage.

The Engineering Guide: Selecting Replacement Cables


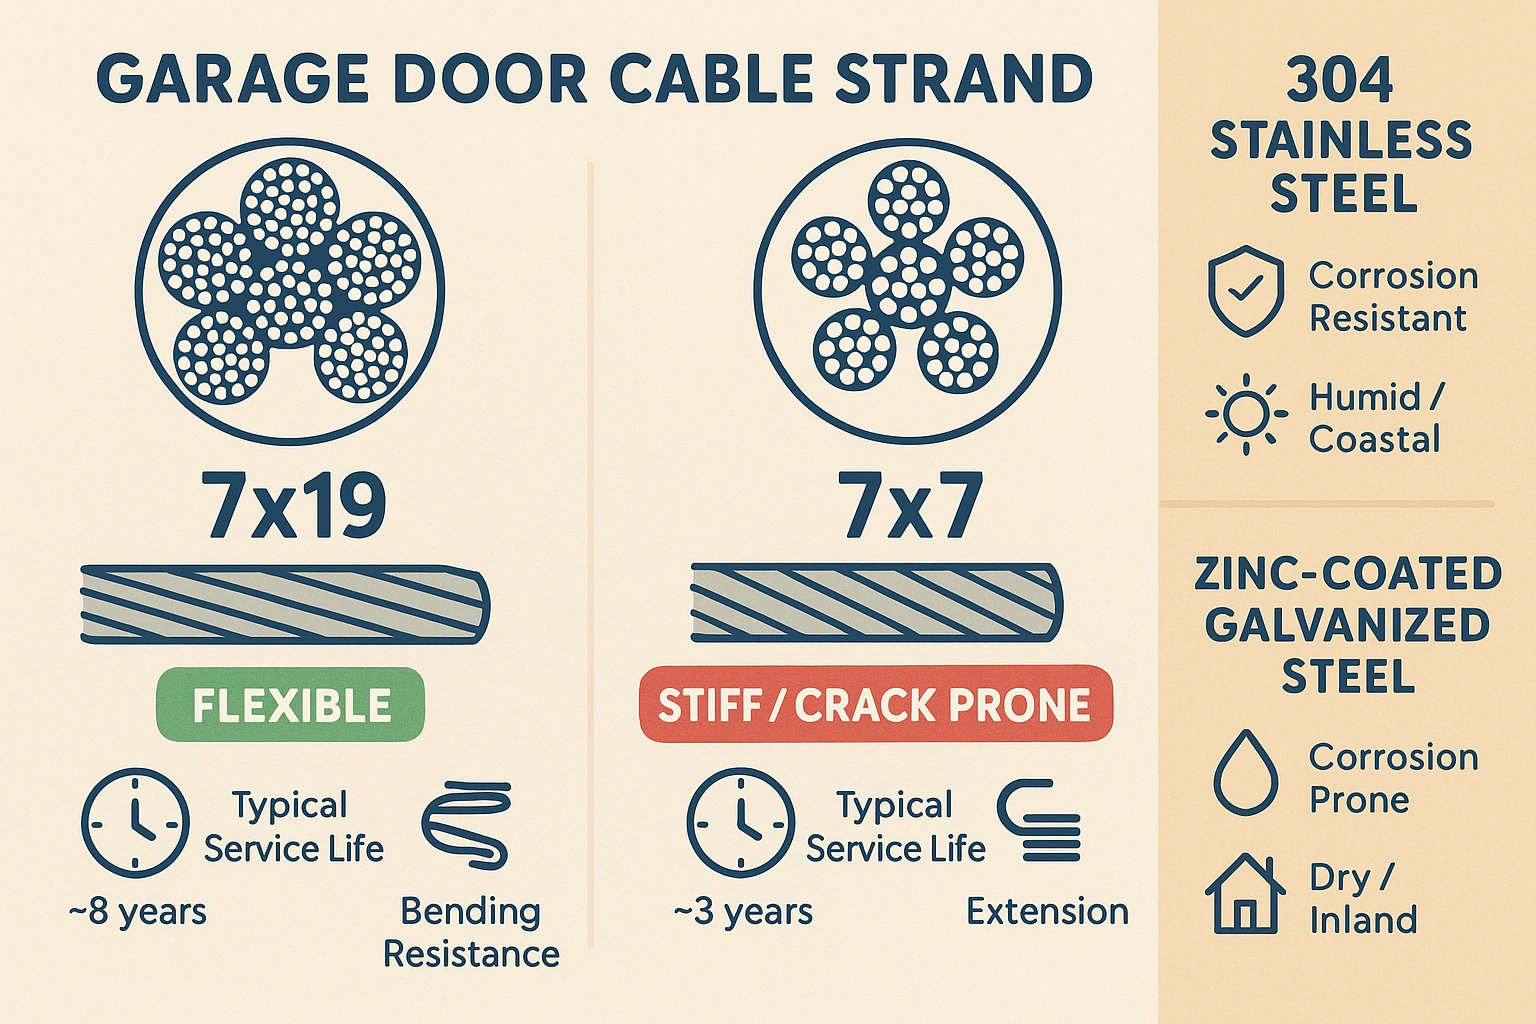
Infographic detailing cable strand differences and material types anchors key engineering concepts for safer, longer-lasting garage door cable choices.

If diagnosis reveals your cables require replacement, selecting the correct replacement specifications is non-negotiable. Standard garage door cables have an average service life of 10,000 to 15,000 cycles (roughly 7 to 10 years), but choosing incorrect materials can reduce this by up to 40%.

Strand Construction: 7×19 vs. 7×7

  • 7×19 Cable (Premium): Composed of 7 strands, each containing 19 micro-threads (133 total wires). This high density offers exceptional flexibility, allowing the cable to wrap smoothly around drums without developing micro-cracks or bending fatigue.
  • 7×7 Cable (Standard): Composed of 7 strands of 7 wires (49 total). This construction is stiffer and highly prone to kinking and rapid wear when wound repeatedly around standard 4-inch drums.

Material Integrity

  • 304 Stainless Steel: Highly recommended. It offers 30% higher resistance to chloride-induced stress corrosion than standard steel, making it essential for humid or coastal environments.
  • Zinc-Coated Galvanized Steel: A strong, budget-friendly alternative for dry climates, though vulnerable to rust once the thin protective coating wears off.

Sizing Rules

To select the correct length, use these standard industry sizing formulas:

  • Torsion Systems: Door Height + 18 Inches (e.g., a 7-foot door requires an 8’6″ cable).
  • Extension Systems: Door Height + 5.5 Feet (e.g., a 7-foot door requires a 12’6″ cable).

If you are comfortable managing the tension calculations, you can follow an technical guide on how to install garage door springs cable assemblies safely.


DIY vs. Professional Repair: The Safety Boundary Matrix


According to the National Electronic Injury Surveillance System (NEISS), approximately 16,300 emergency room injuries associated with residential garage doors occur annually. Knowing when to step back is critical to your physical safety.

  • Green Light (Safe DIY): Adjusting tension on an extension spring system only when the door is fully open and the spring tension is entirely relieved. Inspecting cables or replacing safety cables that run through extension springs to prevent dangerous projectile snaps.
  • Red Light (Professional Mandatory): Replacing any snapped torsion cable. Unwinding or winding torsion springs requires a specialized garage door spring tension tool and precise calibration. Removing bottom corner brackets—which are under direct, immense load from the spring—should never be attempted by a homeowner.

For complex, high-risk failures, contacting a certified specialist for garage door cable replacement near me ensures the repair includes a full system balance, structural inspection, and a reliable labor warranty.


Securing Your Home’s Largest Moving Wall


Your garage door relies on a delicate balance of physical forces to operate smoothly and safely. Identifying worn, slipped, or frayed cables early prevents minor alignment issues from turning into hazardous structural failures. If your cables show signs of advanced wear, or if you are facing a locked, crooked door, contact our responsive, highly-rated technicians at 24H Garage Doors. We provide professional, same-day service and precise, guaranteed repairs to keep your home safe and secure.

FAQ: Resolving Common Concerns


Can I operate my garage door with one frayed cable?

No. Operating a door with a compromised cable places uneven weight on the remaining cable and the track system. This can lead to the door twisting, jumping the track, bending the track frame, or causing the automatic opener motor to strip its gears.

Why did my garage door cable slip off the drum?

This typically happens if the door hits an obstacle (like a trash can) while closing. The door stops moving, but the opener continues to play out slack, allowing the cable to jump out of the drum’s tracking grooves. It can also be caused by worn springs or incorrect initial cable tension.

How often should I inspect my cables?

You should visually inspect your lift cables every six months as part of routine maintenance. Look for loose strands, corrosion, or signs of rubbing against the steel track.


Contact / Request a Call