High Ceiling Garage Lighting Setup Guide


Published: Aug 26, 2026

Ever had that sinking feeling? You just installed a set of brand-new, “ultra-bright” LED shop lights in your garage with 10, 12, or even 15-foot ceilings. You flip the switch, and… it’s just okay. The ceiling is bright, sure, but the floor where you actually work is still murky. Long, dramatic shadows stretch from your car and workbench, turning your spacious garage into a cavern.

If this sounds familiar, you’ve discovered a fundamental truth of lighting: height changes everything. Standard lights that work perfectly in an 8-foot garage simply can’t handle the vertical distance in a taller space.

Welcome to your “aha moment.” This guide is your friendly expert, here to walk you through the science of high-ceiling lighting and empower you to design a workspace that’s not just bright, but brilliantly and evenly lit.

The Science of Light in 30 Seconds


Before we talk about fixtures, let’s cover three simple concepts that are the key to unlocking perfect garage lighting. Understanding these will save you time, money, and frustration.

1. The Light Falloff Principle: Why Height is Your Biggest Challenge

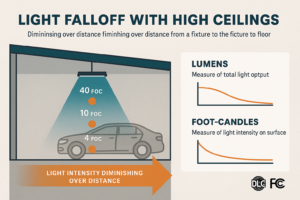
Imagine watering your plants with a watering can. If you hold it just a few inches above the soil, you get a concentrated stream of water. If you hold it five feet up, that same stream spreads out, covering a wider area but delivering less water to any single spot.

Light works the exact same way. This is the Inverse Square Law, or what we can simply call the “Light Falloff Principle.” The farther light has to travel, the more it spreads out and the dimmer it becomes. A light that seems incredibly bright one foot away is significantly less intense by the time it travels 12 feet to your garage floor. This is why high ceilings need a fundamentally different lighting strategy.
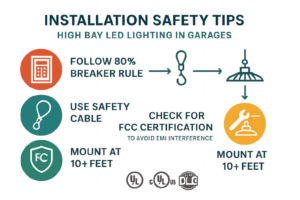
Avoid costly or dangerous mistakes by following these professional installation safety steps tailored for your high-ceiling garage lighting upgrade.

2. Lumens, Not Watts: The True Measure of Brightness

For decades, we bought bulbs based on watts (e.g., a 60-watt bulb). But watts measure energy consumption, not light output. With the efficiency of LEDs, watts are now an unreliable measure of brightness.

The only number you should care about is lumens. Lumens measure the total amount of visible light produced by a source. The more lumens, the brighter the light.

Common Mistake: Buying lights based on “watt-equivalent” marketing. Always look for the actual lumen rating to know what you’re getting.

3. Kelvin (K): The Color of Your Light

Kelvin is the measurement for the color temperature of light. Think of it like a flame: a lower Kelvin number is warmer and more yellow (like a candle at ~1900K), while a higher number is cooler and bluer.

For a garage or workshop, you want a color that mimics natural daylight, making it easy to see details and true colors.

  • 4000K: A neutral white, often used in offices. Can feel a bit soft for a workshop.
  • 5000K: Pure, neutral daylight. This is the sweet spot for most garages. It’s crisp and clear without feeling harsh or sterile.
  • 6500K: A very cool, blue-tinted light. While it seems “brighter,” it can cause eye strain over long periods and make a space feel like a laboratory.

Choosing Your Weapon - The High-Ceiling Fixture Showdown


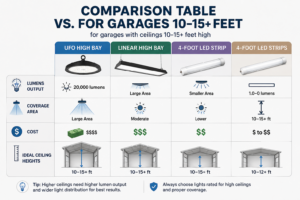
Now that you understand the science, let’s look at the tools. For ceilings over 10 feet, your standard 4-foot LED shop light is often outmatched. You need fixtures designed to push high-lumen light downward, effectively. The main contenders are High Bay lights.

UFO High Bay Lights

These are powerful, round, commercial-grade fixtures.

  • Lumens: Extremely high (15,000 to 30,000+ lumens per fixture).
  • Coverage: Creates a powerful, concentrated circle of light. Excellent for targeting specific work zones like a lift, workbench, or detailing area.
  • Best For: Ceilings 12 feet and higher. Their focused power efficiently punches light all the way to the floor. In a 10-12 foot garage, one or two can illuminate the entire space.
  • Consideration: Because the light is so concentrated, you need to plan your spacing carefully to ensure the circles of light overlap and prevent shadows.

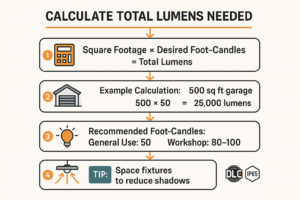
Use this simple formula and layout guide to confidently determine your garage’s lighting needs and spacing, ensuring ideal illumination without guesswork.

Linear High Bay Lights

These look like heavy-duty, oversized versions of traditional shop lights, often 2 or 4 feet long.

  • Lumens: Very high (10,000 to 25,000+ lumens per fixture).
  • Coverage: Creates a wide, rectangular spread of light. Excellent for general, even illumination across a whole room.
  • Best For: Ceilings 10 to 15 feet. They provide a great balance of power and broad coverage, making them a fantastic all-around choice for uniformly lighting a two or three-car garage.
  • Consideration: They are larger and heavier than UFO lights, which can be a factor during installation.

Multiple 4-Foot LED Strip Lights

This involves using many standard (but high-lumen) 4-foot fixtures in a grid pattern.

  • Lumens: Lower per fixture (4,000 to 8,000 lumens), but you use more of them.
  • Coverage: Can provide very even, shadow-free light if spaced correctly.
  • Best For: Ceilings that are right on the edge (10-11 feet) or for users who want to avoid the industrial look of high bay lights.
  • Consideration: This approach requires significantly more wiring and installation work. For ceilings 12 feet and higher, you’ll need a large number of very high-lumen strips to get enough light to the floor, at which point high bay lights become more cost-effective.

How to Design Your Perfect Garage Lighting Layout


This is where you go from learner to planner. With a simple calculation and a few layout principles, you can design a system that’s perfect for your specific needs.

Step 1: Calculate Your Total Lumen Needs

Don’t guess how much light you need—calculate it! Professionals use a unit called a “foot-candle,” which is how bright the light is one foot away from the source. We can use this to find our target.

Here’s the simple formula:Garage Square Footage (Length x Width) x Desired Foot-Candles = Total Lumens Needed

Now, choose your desired brightness level based on how you use your garage:

  • 50 Foot-Candles: Good general-purpose lighting for parking and storage.
  • 80 Foot-Candles: Excellent for a workshop, mechanical work, and all-around task lighting. This is a great target for most hobbyists.
  • 100+ Foot-Candles: Professional-grade lighting for car detailing, painting, or intricate assembly work where seeing every detail is critical.

Example: For a standard 2-car garage (20ft x 20ft = 400 sq ft) that you use as a workshop (80 foot-candles):

  • 400 sq ft x 80 foot-candles = 32,000 total lumens needed.

You could achieve this with two 16,000-lumen UFO high bays or three 11,000-lumen linear high bays. Now you know exactly what to shop for!

Quickly evaluate which LED fixture type best suits your high-ceiling garage based on lighting power, coverage, and cost, empowering you to choose the most effective solution.

Step 2: Plan Your Spacing

Proper spacing is the key to eliminating shadows.

  • General Rule: Space your lights so their “cones” of light overlap. For a 12-foot ceiling, placing fixtures about 10-12 feet apart is a good starting point.
  • Avoid the Edges: Don’t mount lights right against the wall. This wastes light and creates glare. Mount them a few feet in from the perimeter.
  • Task Lighting: Place lights directly over key areas like your workbench or car lift to ensure those zones are shadow-free.

Step 3: Consider the Advanced Details

  • Color Rendering Index (CRI): This measures how accurately a light shows colors. For general use, 80+ CRI is fine. For painting or car detailing, look for 90+ CRI to see true colors.
  • Dimmers and Motion Sensors: High bay lights are powerful. Dimmers give you the flexibility to lower the brightness for simple tasks. Integrating them with other smart lighting for your overhead garage doors can add convenience and save energy.

Installation & Safety Checklist


Installing heavy, powerful lights on a high ceiling requires care. Follow these professional tips to do it safely and correctly.

Understanding how light diminishes over height is the key to selecting the right LED fixture and lumen output for your garage’s unique high ceiling.

  1. Check Your Breaker Capacity (The 80% Rule): To prevent overheating and tripping, a circuit should never be loaded beyond 80% of its maximum capacity. For example, a 15-amp circuit should not carry more than a 12-amp continuous load. Add up the amperage of your planned lights to ensure you’re within a safe limit.
  2. Use Safety Cables: High bay lights are heavy. Always use a secondary steel safety cable, attaching it from the fixture to a secure ceiling joist. This provides critical backup in case the primary mount ever fails.
  3. Ensure Secure Mounting: Never mount heavy fixtures directly to drywall. Always anchor them into a solid wood joist or a securely installed cross-brace.
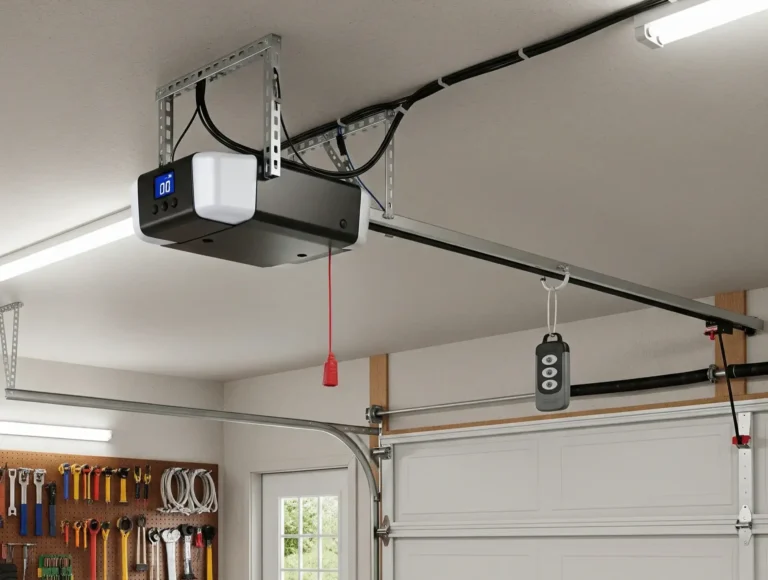
  4. Look for FCC Certification (Avoid Remote Interference): This is a big one. Poorly-shielded LED drivers can emit electromagnetic interference (EMI) that can drastically reduce the range of your garage door opener remote. If you find your garage door remote not working after a lighting upgrade, EMI is a likely culprit. Look for fixtures with an FCC certification, which ensures they are properly shielded.

Frequently Asked Questions


How many lumens do I need for my high-ceiling garage?

Use the formula: (Garage Square Footage) x (Desired Foot-Candles) = Total Lumens. For most workshops, aiming for 80 foot-candles is a great target.

Is 5000K or 6500K better for a garage?

5000K is highly recommended. It provides a clean, neutral daylight that is excellent for task visibility without the harsh blue tint and potential eye strain of 6500K lights.

What type of lights should I use for a 12-foot ceiling?

For a 12-foot ceiling, UFO or Linear High Bay lights are your best bet. They have the power and optics to push bright, usable light all the way to the floor, unlike standard shop lights.

Are high bay lights too bright for a 10-foot ceiling?

Not at all! This is a common misconception. “Too bright” is usually a result of poor placement causing glare, not the light itself. For a 10-12 foot ceiling, you can use fewer high bay fixtures to achieve the same brightness as a dozen weaker strip lights. Adding a dimmer provides even more control.

You’re now equipped with the knowledge to make a confident, informed decision. By understanding the unique challenges of your high ceiling and planning your layout, you can finally transform your garage from a dim workspace into the brilliantly lit haven you’ve always wanted.

Contact / Request a Call